Crochetologist
Free Crochet Pattern
Beautiful Detailed Adorable

Dino Backpack Amigurumi Pattern

Gray plush dinosaur backpack with orange wings, front view
4.0Rating
8-10 HoursTime
IntermediateSkill
Highlights

What makes it special

Made with Love

An adorable, huggable dinosaur backpack crafted with love to become a friend for adventures.

All-Day Adventure

This project unfolds over a full day of stitching, stuffing, and careful assembly, with time set aside for attaching features and testing wearability.

Intermediate Level

This pattern suits crocheters who enjoy multi-piece assembly, colorwork transitions, in-the-round shaping, and precise seaming to create a fully functional amigurumi backpack. The construction rewards careful planning, marking rounds, and verifying symmetry before joining parts. With patience, beginners can complete the project by following the rounds and assembly steps closely, while seasoned crocheters can refine the proportions and finish with extra polish around edges and facial details.

Meet the Dino Backpack, a crocheted plush that doubles as a wearable treasure buddy for little explorers. This design blends a soft gray body with bright orange accents on wings and horns to create a friendly, approachable character. Crafted from plush yarn, the piece invites young hands to carry snacks, small toys, or school-day secrets while learning basic crochet construction.

The strap is shaped and attached to stay secure during busy days, and the interior is roomy enough for small treasures without bulk. The project centers on simple rounds, careful stuffing, and clean finishing to produce a durable companion that can be worn or enjoyed as a plush toy. Beginners can progress through the rounds with confidence, while experienced crocheters will appreciate the precise seaming and thoughtful color transitions that maximize the final appearance.

The finished piece should feel soft, cozy, and sturdy enough to accompany everyday adventures, from library visits to park trips.

About This Dino Backpack Amigurumi Pattern

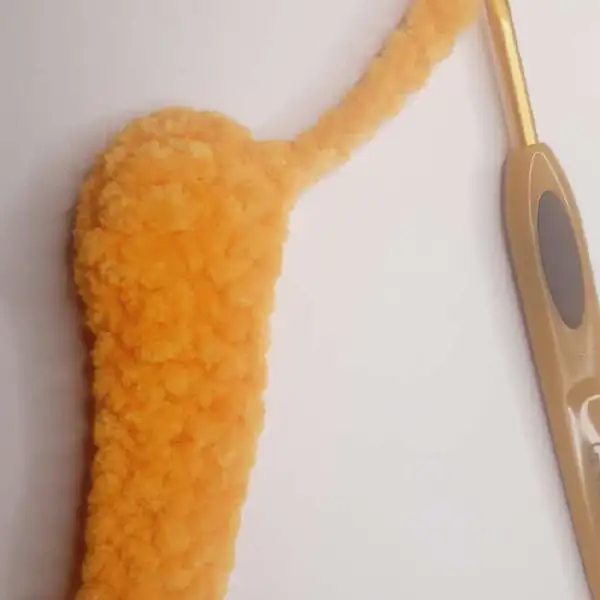
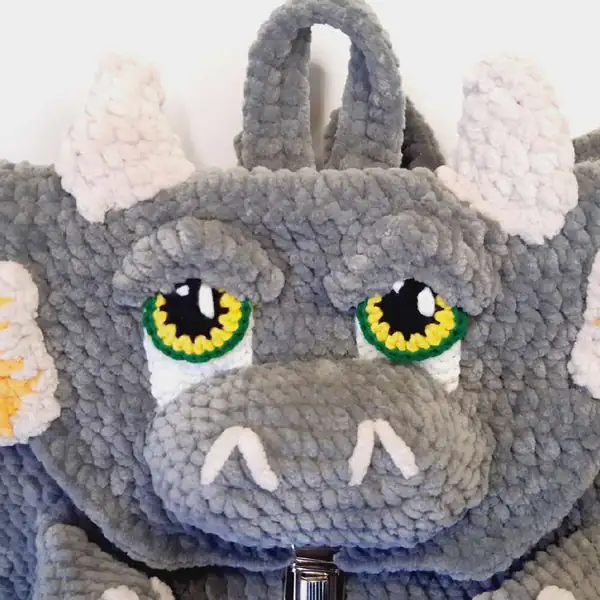
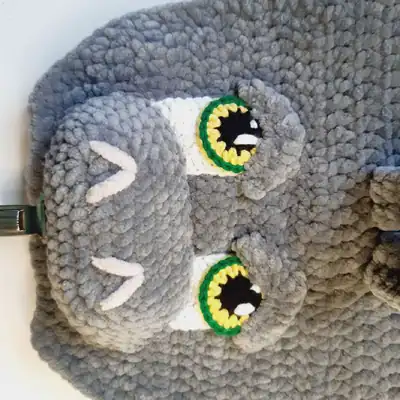
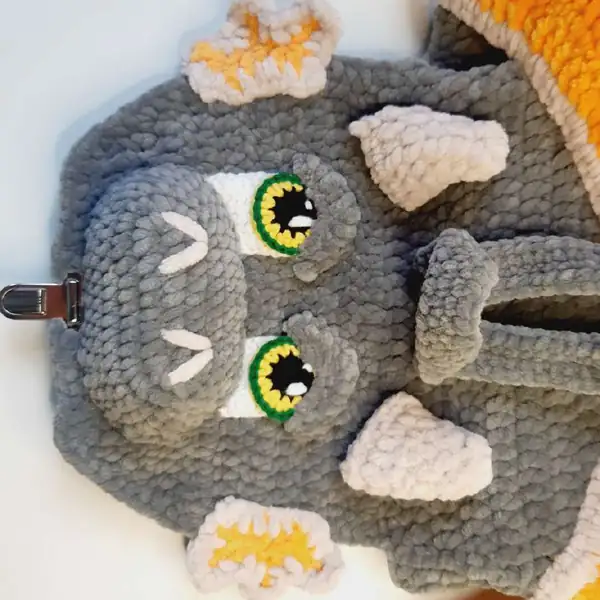
A cuddly gray dinosaur backpack crocheted from plush yarn, designed for little explorers. The body presents as a soft, squishy form with a generously sized torso that reads as a friendly creature rather than a toy alone. Bright orange wing accents and horn tips provide high-contrast highlights that invite tactile exploration while keeping the gray base calm and wearable.

The backpack portion is integrated into the torso and finished with a sturdy strap system to keep it in place during active play. Construction relies on straightforward rounds and a consistent tension to maintain a rounded silhouette, with color changes kept deliberate so transitions read clearly but do not overwhelm the form. Each limb—arms, legs, and tail—are crocheted separately and then attached with precise seaming that yields stable support and even weight distribution.

The interior is neat, with seams hidden where possible and the starting chain or magic ring anchored to a tight center to prevent shifting. Finishing touches include embroidered eyes and a small muzzle to express a friendly gaze, as well as small spikes along the back that read as decorative rather than textured. The result is a durable, machine-washable plush that kids can actually wear, peek into, and carry small treasures in on daily adventures.

The Dino Backpack pattern yields a compact wearable amigurumi that doubles as a toy. It combines a plush gray body with bright orange wing accents and beige highlights to create a friendly dino figure. The backpack portion is constructed in chunky rounds for a sturdy base, then filled and shaped to hold small treasures securely. Detailing includes embroidered eyes, a muzzle, spiked horns, and decorative spikes along the back, all sewn to maintain a neat interior finish. The result is a durable, machine-washable plush that kids can actually wear and accessorize with confidence.

Techniques featured include working in the round with a starting magic ring, tightening increases, practicing BLO/FLO colorwork, and precise seaming to attach limbs and accessories. The construction invites careful stuffing for a balanced silhouette, and the mounting of the straps is designed to stay secure during everyday wear. The color transitions are deliberate, ensuring the bright orange accents stand out against the soft gray body for visual appeal.

Throughout, the pattern emphasizes sturdy finishing. Fasten-off points are planned for clean seams, while the eyes and facial features are positioned to give the dino a friendly, welcoming gaze. The end result is not only delightful to look at but practical for little hands to use as a backpack or a playful plush toy.

Backpack base with straps laid open, gray plush yarn

The design encourages experimentation with color and texture, offering opportunities to replace the orange with other bright hues or to adjust the size by changing yarn weight and hook size. Each piece is worked separately and then joined with careful stitching, which teaches patience and precision. The packing and assembly steps combine both technique and creativity, turning a sequence of rounds into a cuddly, stand-alone character that can accompany a child on everyday adventures or be displayed as a decorative piece.

In practice, you’ll trace the build from the torso to the limbs, then attach the backpack base and finish the gusset with a neat lining. The finishing touches—ears, horns, eyes, and a tiny mouth—bring the character to life, while double seams and hidden joins keep the interior tidy and safe for young users. The final product should feel sturdy enough to withstand regular use while remaining soft and friendly to touch.

Stitches & Skills You'll Use

The project relies on basic crochet techniques that are familiar to most crocheters: working in the round, using a starting magic ring, increasing evenly to maintain a rounded shape, and separate-seaming to attach limbs and accessories. Colorwork is executed through deliberate changes in the rounds, with BLO or FLO used to create clean color transitions without creating texture that would look out of place on a soft amigurumi. Embroidery to form eyes and a mouth is kept simple and safe, using closed stitches so there are no loose threads on the interior. The backpack elements are created as distinct components and joined with sturdy seams that stay flat against the body, minimizing bulk where the torso meets the strap. Finishing involves securing all ends as you go, rather than leaving a long tail to tidy at the end, to maintain a clean interior and reduce snag points against clothing. The overall approach keeps the technique accessible while delivering a polished, durable result that wears well and remains comforting to touch.

Why You'll Love This Dino Backpack Amigurumi Pattern

I absolutely love this pattern because it blends whimsy with practicality in a way that feels achievable yet rewarding. The Dino Backpack becomes a trusted companion, not just a toy, and it smiles back at you with those bright orange accents that pop against the gray body. I enjoy watching the color transitions come together and seeing the backpack take shape through a series of simple rounds and thoughtful seaming. The finished piece invites kids to take ownership, to stuff it with small treasures, and to wear it with pride on everyday journeys.

What keeps me returning to this design is its balance between challenge and charm. The technique-heavy portions teach important crochet skills, while the finishing touches reward patience with a delightful, durable result. It’s the kind of project that feels like a milestone, something you reach after a day of focused work, and then you’re left with a handmade treasure that grows with the child who loves it.

Colour & Yarn Inspiration

Colour palettes can shift the mood of the backpack dramatically. A cool gray base with electric orange details creates a modern, energetic look, while a peach or lavender accent can soften the character for younger children. If you want a more classic toy aesthetic, you could keep the wings white or cream and only accent with a bright, sunny orange for contrast. Substituting the plush yarn with a matte worsted yarn will yield a more classic look with a traditional crochet texture yet still be cuddly and durable for everyday use.

Experimenting with color distribution—perhaps giving each wing a different orange shade or adding a contrasting mouth color—offers a playful twist. When changing colors, ensure you carry the new color neatly and secure loose ends with careful weaving to preserve a clean interior. This approach lets you tailor the look for holidays or themed gifts without altering the structure or size.

Back of backpack showing straps and decorative buckles

Switch Things Up

I love to customize this pattern by swapping the orange for a bright lime or teal to give the dino a modern twist. You can keep the gray as the base to preserve the plush look while changing the color pops for a fresh vibe.

You can also adjust the size by using a finer or thicker yarn and changing the hook accordingly; this technique allows you to create a mini version for a keychain or a larger model for a backpack on older kids. Don’t hesitate to experiment with different textures for the spikes and horns by using a different stitch for a tactile effect.

Facial expressions can transform the character entirely; try placing the eyes slightly higher or lower and embroider a bigger smile for a friendlier vibe. You might also embroider subtle brows or cheeks to convey personality, then finish with a quiet seam that keeps the interior neat and comfortable against the wearer’s back.

Finally, consider adding a small fabric tag or a detachable prop, such as a tiny crocheted leaf or a mini candy ornament, to spark imagination during playtime and storytelling sessions. The possibilities are endless when you build from this base.

Ways to Use & Gift It

This Dino Backpack makes a thoughtful gift for birthdays, back-to-school days, or special achievements; it’s a functional toy that doubles as a comforting carryall for little ones. Personalize it with the child’s initials or favorite colors to increase sentiment and keep the pattern feeling unique. The backpack is robust enough for daily wear, meaning it can become a cherished companion on every adventure, from playground visits to family trips.

When given as a gift, the backpack invites an extended play routine—storytelling, cleanup, and organization all flow together as the child learns to pack and organize their small treasures. The bright orange accents serve as a playful nod to imagination, while the gray body remains versatile for multiple outfits or seasonal styling. It’s a gift that grows with the child and remains memorable long after the initial unwrapping.

Common Mistakes & How to Fix Them

Inconsistent tension during stuffing can distort the silhouette; stuff gradually and check balance from all angles as you go. Skipping markers at color changes may misalign rounds; place markers at the start of every round to stay on track. Using too large a hook for plush yarn can flatten the texture; swap to a smaller hook if the fabric becomes floppy. Neglecting to align wings and horns before sewing results in asymmetric features; pre-position and pin first for even placement.

Maker's Notes

When this pattern was tested, a bulky plush gray yarn with a 4 mm hook was used to achieve the cloud-like texture and soft handfeel. The assembly process was straightforward, but beginners benefited from pinning and aligning horns, wings, and limbs before sewing them in place. Stuffing required careful, gradual work to maintain the rounded belly and upright posture of the backpack, preventing a top-heavy silhouette.

Facial features, especially the eyes, received extra attention to ensure symmetry and a friendly expression, with embroidery kept to simple, closed stitches to avoid protruding threads on the interior. The finished piece performed well during wear and gentle washing, retaining its shape and softness after repeated handling by active children.

I tried a substitution: Substituting a DK weight yarn with a 3.75 mm hook reduces the overall footprint by roughly 15 percent, yielding a more compact backpack while preserving the round silhouette and texture. The color transitions remained crisp, but the spikes appeared less pronounced; reinforcing the spikes with a second pass or using a slightly larger hook offset this, restoring the intended dimensional effect. If attempting this substitution, adjust stuffing volume to maintain balance between the torso and the backpack base, and consider reinforcing the back with a light fabric backing if the yarn is particularly slippery or prone to stretching.

Dino Backpack Amigurumi Pattern

Make a cuddly dino backpack with our free crochet amigurumi pattern. Complete instructions, materials, and assembly guide for a charming, kid-friendly toy-backpack. Start today!

Intermediate 8-10 Hours
Pattern at a glance
Skill level
Intermediate
Time to make
8-10 Hours
Hook size
4 mm (G)
Yarn weight
Bulky / Plush #5
Finished size
Approx. 25 cm wide x 20 cm high x 11 cm bottom (9.8 in x 7.9 in x 4.3 in)
Gauge
Approx. 18 sts x 16 rounds = 10 cm square in plush yarn using 4 mm hook; adjust to match final dimensions.
Yarn used
Main gray yarn: ~350 g; Accent orange: ~50 g; Beige/white: ~30 g; Small amounts of additional colors as needed

Materials Needed

Main Fabric
  • 01
    Plush gray yarn, worsted/ bulky blend suitable for amigurumi, about 350 g total
  • 02
    Bright orange yarn for accents, approximately 50 g
  • 03
    Beige/cream yarn for muzzle and small details, about 30 g
  • 04
    Optional secondary color (white) for highlights and eyes, small amount
Tools Required
  • 01
    Crochet hook 4 mm (G)
  • 02
    Crochet hook 2.5 mm (B) for details
  • 03
    Yarn needle for sewing and weaving in ends
  • 04
    Scissors
  • 05
    Polyester stuffing
  • 06
    Stitch markers
  • 07
    Safety eyes or embroidered eyes if preferred
  • 08
    Pins for holding parts before sewing
  • 09
    Measuring tape or ruler for accurate placement

— Base :

Round 1: Thick plush Himalaya dolphin baby, Yarnart Dolce - 2,5 hanks base color 2. Hook 4mm 3. some Yarnart jeans (white, black, yellow, green) for crochet eyes. 4. Hook 2,5 mm 5. metal accessories if necessary 3cm ( 1.18inch), you can use buttons, or if you know the size and crochet for a child, then after taking measurements you can crochet without metal accessories. 5. filler Abbreviations ch - chain stitch MR - Magic ring inc - increase sc - single crochet dec - decrease hdc - half double crochet tr - treble crochet dc - double crochet sl st - slip stitch FLO - front loops only BLO - back loops only;
Round 6: r. 24sc fill the part with medium-density filler fold in half crochet together 2 sides 12sc cut the thread on the legs, fasten it, and cut the thread on the handles, fasten it, and leave it for sewing.
Round 7: r. 24sc fill the part with medium-density filler fold in half crochet together 2 sides 12sc cut the thread on the legs, fasten it, and cut the thread on the handles, fasten it, and leave it for sewing.
Round 8: r. 24sc fill the part with medium-density filler fold in half crochet together 2 sides 12sc cut the thread on the legs, fasten it, and cut the thread on the handles, fasten it, and leave it for sewing.
Round 9: r. 24sc fill the part with medium-density filler fold in half crochet together 2 sides 12sc cut the thread on the legs, fasten it, and cut the thread on the handles, fasten it, and leave it for sewing.
Round 10: r. 24sc fill the part with medium-density filler fold in half crochet together 2 sides 12sc cut the thread on the legs, fasten it, and cut the thread on the handles, fasten it, and leave it for sewing.
Round 11: r. 24sc fill the part with medium-density filler fold in half crochet together 2 sides 12sc cut the thread on the legs, fasten it, and cut the thread on the handles, fasten it, and leave it for sewing.

— Straps :

Round 7: r. 2ch, 80dc, sl st - height 20 cm ( 7.87 inches) Straps for a backpack 1r. 202ch, from the 3rd loop from the hook 3hdc in one loop, 198hdc, 6hdc in one loop, 198hdc, 3hdc in one loop fasten the thread and leave for sewing;
Round 8: r. 2ch, 80dc, sl st - height 20 cm ( 7.87 inches) Straps for a backpack 1r. 202ch, from the 3rd loop from the hook 3hdc in one loop, 198hdc, 6hdc in one loop, 198hdc, 3hdc in one loop fasten the thread and leave for sewing;
Round 9: r. 2ch, 80dc, sl st - height 20 cm ( 7.87 inches) Straps for a backpack 1r. 202ch, from the 3rd loop from the hook 3hdc in one loop, 198hdc, 6hdc in one loop, 198hdc, 3hdc in one loop fasten the thread and leave for sewing;
Round 10: r. 2ch, 80dc, sl st - height 20 cm ( 7.87 inches) Straps for a backpack 1r. 202ch, from the 3rd loop from the hook 3hdc in one loop, 198hdc, 6hdc in one loop, 198hdc, 3hdc in one loop fasten the thread and leave for sewing;
Round 11: r. 2ch, 80dc, sl st - height 20 cm ( 7.87 inches) Straps for a backpack 1r. 202ch, from the 3rd loop from the hook 3hdc in one loop, 198hdc, 6hdc in one loop, 198hdc, 3hdc in one loop fasten the thread and leave for sewing;
Round 12: r. 2ch, 80dc, sl st - height 20 cm ( 7.87 inches) Straps for a backpack 1r. 202ch, from the 3rd loop from the hook 3hdc in one loop, 198hdc, 6hdc in one loop, 198hdc, 3hdc in one loop fasten the thread and leave for sewing;
Round 13: r. 2ch, 80dc, sl st - height 20 cm ( 7.87 inches) Straps for a backpack 1r. 202ch, from the 3rd loop from the hook 3hdc in one loop, 198hdc, 6hdc in one loop, 198hdc, 3hdc in one loop fasten the thread and leave for sewing;
Round 14: r. 2ch, 80dc, sl st - height 20 cm ( 7.87 inches) Straps for a backpack 1r. 202ch, from the 3rd loop from the hook 3hdc in one loop, 198hdc, 6hdc in one loop, 198hdc, 3hdc in one loop fasten the thread and leave for sewing;
Round 15: r. 2ch, 80dc, sl st - height 20 cm ( 7.87 inches) Straps for a backpack 1r. 202ch, from the 3rd loop from the hook 3hdc in one loop, 198hdc, 6hdc in one loop, 198hdc, 3hdc in one loop fasten the thread and leave for sewing;
Round 16: r. 2ch, 80dc, sl st - height 20 cm ( 7.87 inches) Straps for a backpack 1r. 202ch, from the 3rd loop from the hook 3hdc in one loop, 198hdc, 6hdc in one loop, 198hdc, 3hdc in one loop fasten the thread and leave for sewing;
Round 17: r. 2ch, 80dc, sl st - height 20 cm ( 7.87 inches) Straps for a backpack 1r. 202ch, from the 3rd loop from the hook 3hdc in one loop, 198hdc, 6hdc in one loop, 198hdc, 3hdc in one loop fasten the thread and leave for sewing;

— Closing :

Round 1: r. 28dc, 2ch, turn 8r. 1dec, 24dc, 1dec = 26, 2ch, turn 9r. 1dec, 22dc, 1dec = 24, 2ch, turn 10r. 1dec, 20dc, 1dec = 22, 2ch, turn 11r. 1dec, 18dc, 1dec = 20, 2ch, turn 12r. 2dec sc, 2sc, 1hdc, 6dc, 1hdc, 2sc, 2dec sc = 16;
Round 2: r. 28dc, 2ch, turn 8r. 1dec, 24dc, 1dec = 26, 2ch, turn 9r. 1dec, 22dc, 1dec = 24, 2ch, turn 10r. 1dec, 20dc, 1dec = 22, 2ch, turn 11r. 1dec, 18dc, 1dec = 20, 2ch, turn 12r. 2dec sc, 2sc, 1hdc, 6dc, 1hdc, 2sc, 2dec sc = 16;
Round 3: r. 28dc, 2ch, turn 8r. 1dec, 24dc, 1dec = 26, 2ch, turn 9r. 1dec, 22dc, 1dec = 24, 2ch, turn 10r. 1dec, 20dc, 1dec = 22, 2ch, turn 11r. 1dec, 18dc, 1dec = 20, 2ch, turn 12r. 2dec sc, 2sc, 1hdc, 6dc, 1hdc, 2sc, 2dec sc = 16;
Round 4: r. 28dc, 2ch, turn 8r. 1dec, 24dc, 1dec = 26, 2ch, turn 9r. 1dec, 22dc, 1dec = 24, 2ch, turn 10r. 1dec, 20dc, 1dec = 22, 2ch, turn 11r. 1dec, 18dc, 1dec = 20, 2ch, turn 12r. 2dec sc, 2sc, 1hdc, 6dc, 1hdc, 2sc, 2dec sc = 16;
Round 5: r. 28dc, 2ch, turn 8r. 1dec, 24dc, 1dec = 26, 2ch, turn 9r. 1dec, 22dc, 1dec = 24, 2ch, turn 10r. 1dec, 20dc, 1dec = 22, 2ch, turn 11r. 1dec, 18dc, 1dec = 20, 2ch, turn 12r. 2dec sc, 2sc, 1hdc, 6dc, 1hdc, 2sc, 2dec sc = 16;
Round 6: r. 28dc, 2ch, turn 8r. 1dec, 24dc, 1dec = 26, 2ch, turn 9r. 1dec, 22dc, 1dec = 24, 2ch, turn 10r. 1dec, 20dc, 1dec = 22, 2ch, turn 11r. 1dec, 18dc, 1dec = 20, 2ch, turn 12r. 2dec sc, 2sc, 1hdc, 6dc, 1hdc, 2sc, 2dec sc = 16;
Round 7: r. 28dc, 2ch, turn 8r. 1dec, 24dc, 1dec = 26, 2ch, turn 9r. 1dec, 22dc, 1dec = 24, 2ch, turn 10r. 1dec, 20dc, 1dec = 22, 2ch, turn 11r. 1dec, 18dc, 1dec = 20, 2ch, turn 12r. 2dec sc, 2sc, 1hdc, 6dc, 1hdc, 2sc, 2dec sc = 16;

Assembly Instructions

  1. Stuff each piece firmly before closing.
  2. Pin all parts in place and check the proportions against the photos.
  3. Sew parts on securely with matching yarn.
  4. Weave in all ends and shape the finished piece.

Important Notes

  • Stuff firmly but not too tightly for the best shape and structure.
  • Pin all parts in place before sewing to ensure correct positioning and symmetry.
  • Weave ends as you go to avoid a tedious finishing session.
  • Work with consistent tension throughout for even, professional-looking results.
  • Plan color changes with thoughtful order to minimize loose ends and ensure clean interior finishes.

This amigurumi backpack is a playful combination of a dinosaur motif and a functional carryall. With careful finishing, it remains durable enough for daily wear and gentle play. May you enjoy bringing this friend to life as a gift for a child or a thoughtful keepsake. The project teaches basic sewing and crochet techniques that build confidence and joy in handmade creation.

Good to know

You ask, we answer

The finished dino backpack measures approximately 25 cm wide, 20 cm tall, and about 11 cm deep when stuffed and worn as a backpack.

Yes, you can, but it will change texture and size; use a similar hook size and adjust stuffing to maintain the silhouette.

This pattern is listed as intermediate due to multiple pieces and assembly, though a confident beginner could complete it with careful guidance.

Most crocheters finish in 8-10 hours, depending on experience and whether you choose to embellish or customize the features.

If making for a child, avoid metal components and ensure all attachments are securely sewn and tucked away to minimize risk.

Close-up of orange spikes and white trim along the backpack edge
Join 100k+ crocheters

Get new free patterns, stitch tips and exclusive content in your inbox.