Crochetologist
Free Crochet Pattern
Beautiful Detailed Adorable

Deaths Head Hawk Moth Amigurumi Pattern

Finished Deaths Head Hawk Moth amigurumi with skull mask and layered wings in beige, mustard and blue, photographed flat
4.4Rating
5-7 HoursTime
IntermediateSkill
Highlights

What makes it special

Made with Love

Delightful animal designs with sweet details that capture the essence of your favorite woodland and farmyard friends.

Weekend Treat

This project typically takes about five to seven hours to complete, factoring in wings made in two layers and careful colour changes across the body.

Intermediate Level

Ideal for intermediate makers comfortable with magic rings, colour changes, invisible decreases, working in the round and simple seaming; this pattern combines shaping and multi-layer assembly for a polished amigurumi insect.

About This Deaths Head Hawk Moth Amigurumi Pattern

This amigurumi pattern creates a small Death's Head Hawk Moth with separate parts: a sculpted head, segmented caterpillar-style body, skull mask, two large layered wings (each made from Piece 1 and Piece 2), antennae and small decorative details. The design uses sport/baby weight cotton (size 2, 100% mercerized, 50g/125m per ball) and recommends a 2.25 mm or 2.5 mm crochet hook for tight stitches. Body measurements are approximately 11 cm (4.3 in) using the recommended yarn and hook.

The pattern includes round-by-round instructions, colour change tips, and tutorials for invisible decreases, standing joins and invisible fasten-offs so you can assemble accurate layered wings and a neat skull motif.

This pattern walks you through constructing a small, stylised Death's Head Hawk Moth using tight amigurumi stitches so the stuffing stays hidden and edges sit flat. You will build the head first on a magic loop, add the skull mask overlay, then work the segmented body with multiple colour changes to recreate the moths characteristic banding. The wings are made as two layers and joined together to create depth and a neat rim detail.

Assembly focuses on alignment: antennae and skull details are sewn on after the hat-like skull mask is fitted, and the layered wings are stacked and crocheted together to form leftright pairs before sewing to the body for a secure finish.

Close-up of the moth head showing skull mask fitted over the head and the eye placement for the amigurumi

The instructions include short tutorials for invisible decreases, joining with a standing stitch and closing the remaining stitches through the front loops to keep seams tidy. Clear photo callouts in the original layout guide you where to anchor safety eyes and how to carry yarn when changing colours for neat stripes.

Even though the model uses mercerized cotton and a small hook, the shaping relies on tight tension and progressive stuffing to obtain the correct compact silhouette and crisp skull motif.

Stitches & Skills You'll Use

Magic ring and single crochet form the backbone of this pattern; the head and skull mask are started in an adjustable loop to create a tight centre and smooth shaping. Single crochet increases and decreases are used to sculpt domes and tapered segments throughout the head and body.

Invisible sc-decreases and working into front or back loops (FLO/BLO) appear regularly: invisible decreases preserve the round profile, while BLO or FLO instructions create defined ridges and visual layers on the wings and body. Colour-change technique is essential for the striped caterpillar body: join the new colour in the last step of the final stitch to avoid loose floats.

The wings also rely on basic row construction with chains and turning chains, and finishing techniques such as standing single crochet, slip-stitch joins and the invisible fasten-off ensure edges are tidy. Simple embroidery stitches are used for tiny cheek or mask details.

Why You'll Love This Deaths Head Hawk Moth Amigurumi Pattern

I love designing this Deaths Head Hawk Moth because it balances sculptural shaping with playful surface detail, and the skull motif gives the piece a distinctive silhouette. I enjoy how the pattern invites careful colour-carrying and tiny finishing touches that make the moth feel more like a little artifact than a simple toy. Working the wings in two layers and then joining them taught me a satisfying way to add dimensionality without complicated sewing.

I also appreciate how the pattern rewards attention to tension and stuffing with a neat, professional result that looks great on display or in a collectors shelf.

Colour & Yarn Inspiration

Working in mercerized cotton gives a slightly lustrous finish that makes the skull motif stand out; for a vintage naturalist look choose warm beiges, ecru and a deep charcoal for outlines. If you prefer a modern, graphic take, use high-contrast pairs like cream and jet black with a single accent colour for the banding to keep the design readable from a distance. Sport weight cotton will give crisp stitches; substituting a softer DK cotton or a cotton-blend will yield a slightly puffier appearance and softer drape on the wings.

To highlight the layered wing construction, use a darker rim colour on the outer layer and a brighter inner layer so the join reads as a decorative border. For subtle tone-on-tone results, pick three values of the same hue for gradation across the caterpillar body, which reduces obvious colour joins while enriching the surface texture. Carrying the colour strands where indicated keeps the underside tidy and avoids many woven ends.

Assembly photograph showing layered wings and caterpillar body ready to be joined on the amigurumi moth

Switch Things Up

I often change the main body palette to create seasonal versions of the moth, for example swapping the mustard and blue for autumnal orange and deep teal for a fall display.

If you want a smaller keyring version, try a thinner 1.75–2.0 mm hook with laceweight or fingering yarn for a tiny, delicate specimen.

To make a larger stuffed wall piece, use bulky cotton and a larger hook while keeping the stitch counts identical; the result is much more sculptural and impressive when hung on a bedroom wall.

Try embroidering the skull motif using a darker contrast for a stylised effect, or work it in two tones by surface crocheting a lighter outline after the mask is attached.

I sometimes stiffen the lower wing edges with a fabric interface pasted between layers to help the wings hold a slight curve when displayed on a shelf.

For a plush toy version intended for children, embroider the eyes rather than installing safety eyes and use slightly thicker yarn on the recommended hook to get a softer, cuddlier shape.

You can also add a tiny loop on the back of the body to hang the moth as an ornament or keychain, fastening it securely between wing layers.

Consider adding a small wire inside each antenna if you want them posable; feed the wire through before sewing and wrap the ends so they don't poke through the stitches.

Experiment with gradient yarns for the wing panels to get a striking fade that reduces the number of colour joins while creating a complex effect.

For a set, repeat the pattern in different colours to create a cabinet of curiosity display; each variation highlights different aspects of the skull and banding details.

Ways to Use & Gift It

This moth pattern makes a thoughtful, unusual handmade gift for collectors of natural history, a friend who loves insects, or anyone who enjoys quirky home accents. Pair a finished moth with a small wooden display plaque or a shadowbox frame so the recipient can hang it on a wall as art. A set of three variations in complementary colours looks striking grouped together on a hallway shelf or gallery wall.

Because the finished piece is compact and lightweight, you can also turn it into a seasonal ornament by attaching a discreet loop at the back, or make a tiny keychain version for a craft fair. For baby-safe gifts, embroider the facial features and skip safety eyes, then present the moth alongside a note about fibre content and care instructions so the recipient knows how to launder the cotton if needed.

Common Mistakes & How to Fix Them

Counting stitches only occasionally can lead to incorrect shaping and mismatched wing joins; count every round when working increases and decreases to maintain the correct stitch total. Not fastening off colours securely before carrying threads will result in loose floats and snagging; anchor colour joins on the inside and weave in ends as you work to keep the surface tidy. Using a hook that is too large for sport weight yarn produces loose stitches and visible stuffing; switch to a smaller hook or tighter tension when following this cotton pattern. Skipping the standing stitch join when instructed can cause an uneven start point and misaligned rounds; use the standing sc or slst as shown to create a neat beginning for each colour band. Failing to stuff gradually and firmly during shaping leaves gaps and a lumpy silhouette; add small amounts of stuffing frequently and use a chopstick or stuffing tool to reach corners. Attaching wings without pinning and aligning the two layers often makes the seam crooked; pin both layers carefully and check right-left symmetry before sewing through both layers.

Maker's Notes

When I made this moth I used Scheepjes Catona sport cotton on a 2.5 mm hook and completed the project in approximately six hours across two focused sessions. The caterpillar body rounds that include multiple colour changes (rounds 20 through 33 in the written layout) were the most time consuming, because I carried and anchored contrasting threads for neat stripes. Beginners often struggle at the point of joining black for the ribbed collar around round 18 and in the two-layer wing assembly; careful stitch counting and using pins to align pieces before seaming helped me avoid mismatched edges.

Stuffing tightly in the head and upper body rounds produced the best sculpted skull silhouette.

I tried a substitution: I tested the pattern using a slightly thicker DK cotton yarn on a 3.0 mm hook to see the scale change. The finished moth grew by roughly 30 percent in every dimension compared with the original sport-weight sample: the head became a little rounder and the wings noticeably larger, which improved presence but reduced the crispness of small embroidered details. The DK version held stuffing more loosely and required firmer tension to avoid visible gaps; for a compact look I returned to sport weight and the smaller hook.

Deaths Head Hawk Moth Amigurumi Pattern

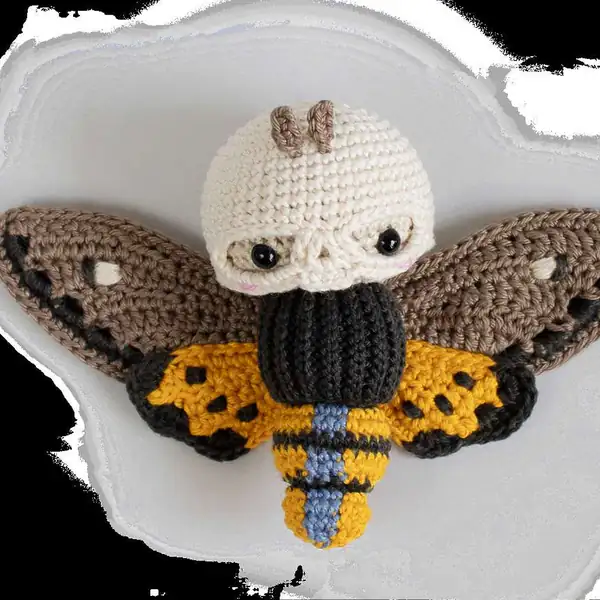
Download this free crochet pattern for a Deaths Head Hawk Moth amigurumi featuring full materials, step-by-step tutorials and colour change tips; start stitching today.

Intermediate 5-7 Hours
Pattern at a glance
Skill level
Intermediate
Time to make
5-7 Hours
Hook size
2.25 mm (UK 13) or 2.5 mm (US C/2)
Yarn weight
Sport / #2
Finished size
Approx. 11 cm / 4.3 in across (measured from wingtip to wingtip in the sample shown)
Gauge
10 x 10 cm (4 x 4 in) = 26 sts x 36 rows, worked in single crochet using sport weight cotton at recommended tension
Yarn used
Approx. 55 g / 137 m total (sum of colour scraps listed in materials: six colours as specified)

Materials Needed

Main Fabric
  • 01
    Sport/Baby weight yarn (size 2, fine), 100% mercerized cotton, 50g / 125m per ball (recommended)
  • 02
    Yarn And Colors Must Have set: A white 002 Cream 10g
  • 03
    Yarn And Colors Must Have set: B sand 003 Ecru 10g
  • 04
    Yarn And Colors Must Have set: C beige 007 Cigar 10g
  • 05
    Yarn And Colors Must Have set: D black 099 Antracite 10g
  • 06
    Yarn And Colors Must Have set: E yellow 015 Mustard 10g
  • 07
    Yarn And Colors Must Have set: F blue 061 Denim 5g
  • 08
    Alternative: Scheepjes Catona equivalents: white 130 Cream 10g, sand 505 Linen 10g, beige 254 Moon Rock 10g, black 110 Jet Black 10g, yellow 208 Yellow Gold 10g, blue 247 Bluebird 5g
Tools Required
  • 01
    Crochet hook 2.25 mm (UK 13)
  • 02
    Crochet hook 2.5 mm (US C/2, UK 12)
  • 03
    Safety or glass eyes Ø 7 mm (2 pieces)
  • 04
    Soft polyester stuffing (Polyfiber Fill)
  • 05
    Darning needle for sewing and weaving in ends
  • 06
    Stitch markers
  • 07
    Pins for assembly
  • 08
    Scissors
  • 09
    Optional: a chopstick or stuffing tool to push filling into small areas

— Part 1 :

Round 1: For most parts you start with an adjustable ring („magic ring“ or „magic loop“) and you’ll go on work in a continuous spiral (except the pattern calls for a slst to close the round). This means, you continue to crochet;
Round 2: You should mark the first stitch of a round to keep track of where the round begins. This helps when counting your stitches to compare it with the pattern.

— Part 2 :

Round 1: . The next stitch you make will be the;

— Part 3 :

Round 1: . Take care to keep the knot on the back of the fabric. Work into the next stitch, or;

— Part 4 :

Round 1: sc 7 into magic loop (7)
Round 2: [inc] 7x (14)
Round 3: [sc 1, inc] 7x (21)
Round 4: sc 1, inc, [sc 2, inc] 6x, sc 1 (28)
Round 5: [sc 3, inc] 7x (35)
Round 6: sc 35;
Round 7: sc 2, inc, [sc 4, inc] 6x, sc 2 (42)
Round 8: (6 rnds) sc 42;
Round 9: (6 rnds) sc 42;
Round 10: (6 rnds) sc 42;
Round 11: (6 rnds) sc 42;
Round 12: (6 rnds) sc 42;
Round 13: (6 rnds) sc 42;
Round 14: sc 2, dec, [sc 4, dec] 6x, sc 2 (35)
Round 15: [dec, sc 3] 7x (28)
Round 16: sc 1, dec, [sc 2, dec] 6x, sc 1 (21)
Round 17: [dec, sc 1] 7x (14)
Round 18: Join black with a standing slst into the indicated 8th stitch, slst 13;
Round 19: [sc-blo 1, inc-blo] 7x (21)
Round 20: change to yellow, cut black: [sc 2, inc] 3x, sc 1;
Round 21: sc 13, change to blue, sc 3, change to yellow, sc 12;
Round 22: sc 13, change to blue, sc 3, change to yellow, sc 12;
Round 23: change to black, sc 28;
Round 24: change to yellow (cut black), sc 13, change to blue, sc 3, change to yellow, sc 12;
Round 25: dec, sc 2, dec, sc 1, dec, sc 2, dec, change to blue, sc 3;
Round 26: [sc 1, dec] 3x, change to blue, sc 1, dec change to yellow, [sc 1, dec] 3x;
Round 27: change to black (cut blue and yellow), slst 14;
Round 28: [sc-flo 1, inc-flo] 7x (21)
Round 29: Join yellow with a standing sc into the closing st. Place marker (= new beginning of;
Round 30: sc 12, change to blue, sc 3, change to yellow, sc 12;
Round 31: change to black, sc 27 01;
Round 32: change to yellow (cut black), sc 12, change to blue, sc 3, change to yellow, sc 12;
Round 33: [sc 2, dec] 3x, change to blue, sc 3, change to yellow, [dec, sc 2] 3x;
Round 34: change to black, [dec, sc 1] 7x (14)
Round 35: slst 14 Stuff the middle part of the body.
Round 36: change to yellow (cut black), [sc-flo 1, inc-flo] 3x, change to blue, sc-flo 3, change to yellow;
Round 37: sc 9, change to blue, sc 3, change to yellow, sc 8;
Round 38: [sc 1, dec] 3x, change to blue, sc 3, change to yellow, [dec, sc 1] 2x, dec;
Round 39: [dec] 3x, change to blue, sc3tog, change to yellow, [dec] 2x, sc 1;

— Part 5 :

Round 1: sc 7 into magic loop (7)
Round 2: [inc] 7x (14)
Round 3: [sc 1, inc] 7x (21)
Round 4: sc 1, inc, [sc 2, inc] 6x, sc 1 (28)
Round 5: [sc 3, inc] 7x (35)
Round 6: sc 35;
Round 7: sc 2, inc, [sc 4, inc] 6x, sc 2 (42)
Round 8: [sc 13, inc] 3x (45)
Round 9: (5 rnds) sc 45;
Round 10: (5 rnds) sc 45;
Round 11: (5 rnds) sc 45;
Round 12: (5 rnds) sc 45;
Round 13: (5 rnds) sc 45;
Round 14: sc 15, slst 6, sc 3, slst 6, sc 15;
Round 15: sc 15, ch 7, sk 6, dc 1, into the next stitch: [dc 1 + ch 2 + dc 1];
Round 16: sc 14, sk 1, sc 8 into ch7sp, sk 2, [sc 3] into ch2sp;
Round 17: sc 14, sk 1, slst 7, into next st: [slst 1 + ch 1 + sc 1];

— Part 6 :

Round 1: Work into the bumps on the back of the chain, starting in the 2nd back bump :;

— Part 7 :

Round 1: Starting in the 5th ch from hook, work along the chain: [dc 2] into the 5th ch, dc 1, hdc 3, sc 3, slst 3, turn;
Round 2: ch 1, slst 3, sc 3, hdc 3, dc 2, [dc 2] into the next st, [dc 1 + tr 1] into the last st (= into top of the beginning ch-4), turn;
Round 3: ch 4, dc 1 into the st at the base of the turning ch-4, [dc 2] into the next st, dc 1, hdc 3, sc 3, slst 2, leave remaining sts unworked, turn;
Round 4: ch 1, slst 3, sc 3, hdc 3, dc 2, [dc 2] into the next st, [dc 1 + tr 1] into last st, turn (15)
Round 5: ch 3, dc 1 into the st at the base of the turning ch-3, [dc 2] into the next st, dc 3, hdc 4, sc 6, along the remaining sts of row 02 : hdc 1, sc 2, slst 1;

— Part 8 :

Round 5: Cut the yarn and fasten off.

— Part 9 :

Round 27: , sc 19 along the top side, hdc 1 into the same space as;

— Part 10 :

Round 1: Starting in the 4th ch from hook, work along the chain: hdc 2, sc 3, slst 2, turn;
Round 2: ch 1, slst 2, sc 2, hdc 3, [hdc 1 + dc 1] into the last st, turn;
Round 3: ch 3, hdc 1 into the st at the base of the turning ch-3, hdc 1, sc 2, slst 2;
Round 4: ch 1, slst 2, sc 2, hdc 2, [hdc 1 + dc 1] into last st;

— Part 11 :

Round 1: ch 3, into the loop: dc 4, ch 4, hdc 1, ch 1, hdc 1, ch 4, close rnd with a slst into 3rd;
Round 2: sc 4, sc 5 into the ch4sp, into the ch1sp: [slst 1 + ch 2 + hdc 2 + ch 2 + slst 1];

— Part 12 :

Round 1: slst-blo 11, turn (11)
Round 2: (34 rows) ch 1, slst-blo 11, turn;
Round 3: (34 rows) ch 1, slst-blo 11, turn;
Round 4: (34 rows) ch 1, slst-blo 11, turn;
Round 5: (34 rows) ch 1, slst-blo 11, turn;
Round 6: (34 rows) ch 1, slst-blo 11, turn;
Round 7: (34 rows) ch 1, slst-blo 11, turn;
Round 8: (34 rows) ch 1, slst-blo 11, turn;
Round 9: (34 rows) ch 1, slst-blo 11, turn;
Round 10: (34 rows) ch 1, slst-blo 11, turn;
Round 11: (34 rows) ch 1, slst-blo 11, turn;
Round 12: (34 rows) ch 1, slst-blo 11, turn;
Round 13: (34 rows) ch 1, slst-blo 11, turn;
Round 14: (34 rows) ch 1, slst-blo 11, turn;
Round 15: (34 rows) ch 1, slst-blo 11, turn;
Round 16: (34 rows) ch 1, slst-blo 11, turn;
Round 17: (34 rows) ch 1, slst-blo 11, turn;
Round 18: (34 rows) ch 1, slst-blo 11, turn;
Round 19: (34 rows) ch 1, slst-blo 11, turn;
Round 20: (34 rows) ch 1, slst-blo 11, turn;
Round 21: (34 rows) ch 1, slst-blo 11, turn;
Round 22: (34 rows) ch 1, slst-blo 11, turn;
Round 23: (34 rows) ch 1, slst-blo 11, turn;
Round 24: (34 rows) ch 1, slst-blo 11, turn;
Round 25: (34 rows) ch 1, slst-blo 11, turn;
Round 26: (34 rows) ch 1, slst-blo 11, turn;
Round 27: (34 rows) ch 1, slst-blo 11, turn;
Round 28: (34 rows) ch 1, slst-blo 11, turn;
Round 29: (34 rows) ch 1, slst-blo 11, turn;
Round 30: (34 rows) ch 1, slst-blo 11, turn;
Round 31: (34 rows) ch 1, slst-blo 11, turn;
Round 32: (34 rows) ch 1, slst-blo 11, turn;
Round 33: (34 rows) ch 1, slst-blo 11, turn;
Round 34: (34 rows) ch 1, slst-blo 11, turn;
Round 35: (34 rows) ch 1, slst-blo 11, turn;

Assembly Instructions

  1. Place safety eyes between rounds 12 and 13 of the head, leaving eight stitches between the eyes, then embroider any cheek highlights before fitting the skull mask over the head.
  2. Fit the skull mask hat over the head so the rim sits two rounds above the eyes; fasten it invisibly with a running stitch around the rim and weave in the ends.
  3. Sew the antennae to the skull hat between rounds 08 and 09 with a distance of two stitches between them, using the long tail left on each antenna for sewing.
  4. Stack Piece 2 on top of Piece 1 for each wing with the right sides of black rows visible, then crochet through both layers along the top side to join them into a single wing unit before finishing the rim.
  5. Attach the completed wings to the back of the body centrally, aligning the top of the wing where the body meets the upper thorax and sewing securely through the ribbed centre band for stability.

Important Notes

  • Work with tight tension to prevent stuffing from showing; if you crochet loosely, switch to a smaller hook for a denser fabric.
  • Mark the first stitch of each round with a removable marker to keep track of beginnings during colour changes and shaping.
  • Stuff firmly and progressively so the head and upper body keep their sculpted shapes; overstuff where necessary to avoid flat spots.
  • When making toys for small children, replace safety eyes with embroidered eyes and ensure all parts are sewn on very securely.
  • Weave in ends as you go to minimize finishing work and keep colour transitions tidy when changing yarns.

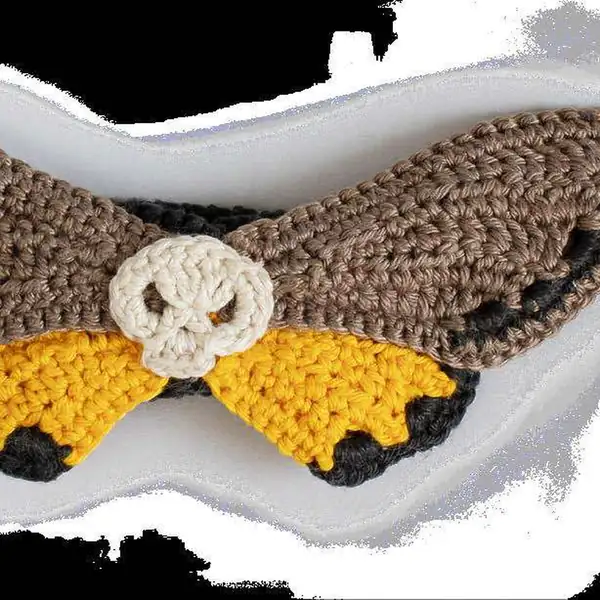
This small Deaths Head Hawk Moth pattern was written to celebrate curious form and careful finishing. I hope making it is as satisfying as arranging the final stitches into place and seeing the skull motif emerge. Make one in a set of colours for a charming display or keep a single specimen as a tactile, handmade keepsake.

Good to know

You ask, we answer

The finished moth measures approximately 11 cm (4.3 in) across with the recommended sportweight cotton and the 2.25–2.5 mm hook, although wingspan and overall size will change slightly if you substitute yarn or hook size.

Yes, you can use a different yarn weight, but expect significant size and texture differences; for example, using DK yarn with a larger hook creates a chunkier, less defined skull motif and requires firmer stuffing and tighter tension to avoid visible gaps in the fabric.

This pattern is rated intermediate because it includes frequent colour changes on the segmented body, working in continuous rounds, and joining two-layer wing pieces; some prior experience with colour joins and invisible decreases will make the process smoother for first-time makers.

Because the pattern uses mercerized cotton, hand washing is safest: spot-clean when possible, otherwise hand wash gently in cool water and reshape while damp; avoid machine washing or tumble drying to preserve the shape and join integrity.

Safety eyes are optional; if used, position them between rounds 12 and 13 of the head with eight stitches between them as directed to ensure symmetrical placement and proper mask coverage when you add the skull overlay.

Most crocheters finish the moth in about five to seven hours when following the instructions and working at a steady pace, although the wings and multiple colour changes may extend the time if you work slowly or make several colour alterations for variants.

Two small yellow and black inner wing pieces completed, photographed side by side as right and left wings for the amigurumi
Join 100k+ crocheters

Get new free patterns, stitch tips and exclusive content in your inbox.