Crochetologist
Free Crochet Pattern
Beautiful Detailed Adorable

Crochet Puff Quilt Pattern

Close up of a puff square crochet in progress for the puff quilt amigurumi style pattern
4.5Rating
8-10 HoursTime
Beginner FriendlySkill
Highlights

What makes it special

Cozy & Cuddly

This quilt‑like crochet blanket is built from puff squares that sew into a generous, comfy throw with bright, friendly color combinations and simple shaping.

All-Day Adventure

A full‑day, mindful make that fits into a weekend chunk; finish two or three blocks, then return to sew them into a grand blanket you’ll treasure for years.

Beginner Friendly Level

This pattern is best described as accessible to a confident beginner who enjoys working in the round on small puff squares, uses basic stitches (hdc and ch), and appreciates a calm rhythm for seaming with a careful back‑side join to form a large, comforting throw. The project rewards steady practice, with room to grow into color planning, grid arrangement, and the nuance of consistent tension. The overall approach remains gentle, designed to build confidence as each puff square comes together and the grid expands, without requiring special stitches or unusual techniques.

There is a quiet, almost meditative pleasure in watching a simple idea become something that wraps you in color and warmth. This Puff Quilt Pattern invites crochet makers to slow down just enough to let each tiny puff square glow on its own, while the overall blanket grows into a comforting, quilt-like throw. The project rewards steady, repetitive motion with a generous, tangible payoff in texture and coziness. It’s a gift-friendly build that scales with your momentum: begin with a few blocks, then resume later without losing the rhythm you’ve settled into.

Designed to feel approachable whether time is scarce or plentiful, the pattern emphasizes a calm workflow that can be picked up at a comfortable pace. The layout emphasizes color decisions and layout choices, so every finished piece carries a personal touch. The result is a soft, tactile surface that invites touch, with a structure that reads as a stitched quilt on the couch, not a tightly packed blanket. This project celebrates the simple joy of turning small, crocheted elements into a larger, comforting whole.

About This Crochet Puff Quilt Pattern

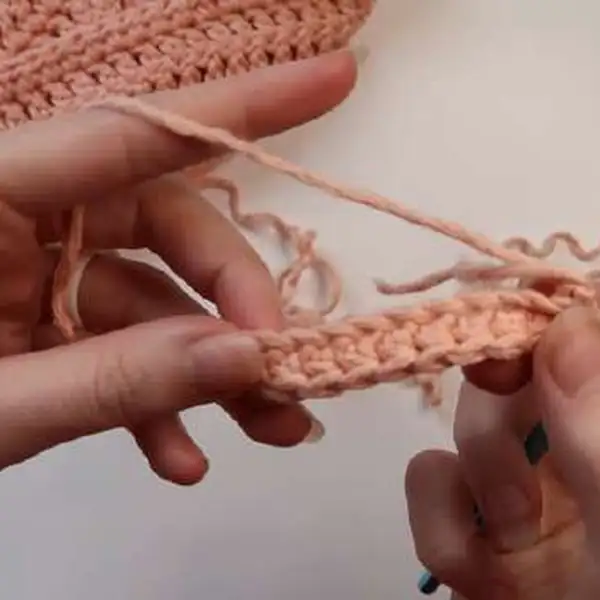
Each puff square is worked individually, beginning with a foundation chain that establishes the width of the block. The puff is formed with a simple sequence of stitches that compress into a round, plush center. Once the puff is complete, the square is gently stuffed enough to hold its shape and closed at the top with a few careful stitches. The completed puff block is set aside as the next square is formed. When a row of squares has been crocheted, the joining stage begins, using back‑side seams to connect blocks in a neat grid that remains invisible from the front. The blanket then grows square by square, row by row, until the full footprint has been reached. The process emphasizes measured progress, careful counting, and the quiet joy of turning small pieces into a larger, cohesive tapestry.

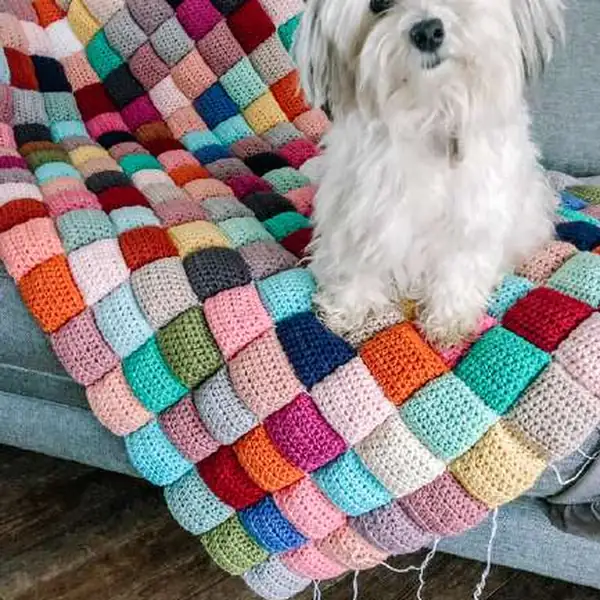
The texture created by the puff stitches catches light and color in a way that reads as cozy and tactile. The layout choices—whether a rainbow spectrum, a soft gradient, or a personal, improvised mix—are where creativity comes to life. Seaming is designed to be tidy from the back, with the front presenting a seamless field of puffs that form a continuous, plush surface. The project invites experimentation with palette and placement while staying anchored in straightforward crochet technique and patient, methodical construction.

Seaming two puff squares together using mattress stitch on the puff quilt

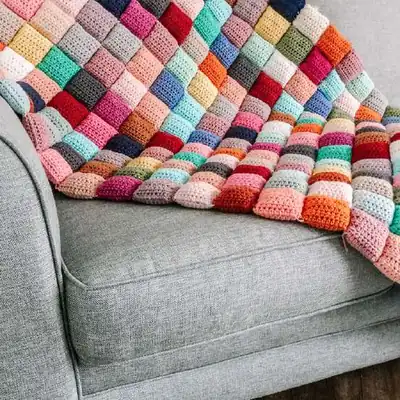
The Puff Quilt pattern offers two standout benefits for makers who crave both a clear path and room to grow. First, the modular nature of puff squares makes it easy to pause after completing a handful of blocks and return later without losing momentum. This design is well suited to busy schedules or unpredictable time blocks, because progress can be measured in small, repeatable steps rather than a single long session. Second, the blanket’s scale remains forgiving—small variations in block count or grid alignment do not dramatically impact the overall look. The texture stays inviting, and the color story remains readable even if tweaks to the grid occur during assembly.

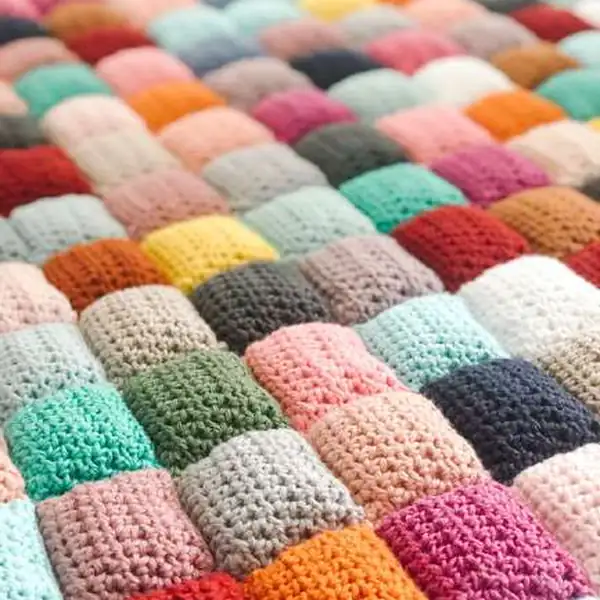
Careful seam work is the finishing touch that preserves a clean front with almost invisible joins from the back. The color planning component—whether opting for a bold rainbow, a restrained gradient, or a playful mixed palette—becomes a key part of the process. The method rewards thoughtful layout decisions and offers a chance to practice planning for larger projects in the future, reinforcing confidence as a crocheter progresses through different sizes and configurations.

Stitches & Skills You'll Use

The technique core of this pattern centers on a trio of practical crochet actions. Start with a foundation chain to establish the puff square’s starting width. Work a sequence of half‑double crochets that builds the body of the puff—each loop pulled through in a controlled way to form a compact, plush round. The puff is then stuffed gently to maintain a rounded silhouette, encouraging even density across the block. After stuffing, the top is closed with a few closing stitches to secure the puff round. A slip or small finishing stitch may be used to seal the final pass and keep the puff shape intact while it rests before being joined to its neighbors. The joining method chosen is a back‑side seam that anchors blocks neatly from the back; the front reads as a continuous field of puffs, with no obvious seam breaks along the surface.

Throughout, consistent tension and careful counting are essential to keep each puff square uniform in size. Working in flat rounds allows the layout to be adjusted as blocks accumulate, which is helpful when planning color transitions or testing layouts before committing to the final seaming sequence. The puff texture is a gentle display of the chosen yarn’s color and plies, and it photographs well because the depth of each puff catches light with soft shadows that emphasize the quilt‑like overall effect.

For beginners, the pattern offers a measured pace: crochet a small rectangular area of puff squares, check gauge, stuff gently, and set aside. For more advanced makers, there is room to experiment with color transitions and layout variations, potentially creating a gradient quilt or a mosaic arrangement. The critical takeaway is to enjoy the texture development and to allow the color story to emerge as stitching continues. By design, the Puff Quilt remains approachable while still offering depth for creative exploration.

Why You'll Love This Crochet Puff Quilt Pattern

This pattern appeals to crocheters who relish a calm, sustaining workflow paired with a big, satisfying payoff. Each puff square acts as a tiny moment of texture that, when assembled, forms a blanket that invites wrapping and sharing. The grid comes together with a quiet, methodical rhythm, and the back‑of‑the‑piece joins stay tidy, allowing the front to be the star. The finished piece becomes a tactile statement of patience, care, and the pleasure of turning many small pieces into one large, comforting surface.

Color planning becomes a personal exploration: bright, high‑contrast blocks offer a playful atmosphere, while softer, coordinated tones create a modern, understated vibe. The blanket lends itself to gifting—new homes, weddings, or simply a thoughtful indulgence for someone who cherishes handmade warmth. The project’s forgiving nature means beginners can learn the core technique with confidence, while more experienced makers can enjoy layering color and refining layout choices with intention.

Beyond the finished look, there is value in the process: a steady rhythm, consistent tension, and the satisfaction of a project that grows block by block. The puff texture provides a plush surface that invites touch, and the modular structure supports experimentation with color and arrangement without sacrificing cohesion or ease of construction. The Puff Quilt stands as a tangible, comforting reminder that great results can emerge from small, deliberate steps.

Colour & Yarn Inspiration

Color strategies for this puff quilt range from bright, energetic rainbows to sophisticated monochromes. A rainbow palette creates a focal point that enlivens a room, while a gradient—from pale blush to deep plum—offers a calm, contemporary look. For a nautical vibe, blues, teals, and whites work well; for a sunset palette, warm corals and golds blend into a soft glow. To maintain cohesion, begin with a neutral base (cream, taupe, or ivory) and sprinkle brighter puffs in strategic spots, letting the color story unfold across the entire grid. Subtle speckled or heathered yarns can add depth and texture without overpowering the overall design.

When substituting colors, prioritize contrast between puff blocks and the surrounding space to define edges and keep the grid legible. A higher contrast between adjacent blocks creates crisp separation, whereas a lower contrast yields a softer, crocheted‑looking surface. Mix textures by pairing smooth worsted with a few speckled or heathered yarns for an added tactile surprise, and keep a color card handy to reference exact families as color decisions are made. This helps prevent clashes and ensures a harmonious final piece that reads clearly on the carpet or chair where it will live.

Colored puff squares laid out in a grid for the quilt pattern

Switch Things Up

Freshness comes from deliberate variation: swap in a different color palette to reflect a season or room mood, while keeping the grid pattern intact. A gradual gradient across rows can create a visual flow that reads like a soft transition from light to dark. Place high‑contrast puff blocks at the grid’s perimeters to frame the blanket with a bold edge. Subtle changes in the puff density, achieved by adjusting the amount of stuffing, can add a tactile cue without altering the overall silhouette.

Edge details can transform the finish: a simple single‑crochet border around the entire throw defines the outer frame and keeps the back neat. For an extra design accent, experiment with seam thread color to create a decorative line that emphasizes the grid without overpowering the puff texture. Alternative joining methods, if pursued, might include a decorative whip stitch or a nearly invisible join that emphasizes the puff texture from the back while maintaining a continuous front appearance.

As confidence increases, consider reimagining the joining order—perhaps assembling the grid by bands of color or by alternating focal color blocks to create a distinctive rhythm. The modular nature of the pattern invites experimentation while still delivering a comfortable, cozy blanket that remains practical to finish and easy to adapt for future projects.

In short, tailor the quilt to fit your space and style: the grid is a framework, not a cage. The pattern supports extension, future rework, or reassembly, making it a flexible choice for ongoing crochet exploration and home décor refreshes.

Ways to Use & Gift It

Gifting a Puff Quilt is a warm hug in fabric form, ideal for weddings, housewarmings, or a thoughtful “just because” surprise. The blanket can be tuned to fit a new home’s palette or a baby’s nursery by selecting soft pastels or airy neutrals and coordinating with a matching pillow or mug cozy to complete the set. Including a small note about the care and patience that went into each puff square adds a personal touch to the gift and makes the handmade feel even more special.

Another thoughtful idea is to create a family memory blanket by incorporating a few signature colors from each person. The puff squares can be arranged to honor birthdays, anniversaries, or shared moments, turning the project into a keepsake that grows with the family. Pairing the quilt with a simple storage bag or a ready‑to‑hang garment hook can extend the handmade vibe beyond the couch and into everyday living spaces.

Common Mistakes & How to Fix Them

Skipping markers at the start of a new row can throw off alignment; place a stitch marker at the first stitch of each row and move it as you complete rounds.

Overstuffing puff squares makes the fabric stiff and difficult to join; stuff just enough to hold shape without distorting the puff.

Forgetting to maintain consistent tension while joining; pull snug but not tight to keep a smooth surface on the back of the blanket.

Miscounting squares when laying out the grid; photograph or lay out your squares in the exact 18 by 18 plan before final sewing to ensure accuracy.

Maker's Notes

Early trials with this pattern emphasized the rhythm of puff formation and the calm of stuffing the blocks. A deliberate approach to tension across rounds helped maintain uniform puff size and roundness. Layout tests revealed that a planned grid, even if composed of variable color blocks, reads more clearly when the puff squares are kept evenly shaped and lightly stuffed. A small portfolio of color samples beside the work provided a visual guide for color transitions and helped avoid accidental clashes in the final layout.

A practical note on preparation: lay out a representative section of the grid before starting the joining process to verify alignment and color order. The joining process benefits from a clean back and a front that reads as an uninterrupted field of puffs. Time estimates vary with color decisions and the pace of crocheting each block; the process tends to be more studio‑style than throw‑together, encouraging deliberate, relaxed stitching sessions. Overall, the project is satisfying for weekend productivity and thoughtful enough to serve as a meditation during weekday evenings.

What often challenges beginners is maintaining uniform stuffing density across blocks. A light touch helps the puff remain rounded without appearing flat or bulbous. It is helpful to keep a loose supply of stuffing at hand and to test a block’s density against a prepped example before proceeding. The seam stage is where most crafters refine alignment; keeping a consistent seam technique from row to row ensures a neat back and a seamless front. This pattern rewards steady work and yields a final piece that reads as classic crochet craftsmanship rather than a rushed, accidental arrangement.

I tried a substitution: Substituting yarn weight or a different yardage configuration alters both the feel and the finished silhouette of the blanket. When a lighter weight yarn is used in place of a standard worsted, the puff density tends to relax, the overall blanket becomes lighter, and the dimensions shift accordingly. The texture may read airier and the puffs settle with a softer, more delicate presence across the grid. Any substitution of weight requires an adjustment in the hook size and potentially the total yardage needed to reach the same finished footprint. A swatch check before committing to the full project is essential to predict how the puff density and the grid alignment will respond to the new materials. Color integrity can also shift with substitutions; patch color saturation and brightness by comparing the new yarn against the original selection. When substituting, plan for a potentially larger required yardage if the puff density decreases or if the grid expands slightly due to gauge differences. The goal is to maintain the plush feel and visual balance, even if the exact dimensions diverge from the original pattern. The key is to measure frequently and to adjust the block scale through careful stuffing to preserve the intended puff silhouette across the grid.

Crochet Puff Quilt Pattern

Make a cozy puff quilt with our free crochet pattern—step‑by‑step instructions, materials, and seaming tips. Start today!

Beginner Friendly 8-10 Hours
Pattern at a glance
Skill level
Beginner Friendly
Time to make
8-10 Hours
Hook size
5.0 mm (H) or to meet gauge
Yarn weight
Worsted / #4
Finished size
Approx. 54 in x 54 in / 137 cm x 137 cm
Gauge
Each puff square finishes at roughly 3 in x 3 in before stuffing
Yarn used
Total main-color yarn: approx 4,860–6,480 yards (assuming 15–20 yards per square); depends on color choices and yardage per square

Materials Needed

Main Fabric
  • 01
    Worsted weight yarn (#4), roughly 15-20 yds per square, plus yarn for seaming
  • 02
    Color A: Assorted rainbow hues - 4,860–6,480 yards total depending on chosen colors
  • 03
    Color B: White or cream for accents - 100–300 yards
  • 04
    Total yardage varies with color choice; expected to cover 18x18 puff squares and seam work
Tools Required
  • 01
    Crochet hook size 5.0mm (H)
  • 02
    Yarn needle for sewing and weaving in ends
  • 03
    Scissors
  • 04
    Stitch markers
  • 05
    Polyester stuffing for puff squares
  • 06
    Measuring tape for gauge and square sizing
  • 07
    Pins or clips for layout before seaming

— Pattern :

Round 1: Starting in the second ch from the hook, hdc in each ch across. Rotate your work to the other side of the ch and hdc in each ch across. Slst to the starting stitch. (20 stitches)
Round 2: Ch 1 and turn. Hdc in each of the next 20 stitches. Slst to the starting stitch. (20 stitches)
Round 3: Ch 1 and turn. Hdc in each of the next 20 stitches. Slst to the starting stitch. (20 stitches)
Round 4: Ch 1 and turn. Hdc in each of the next 20 stitches. Slst to the starting stitch. (20 stitches)
Round 5: Ch 1 and turn. Hdc in each of the next 20 stitches. Slst to the starting stitch. (20 stitches)
Round 6: Ch 1 and turn. Hdc in each of the next 20 stitches. Slst to the starting stitch. (20 stitches)
Round 7: Ch 1 and turn. Hdc in each of the next 20 stitches. Slst to the starting stitch. (20 stitches)
Round 8: Ch 1 and turn. Hdc in each of the next 20 stitches. Slst to the starting stitch. (20 stitches)

Assembly Instructions

  1. Stuff each piece firmly before closing.
  2. Pin all parts in place and check the proportions against the photos.
  3. Sew parts on securely with matching yarn.
  4. Weave in all ends and shape the finished piece.

Important Notes

  • Begin with a small swatch to check gauge and puff density before starting the full grid; adjust hook size or stuffing depth if needed to maintain uniform puff size across blocks.

  • Maintain a comfortable pace to keep tension even across all puff squares; consistency helps ensure a tidy grid when joining blocks.

  • Choose a color palette early and lay out a rough plan for color placement; having a map reduces random placement and helps the final piece read clearly.

  • Plan for a neat back finish by using a joining method that minimizes visible seams from the back; this helps the front remain seamless and the texture uniform.

This will be a cherished handmade blanket that grows with you, offering colorful comfort and a sense of calm as you stitch. It invites you to explore color and layout while staying grounded in simple crochet techniques and a steady, repeatable workflow. The soft puff texture, combined with a clean, structured grid, yields a blanket that is as inviting to touch as it is pleasing to look at. Enjoy the journey of creating one puff square at a time and watching them come together into a warm, personal treasure. Happy crocheting and may the Puff Quilt bring warmth to everyday moments and celebratory occasions alike. May the puff squares multiply with patience and purpose, and may the finished blanket wrap you in warmth during quiet nights and lively gatherings. The process embodies the beauty of small, consistent efforts adding up to a substantial, comforting result. Let this piece stand as a testament to the joy of making with your hands and the enduring charm of a handmade medley of color and texture. Thank you for choosing this pattern and for weaving care into every stitch. May your Puff Quilt become a family keepsake, a cozy companion on cold afternoons, and a reminder of the mindful simplicity that crochet can offer in a busy world.

Good to know

You ask, we answer

The Puff Quilt finishes at approximately 54 inches by 54 inches (137 cm by 137 cm) when using the recommended yarn and hook, with an 18 by 18 square grid. This dimension is achieved by assembling 324 puff squares into a square footprint and joining them in a neat, even grid.

You will crochet 324 puff squares in total to complete the 18 by 18 grid. Each puff square is crafted individually, then stuffed, closed, and joined to its neighbors to form the full blanket.

Yes. To make a smaller version, reduce the number of puff squares per row and column in increments that preserve a square grid, and adjust yardage accordingly. For example, a 12 by 12 grid would require fewer blocks and correspondingly less yarn, while preserving the plush puff texture.

Yes. It uses foundational crochet techniques, including a simple puff construction and a straightforward joining method. Take time with the foundation work, maintain consistent tension, and count stitches to ensure uniform puff squares as you progress.

Most crocheters complete this project in multiple sessions, with the time varying based on the pace of forming puff squares, color decisions, and the amount of seaming completed in each session. A realistic range accommodates both careful, leisurely stitching and more rapid, goal‑driven completion across several days or weekends.

Stuffing a puff square with soft filling for the puff quilt
Join 100k+ crocheters

Get new free patterns, stitch tips and exclusive content in your inbox.