Free crochet Hatimals pattern with beanie-style animal hats. Learn magic ring, color changes, and facial detailing for baby to adult sizes. Start crocheting today!
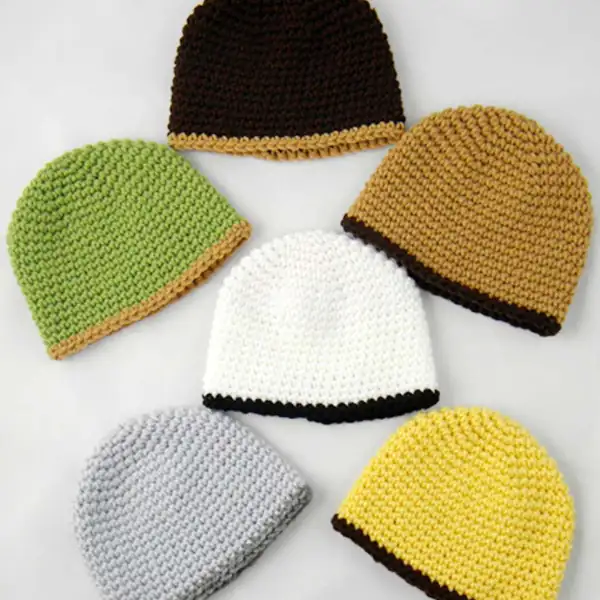
— Basic Beanie :
Round 1: With Main Color (from table on page 3) and “H” hook, CH 2, 6 SC in 2nd CH from hook. (6 SC)
Round 2: 2 SC in each SC around. (12 SC)
Round 3: *1 SC in next SC, 2 SC in next SC*, repeat from * to * around. (18 SC)
Round 4: *1 SC in each of the next 2 SC, 2 SC in next SC*, repeat from * to * around. (24 SC)
Round 5: *1 SC in each of the next 3 SC, 2 SC in next SC*, repeat from * to * around. (30 SC)
Round 6: *1 SC in each of the next 4 SC, 2 SC in next SC*, repeat from * to * around. (36 SC)
Round 7: *1 SC in each of the next 5 SC, 2 SC in next SC*, repeat from * to * around. (42 SC)
Round 8: *1 SC in each of the next 6 SC, 2 SC in next SC*, repeat from * to * around. (48 SC)
Round 9: 1 SC in each SC around. (48 SC)
— Part 2 :
Round 9: *1 SC in each of the next 7 SC, 2 SC in next SC*, repeat from * to * around. (54 SC)
Round 10: 1 SC in each SC around. (54 SC)
— Part 3 :
Round 9: *1 SC in each of the next 7 SC, 2 SC in next SC*, repeat from * to * around. (54 SC)
Round 10: *1 SC in each of the next 8 SC, 2 SC in next SC*, repeat from * to * around. (60 SC)
Round 11: 1 SC in each SC around. (60 SC)
— Part 4 :
Round 9: *1 SC in each of the next 7 SC, 2 SC in next SC*, repeat from * to * around. (54 SC)
Round 10: *1 SC in each of the next 8 SC, 2 SC in next SC*, repeat from * to * around. (60 SC)
Round 11: *1 SC in each of the next 9 SC, 2 SC in next SC*, repeat from * to * around. (66 SC)
Round 12: 1 SC in each SC around. (66 SC)
— Part 5 :
Round 9: *1 SC in each of the next 7 SC, 2 SC in next SC*, repeat from * to * around. (54 SC)
Round 10: *1 SC in each of the next 8 SC, 2 SC in next SC*, repeat from * to * around. (60 SC)
Round 11: *1 SC in each of the next 9 SC, 2 SC in next SC*, repeat from * to * around. (66 SC)
Round 12: *1 SC in each of the next 10 SC, 2 SC in next SC*, repeat from * to * around. (72 SC)
Round 13: 1 SC in each SC around. (72 SC)
— Part 6 :
Round 1: 14” – 16” SC in next 7 SC, CH 1, turn. (8 SC)
Round 2: Skip first SC, SC in each SC across, CH 1, turn. Repeat Row 2 until only 1 SC remains. Fasten off. Remove marker.
— Part 7 :
Round 1: 14” – 16” SC in next 7 SC, CH 1, turn. (8 SC)
Round 2: Skip first SC, SC in each SC across, CH 1, turn. Repeat Row 2 until only 1 SC remains. Fasten off. Remove marker.
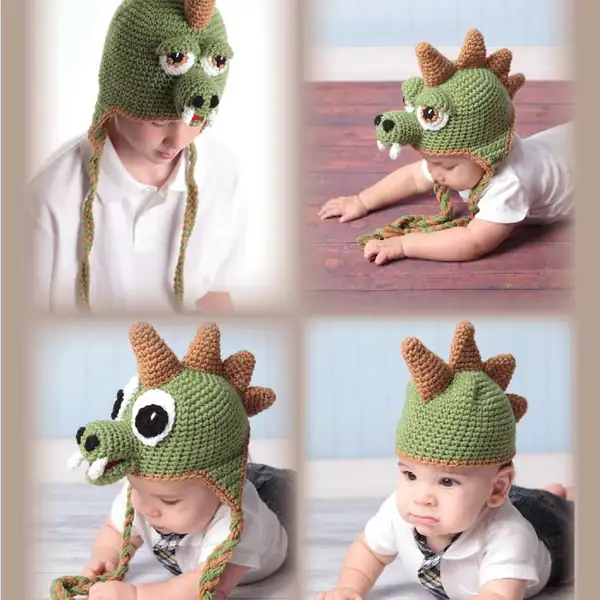
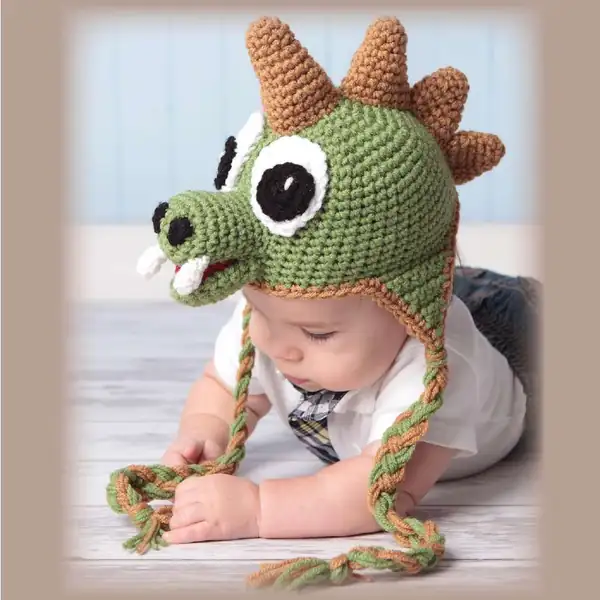
— Dinosaur :
Round 1: With Trim Color (from table on page 3) and an “H” hook, CH 2, 4 SC in 2nd CH from hook. Use a stitch marker as needed. (4 SC)
Round 2: 2 SC in each SC around. (8 SC)
Round 3: SC in each SC around. (8 SC)
Round 4: SC in each SC around. (8 SC)
Round 5: *2 SC in next SC, SC in next SC*, repeat from * to * around. (12 SC)
Round 6: SC in each SC around. (12 SC)
Round 7: SC in each SC around. (12 SC)
Round 8: *2 SC in next SC, SC in next 2 SC*, repeat from * to * around. (16 SC)
Round 9: SC in each SC around. (16 SC)
Round 10: SC in each SC around. (16 SC)
Round 11: SC in each SC around. (16 SC)
Round 12: SC in each SC around, SLST in next SC, fasten off leaving an 8” tail for sewing. (16 SC)
— Tail :
Round 1: With Trim Color (from table on page 3) and an “H” hook, CH 2, 4 SC in 2nd CH from hook. Use a stitch marker as needed. (4 SC)
Round 2: 2 SC in each SC around. (8 SC)
Round 3: SC in each SC around. (8 SC)
Round 4: SC in each SC around. (8 SC)
Round 5: *2 SC in next SC, SC in next SC*, repeat from * to * around. (12 SC)
Round 6: SC in each SC around. (12 SC)
Round 7: SC in each SC around. (12 SC)
Round 8: *2 SC in next SC, SC in next 2 SC*, repeat from * to * around. (16 SC)
Round 9: SC in each SC around, SLST in next SC, fasten off leaving an 8” tail for sewing. (16 SC)
— Small Scales (make 2 or more) :
Round 1: With Trim Color (from table on page 3) and an “H” hook, CH 2, 4 SC in 2nd CH from hook. Use a stitch marker as needed. (4 SC)
Round 2: 2 SC in each SC around. (8 SC)
Round 3: SC in each SC around. (8 SC)
Round 4: *2 SC in next SC, SC in next SC*, repeat from * to * around. (12 SC)
Round 5: SC in each SC around. (12 SC)
Round 6: *2 SC in next SC, SC in next 2 SC*, repeat from * to * around. (16 SC)
Round 7: SC in each SC around, SLST in next SC, fasten off leaving an 8” tail for sewing. (16 SC)
— Part 11 :
Round 1: With White and “F” hook, CH 2, 3 SC in 2nd CH from hook. Do not join. (3 SC)
Round 2: 2 SC in first SC, 1 SC in next 2 SC. (4 SC)
Round 3: 1 SC in each SC around, SLST to join. fasten off leaving small tail to sew. (4 SC)
— Part 12 :
Round 1: With Black and “F” hook, CH 2, 3 SC in 2nd CH from hook, SLST to join, fasten off leaving a small tail to sew with. Proceed to the Facial Features section to determine what type of eyes you want your hat to have!;
— Bear :
Round 1: With Trim Color (from table on page 3) and an “H” hook, CH 2, 6 SC in 2nd CH from hook, SLST to join, CH 1. (6 SC)
Round 2: 2 SC in each SC around, SLST to join, CH 1. (12 SC)
Round 3: 2 SC in each SC around, SLST to join, fasten off and set aside. (24 SC)
— Bear :
Round 1: With Main Color (from table on page 3) and an “H” hook, CH 2, 6 SC in 2nd CH from hook, SLST to join, CH 1. (6 SC)
Round 2: 2 SC in each SC around, SLST to join, CH 1. (12 SC)
Round 3: 2 SC in each SC around, SLST to join, CH 1, turn. (24 SC)
Round 4: Pick up inside ear and with wrong sides facing each other, working through both thicknesses, 1 SC in each SC around, SLST to join, fasten off leaving a tail to sew with. (24 SC)
— Puppy :
Round 1: With Trim Color (from table on page 3) and an “H” hook, CH 11, 1 SC in 2nd CH from hook, 1 SC in each of the next 8 CH, 3 SC in last CH. Working on opposite side of CH, 1 SC in each of the next 9 SC, CH 1, turn. (21 SC)
Round 2: 1 SC in each of the next 9 SC, 2 SC in each of the next 3 SC, 1 SC in each of the last 9 SC, CH 1, turn. (24 SC)
Round 3: 1 SC in each of the next 9 SC, *2 SC in next SC, 1 SC in next SC*, repeat from * to * 2 more times, 1 SC in each of the next 9 SC, CH 1, turn. (27 SC)
Round 4: 1 SC in each of the next 9 SC, *2 SC in the next SC, 1 SC in each of the next 2 SC*, repeat from * to * 2 more times, 1 SC in each of the next 9 SC, CH 1, turn. (30 SC)
— Wolf :
Round 1: With Trim Color (from table on page 3) and an “H” hook, CH 2, 1 SC in 2nd CH from hook, CH 1, turn. (1 SC)
Round 2: 2 SC in next SC, CH 1, turn. (2 SC)
Round 3: 2 SC in each SC across, CH 1, turn. (4 SC)
Round 4: 1 SC in each SC across, CH 1, turn. (4 SC)
Round 5: 2 SC in first SC, 1 SC in next 2 SC, 2 SC in last SC, CH 1, turn. (6 SC)
Round 6: 1 SC in each SC across, CH 1, turn. (6 SC)
Round 7: 2 SC in first SC, 1 SC in next 4 SC, 2 SC in last SC, CH 1, turn. (8 SC)
Round 8: 1 SC in each SC across. (8 SC)
Round 9: Pick up inside ear and with wrong sides facing each other, working through both thicknesses, 1 SC in each SC around, put 3 SC in each of the 3 corners to round the corners, SLST to join, fasten off leaving a tail to sew with. Proceed to the Facial Features section to determine what type of eyes you want your hat to have!;
— Panda :
Round 1: With Trim Color (from table on page 3) and an “H” hook, CH 2, 6 SC in 2nd CH from hook, SLST to join, CH 1. (6 SC)
Round 2: 2 SC in each SC around, SLST to join, CH 1. (12 SC)
Round 3: 2 SC in each SC around, SLST to join, fasten off and set aside. (24 SC)
— Panda :
Round 1: With Trim Color (from table on page 3) and an “H” hook, CH 2, 6 SC in 2nd CH from hook, SLST to join, CH 1. (6 SC)
Round 2: 2 SC in each SC around, SLST to join, CH 1. (12 SC)
Round 3: 2 SC in each SC around, SLST to join, CH 1, turn. (24 SC)
Round 4: Pick up inside ear and with wrong sides facing each other, working through both thicknesses, 1 SC in each SC around, SLST to join, fasten off leaving a tail to sew with. (24 SC)
— Part 19 :
Round 1: With Black and “H” hook, CH 5, 1 SC in 2nd CH from hook, 1 SC in next 2 CH, 3 SC in last CH. Working on opposite side of CH, 1 SC in next 2 CH, 2 SC in last CH. Do not join. Use stitch marker if needed.
Round 2: 2 SC in next SC, SC in next 2 SC, 2 SC in next 3 SC, 1 SC in next 2 SC, 2 SC in next 2 SC. (16 SC)
Round 3: 1 SC in next SC, 2 SC in next SC, 1 SC in each of the next 2 SC, *1 SC in next SC, 2 SC in next SC*, repeat from * to * 2 more times, SC in next 2 SC, *1 SC in next SC, 2 SC in next SC*, repeat from * to * 1 more time, SLST to join, fasten off leaving a tail to sew with. (22 SC)
— Part 20 :
Round 1: With White and “H” hook, CH 2, 6 SC in 2nd CH from hook. (6 SC)
Round 2: 2 SC in each SC around, SLST to join, fasten off leaving a tail to sew with. (12 SC)
— Part 21 :
Round 1: With Black and “H” hook, CH 2, 6 SC in 2nd CH from hook, SLST to join, fasten off leaving a tail to sew with. (6 SC)
— Nose :
Round 1: With Main Color (from table on page 3) and an “H” hook, CH 5, 2 SC in 2nd CH from hook, SC in next 2 SC, 3 SC in last CH, working on opposite side of chain, 1 SC in next 3 CH. (10 SC)
Round 2: 1 SC in each SC around. (10 SC)
Round 3: 3 SC in next SC, SC in next 4 SC, 3 SC in next SC, 1 SC in next 4 SC. (14 SC)
Round 4: 1 SC in next SC, 3 SC in next SC, 1 SC in next 6 SC, 3 SC in next SC, 1 SC in next 5 SC. (18 SC)
Round 5: 1 SC in each SC around, at end of round 7, SLST to join, fasten off leaving a tail for sewing. (18 SC)
Round 6: 1 SC in each SC around, at end of round 7, SLST to join, fasten off leaving a tail for sewing. (18 SC)
Round 7: 1 SC in each SC around, at end of round 7, SLST to join, fasten off leaving a tail for sewing. (18 SC)
— Part 23 :
Round 1: With Trim Color (from table on page 3) and an “H” hook, CH 2, 6 SC in 2nd CH from hook, do not join. (6 SC)
Round 2: 2 SC in each SC around. (12 SC)
Round 3: *1 SC in next SC, 2 SC in next SC*, repeat from * to * around. (18 SC)
Round 4: SC in each SC around. (18 SC)
Round 5: SC in each SC around. (18 SC)
Round 6: *SC in next SC, SC DEC next two SC*, repeat from * to * around, SLST to join, fasten off. (12 SC)
Round 7: Attach Main Color in any SC with a SC, SC in each SC around. (12 SC)
Round 8: SC in each SC around, at the end of Rnd 10, SLST to join, fasten off leaving a tail to sew with. Lightly stuff to desired firmness. *NOTE* For taller horns, repeat Rnd 8 a few more times to desired height.
Round 9: SC in each SC around, at the end of Rnd 10, SLST to join, fasten off leaving a tail to sew with. Lightly stuff to desired firmness. *NOTE* For taller horns, repeat Rnd 8 a few more times to desired height.
Round 10: SC in each SC around, at the end of Rnd 10, SLST to join, fasten off leaving a tail to sew with. Lightly stuff to desired firmness. *NOTE* For taller horns, repeat Rnd 8 a few more times to desired height.
— Part 24 :
Round 1: With Main Color (from table on page 3) and an “H” hook, CH 2, 4 SC in 2nd CH from hook, do not join. (4 SC)
Round 2: 2 SC in next SC, SC in next SC, 2 SC in next SC, SC in next SC. (6 SC)
Round 3: *SC in next SC, 2 SC in next SC*, repeat from * to * 2 more times. (9 SC)
Round 4: SC in each SC around. (9 SC)
Round 5: *SC in next 2 SC, 2 SC in next SC*, repeat from * to * 2 more times. (12 SC)
Round 6: *SC in next 2 SC, 2 SC in next SC*, repeat from * to * 3 more times. (16 SC)
Round 7: SC in each SC around. (16 SC)
Round 8: SC in each SC around. (16 SC)
Round 9: *SC in next 3 SC, 2 SC in next SC*, repeat from * to * around. (20 SC)
Round 10: *SC in next 4 SC, 2 SC in next SC*, repeat from * to * around. (24 SC)
Round 11: *SC DEC next 2 SC together*, repeat from * to * around. (12 SC)
Round 12: *SC DEC next 2 SC together*, repeat from * to * around, SLST to join, fasten off leaving tail for sewing. (6 SC)
— Part 25 :
Round 1: With Trim Color (from table on page 3) and an “G” hook, CH 7, 2 SC in 2nd CH from hook, 1 SC in next 4 CHs, 2 SC in last CH, CH 1, turn. (8 SC)
Round 2: 2 SC in 1st SC, 1 SC in next 5 SC, skip last 2 SC, CH 1, turn. (7 SC)
Round 3: 1 SC in 6 SC, 2 SC in last SC, CH 1, turn. (8 SC)
Round 4: 1 SC in next 7 SC, Skip last SC, CH 1, turn. (7 SC)
Round 5: 1 SC in next 6 SC, Skip last SC, CH 1, turn. (6 SC)
Round 6: 1 SC in next 5 SC, Skip last SC, fasten off leaving a tail for sewing. (5 SC)
— Part 26 :
Round 1: With Trim Color (from table on page 3) and an “F” hook, CH 5, 1 SC in 2nd CH from hook, 1 SC in next 2 CH, 2 SC in last CH, CH 1, turn. (5 SC)
Round 2: 2 SC in 1st SC, 1 SC in next SC, 1 SLST in next SC, CH 1, turn. (3 stitches)
Round 3: 1 SC in next 2 SC, 2 SC in last stitch, CH 1, turn. (4 SC)
Round 4: 2 SC in next SC, 1 SC in next 3 SC, CH 1, turn. (5 SC)
Round 5: SC in next 4 SC, SLST in the last stitch, fasten off leaving a tail for sewing. (5 stitches)
— Facial Features :
Round 1: With Main Color (from table on page 3) and an “H” hook, CH 2, 6 SC in 2nd CH from hook. Do not join. (6 SC)
Round 2: 2 SC in each SC around. (12 SC)
Round 3: *1 SC in next SC, 2 SC in next SC*, repeat from * to * around. (18 SC)
Round 4: SC in each SC around. (18 SC)
Round 5: SC in each SC around. (18 SC)
Round 6: SC in each SC around. (18 SC)
Round 7: SC in each SC around. (18 SC)
Round 8: SC in each SC around. (18 SC)
Round 9: SC in each SC around, SLST to join, fasten off leaving a tail to sew with. (18 SC)
— Part 28 :
Round 1: With Black and “H” hook, CH 2, 6 SC in 2nd CH from hook. Do not join. (6 SC)
Round 2: 2 SC in each SC around. (12 SC)
Round 3: 1 SC in each SC around. (12 SC)
Round 4: SC Dec around 6 times, SLST to join, fasten off leaving a tail to sew with. (6 SC)
— Part 29 :
Round 1: With White and “H’ hook, CH 5, 1 SC in 2nd CH from hook, 1 SC in next 2 CH, 3 SC in last CH, working on opposite side of CH, 1 SC in next 2 CH, 2 SC in last CH, do not join. Use stitch marker if needed. (10 SC)
Round 2: 2 SC in next SC, SC in next 2 SC, 2 SC in next 3 SC, 1 SC in next 2 SC, 2 SC in next 2 SC. (16 SC)
Round 3: 1 SC in next SC, 2 SC in next SC, 1 SC in each of the next 2 SC, *1 SC in next SC, 2 SC in next SC*, repeat from * to * 2 more times, SC in next 2 SC, *1 SC in next SC, 2 SC in next SC*, repeat from * to * 1 more time, SLST to join, fasten off leaving a tail to sew with. (22 SC)
— Part 30 :
Round 1: With Black and “H” hook, CH 2, 6 SC in 2nd CH from hook. Do not join. (6 SC)
Round 2: 2 SC in each SC around, SLST to join, fasten off leaving a tail to sew with. (12 SC)
— Part 31 :
Round 1: With Main Color and “H” hook, CH 2, 5 SC in 2nd CH from hook. Do not join. (5 SC)
Round 2: 2 SC in each SC around. (10 SC)
Round 3: *1 SC in next SC, 2 SC in next SC*, repeat from * to * around. (15 SC)
Round 4: 1 SC in each SC around. (15 SC)
Round 5: 1 SC in each SC around. (15 SC)
Round 6: 1 SC in each SC around, SLST to join, fasten off leaving a tail to sew with. (15 SC)
— Part 32 :
Round 1: With Red and “H” hook, CH 2, 6 SC in 2nd CH from hook, CH 1, turn. (6 SC)
Round 2: *2 SC in first SC, 1 SC in next SC*, repeat from * to * across, fasten off leaving a tail to sew with. (9 SC)
— Part 33 :
Round 1: With Black and “F” hook, CH 2, 6 SC in 2nd CH from hook, SLST to join, fasten off. (6 SC)
Round 2: Attach Warm Brown (or eye color of choice) in any SC with a SC, SC again in same SC, 2 SC in each SC around, SLST to join, fasten off. (12 SC)
Round 3: Attach White in any SC with a SC, 2 SC in next SC, *SC in next SC, 2 SC in next SC*, repeat from * to * around, do not join. (18 SC)
Round 4: SC in each SC around, SLST to join, fasten off leaving a long tail to sew with. (18 SC)
— Part 34 :
Round 1: With Main Color (from table on page 3) and an “H” hook, CH 2, 6 SC in 2nd CH from hook, do not join. (6 SC)
Round 2: 2 SC in each SC around. (12 SC)
Round 3: *SC in next SC, 2 SC in next SC* repeat from * to * 5 more times. (18 SC)
Round 4: *2 SC in next SC, SC in next SC, 2 SC in next SC, SC in next 6 SC*, repeat from * to * one time, SC in next 2 SC. (22 SC)
— Part 35 :
Round 1: Fold piece in half and working through both thicknesses SC in each SC across, finish off leaving a tail to sew with. (11 SC)
Round 2: Fold the mouth flat and whip stitch the ends closed. Sew the tongue to the top of the mouth 3. Sew the mouth to the hat beneath the snout.
Round 4: Sew or whip stitch the nose onto the top of the snout. For the Dino hat, sew on the nostrils and sew the teeth onto the snout in desired position. 5. For Cartoon Eyes, if desired add a white dot for “glint” to the black pupil and then sew the pupil of the eyes to the white backs.
This set of Hatimals hats is designed to bring a smile to every little face. Crafted with care, each hat blends friendly character with practical warmth, perfect for chilly days and cozy photo moments. You’ll find that the stitches are forgiving and the assembly straightforward, making it a satisfying project for confident beginners and seasoned crocheters alike. Enjoy turning yarn into a small, lovable creature that can be worn, shared, or given as a thoughtful gift. You’re creating a small treasure that will be treasured for years to come. Happy crocheting!