Crochetologist
Free Crochet Pattern
Beautiful Detailed Adorable

Crochet Girl Portrait Amigurumi Pattern

Face close-up crochet girl amigurumi with sunglasses
4.0Rating
5-7 HoursTime
Beginner FriendlySkill
Highlights

What makes it special

Made with Love

An adorable friend to cherish, handcrafted with love to bring comfort and joy for years to come.

Weekend Treat

Takes 5-7 hours, offering a satisfying, relaxed pace that fits a weekend project with room for creative color tweaks and personal detailing.

Beginner Friendly Level

This project operates at an entry-level pace with a clear sequence that builds confidence in working in the round, shaping the facial area, and performing simple color changes. It emphasizes consistent tension, clean color transitions, and straightforward assembly, while delivering a visually striking crochet portrait that remains approachable for those building foundational amigurumi skills. The steps are designed to reinforce basic crochet competencies—round-by-round progression, careful stuffing, and tidy seaming—without introducing advanced or unfamiliar techniques. The result is a complete character that demonstrates how steady practice yields a polished, display-ready piece.

Step into a compact world where yarn becomes a portable character you can cradle on a desk or shelf. This project transforms a skein into a small portrait of a girl, head-and-shoulders, wearing sunglasses and a striped shirt, with hair that catches light in simple, friendly strands. The approach emphasizes clear, repeatable steps, tidy finishing, and a playful attention to detail. You’ll crochet separate pieces—the face, neck, hair, shirt, and tiny accessories—and join them with careful seams to produce a smooth, cohesive silhouette. The result is an amiable keepsake that feels crafted rather than merely stuffed, a tiny sculpture you can hold and display with pride. Because the build unfolds in modular stages, you can pause after each section to check proportions, adjust color blocks, and approach the next component with confidence. Expect a patient, mindful workflow, with opportunities to tweak lip color, hair shine, and sunglasses glare through straightforward color changes and small stitches. Materials are forgiving, and the instruction path is designed to support steady progress without rushing toward a rushed finish. This piece invites personalization—swap hair color, shirt stripes, or accessory accents to reflect a friend’s style or your own imaginative palette.

About This Crochet Girl Portrait Amigurumi Pattern

This Crochet Girl Portrait is a small amigurumi-inspired figure that resembles a stylish girl wearing sunglasses and a striped shirt. The project balances facial shaping with hair creation and fashion details to convey personality in miniature form. The design includes a face, neck, shirt, hair, and optional accessories that can be customized to yield a unique look. Finishing emphasizes clean seam work and neat color transitions, while simple assembly keeps the process approachable for crocheters who are comfortable working in the round. The pattern invites personalization—try different hair colors, lip tones, or shirt stripe combinations to craft a distinct character that feels like your own.

Color theory and yarn choices influence the final look, so feel free to experiment with palettes that suit a room’s mood or a gift recipient’s preferences. The portrait can become a mini fashion muse when you adjust sunglasses frames, lip color, and shirt hues. You’ll learn to crochet the pieces in standard amigurumi fashion, with attention to balanced tension and even stuffing around the face to maintain a smooth contour. Optional accessories provide opportunities to extend the build without complicating the core assembly. This pattern encourages experimentation while keeping each step straightforward and clearly explained, so you stay on track and enjoy the process from start to finish.

Hair bun and striped shirt crochet on the girl portrait

With accessible stitches and clear, friendly language, this project supports a confident start as you complete each component and practice precise assembly. The instruction set guides you through the face, neck, and clothing in a logical sequence, then adds flair with optional accessories that can be swapped for your own style. The result is a complete, endearing portrait you can proudly display or gift. Color choices influence the look, so feel free to mix hues for skin, hair, and clothing that reflect personal taste or a room’s decor. As you work, you’ll build consistency in tension and neatness, essential skills that transfer to future crochet projects and pave the way for more experienced amigurumi adventures. The method remains firmly in the realm of crochet, avoiding specialized textures or invented stitches, and instead focusing on reliable, well-known techniques that yield a polished finish.

Stitches & Skills You'll Use

The core technique centers on working in the round with single crochet and controlled increases to shape the head, neck, and shoulders. Beginning with a foundation chain for the starting tail, you crochet around to build the facial contour, gradually increasing to create width, then easing with decreases toward the jawline. Color changes are introduced through simple strand rotation, which keeps yarn management tidy and minimizes ends to weave. You’ll keep surface texture minimal to preserve a smooth face, and you’ll use small stitches to define lips through light embroidery or color adds, if you choose. The sunglasses are a straightforward geometric addition crafted from a few tight rounds that form rectangular frames; these frames attach with minimal seam exposure and sit flush against the cheeks. Hair is crocheted as a separate module and then attached to the head to preserve a natural fall around the face, allowing you to adjust part lines and strand directions without disturbing the facial shaping. Attaching the hair, shirt, and accessories requires careful alignment to maintain a cohesive silhouette; you’ll line up the shoulder seam and neck with the collarbone area to achieve a believable posture. When assembling, a gentle slip-stitch seam helps maintain a clean look along the edges, and stuffing is applied cautiously to preserve facial shape without creating pressure points. Invisible decreases are an option for sculpting the jawline or chin without creating harsh lines, a technique you can employ if you prefer a subtle transition. As you progress, you’ll notice the rhythm of rounds becomes predictable: rounds for the head, then a controlled taper into the neck, followed by attaching the shirt and decorative elements. The final assembly emphasizes alignment and balance, ensuring the pieces look like a single figure rather than several parts joined together. The result is a polished, display-worthy portrait that emphasizes practicality and charm over gimmickry, a testament to how a few simple stitches can convey personality and style.

Why You'll Love This Crochet Girl Portrait Amigurumi Pattern

You’ll love this project for its balance of charm and practicality. The build teaches reliable, beginner-friendly steps while inviting customization at every turn, so your final piece reflects personal style. The modular approach makes it easy to pace yourself, pause between sections, and inspect the shaping of the face, the fit of the neck, and the placement of the stripes on the shirt. The result is a friendly portrait that reads as a single, cohesive figure rather than a collection of disparate parts. The ease of color changes encourages experimentation without fear of ruining the shape, and the optional accessories let you tailor the character for different occasions or recipients. The overall effect is a compact, display-worthy piece that sits comfortably on a shelf or desk, ready to spark conversation or brighten a workspace. If you enjoy color blocks, small-scale facial features, and a gentle challenge that remains accessible, this pattern offers a satisfying, repeatable process that yields a complete character with personality.

Colour & Yarn Inspiration

Opt for a bold, sunny palette with bright skin tones and a striped shirt featuring electric blues and pinks for a modern pop. For a softer aesthetic, choose a pastel skin shade, a light peach shirt, and neutral sunglasses for a retro vibe. Explore hair color with a deep espresso for depth or a warm brown for a gentler look, then balance lip color with a complementary shade. Yarn substitutions can dramatically alter texture: cotton DK provides a crisp silhouette with clean edges, while soft acrylic worsted yields a plush feel. For a shinier finish, select yarns with a slight sheen to accentuate the sunglasses and hair highlights. Matte or metallic threads can be used to simulate metal frames for the sunglasses without complicating construction. Keep in mind color fastness and washability when choosing hues for a display piece that will be handled or gifted.

Two heart-shaped patches and portrait backdrop

Switch Things Up

Experiment with color to create distinctive variants. Swap the hair color and sunglasses for bold high-contrast combinations or softer tones to suit a room’s decor. A tiny felt backdrop or a matching mini accessory set can extend the theme without altering the core pattern—think a small scarf, a bracelet, or a miniature tote that echoes the same color palette. Try different facial expressions through lip color or subtle embroidery for a hint of a smile or a blush, keeping the techniques simple and achievable. If you want a larger version for display, use a slightly heavier yarn and a proportionally larger hook, but maintain stitch density to prevent floppy results. Consider building a family gallery by creating multiple portraits with a shared color family yet distinct personalities. When gifting, add a small tag that hints at the details included in the build—this encourages the recipient to spot the accessorized accents and color choices you embedded in each figure.

Ways to Use & Gift It

This Crochet Girl Portrait makes a charming gift for teens and adults who enjoy handmade decor or whimsical desk companions. Present it as a desk buddy for an artist, a thoughtful keepsake for a friend who appreciates crafty display pieces, or a small memento for a special occasion. Its compact size makes it easy to include with a handwritten note and a matching tote or mug cozy that echoes the same color palette. Display it on a bookshelf, near a computer monitor, or on a gallery wall that features other small amigurumi. The portrait also works well as a commemorative gift for birthdays, graduations, or any celebration that calls for a handmade sentiment. A crocheted mini scarf or a tiny sunglasses charm can extend the theme into a small gift set that reads as a cohesive, thoughtful ensemble.

Common Mistakes & How to Fix Them

Losing your stitch count — place a marker at the start of each round. Working too loosely, which lets the stuffing show through the fabric. Forgetting to stuff firmly before closing a piece. Sewing parts on before pinning and checking the proportions.

Maker's Notes

During testing, worsted weight yarn in skin, hair, and shirt colors was paired with a 5 mm hook. The assembly took about 6 hours, including finishing touches. It was important to stuff gently around the face to maintain a smooth contour and to hold two ends of yarn together when starting color changes to prevent tension shifts. Marking rounds can help beginners prevent miscounts, especially during neck shaping and when attaching the shirt. The sunglasses provide a strong focal point that anchors the facial area, and the modest size helps maintain proportion throughout assembly. Overall, the process was calm and steady, yielding a character with personality and a finish that reads as polished rather than rushed. If you’re new to this pattern, approach each section deliberately, and don’t rush the seam work; gradual progress pays off in the final, cohesive look.

I tried a substitution: When substituting DK weight yarn with a 4.5 mm hook, the head reduces by about 1 cm in diameter, necessitating extra rounds on the face to preserve the overall silhouette. The finish remains neat, but the denser weave requires careful attention to seam edges to prevent gaps. Plan for a bit more stuffing to maintain the intended shape and maintain the same balance of head-to-neck proportions. If using DK weight, allow for a slightly longer neck and a few additional rounds on the head area to keep the final proportions similar to the original. Always recheck the scale visually against the rest of the pieces as you work and adjust as needed to maintain harmony among features.

Crochet Girl Portrait Amigurumi Pattern

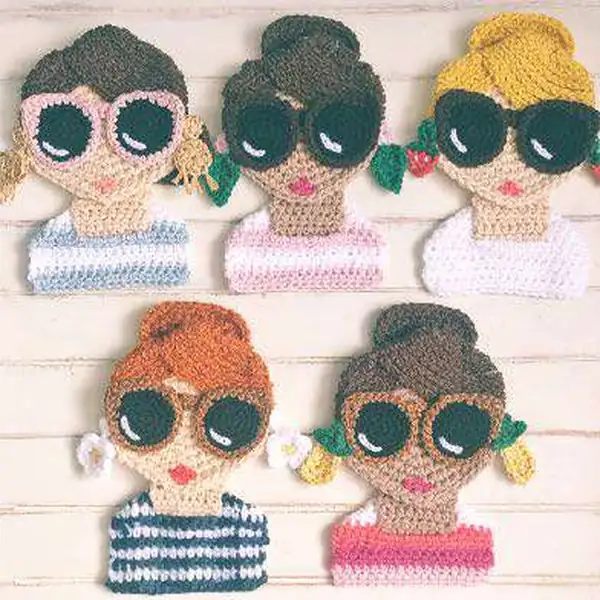
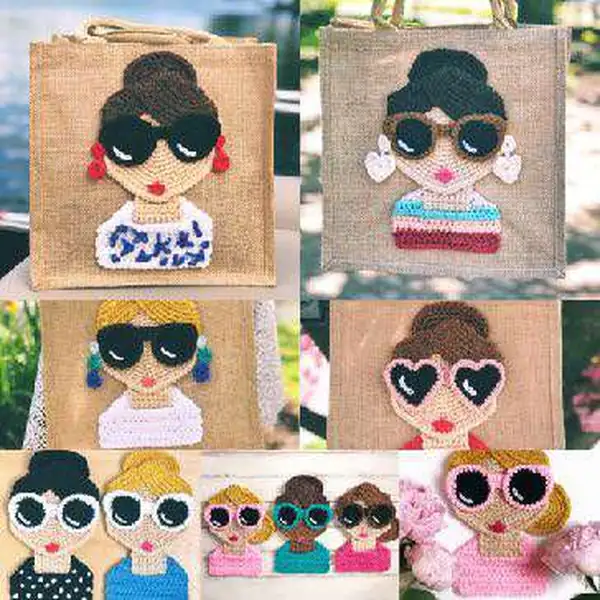
Download this free crochet pattern for a Crochet Girl Portrait amigurumi. Includes complete rounds, materials, and assembly tips. Start your creative journey now!

Beginner Friendly 5-7 Hours
Pattern at a glance
Skill level
Beginner Friendly
Time to make
5-7 Hours
Hook size
5.00 mm (H/8)
Yarn weight
Worsted / #4
Finished size
Approx. 5 cm / 2.0 in (varies with yarn, hook and stuffing)
Gauge
Gauge not required; size varies with yarn weight and hook. Maintain even tension to avoid gaps.
Yarn used
Approx. 180-220 g total yarn (skin, hair, shirt, accessories) with variations by color choice

Materials Needed

Main Fabric
  • 01
    Worsted / DK yarn in your chosen colours
Tools Required
  • 01
    0 mm crochet hook
  • 02
    Stitch markers
  • 03
    Yarn needle
  • 04
    Fibrefill stuffing
  • 05
    Scissors
  • 06
    Safety eyes (optional)

— Face :

Round 1: Work 6 sc into ring - 6 sts. Do not join, continue in a spiral.
Round 2: (2 sc) in each st —12 sts;
Round 3: [(2 sc) in next sc, sc in next sc]— 18 sts;
Round 4: [(2 sc) in next sc, sc in next 2 sc]— 24 sts;
Round 5: [(2 sc) in next sc, sc in next 3 sc]— 30 sts;
Round 6: [(2 sc) in next sc, sc in next 4 sc]— 36 sts;
Round 7: [(2 sc) in next sc, sc in next 5 sc]— 42 sts;
Round 8: [(2 sc) in next sc, sc in next 6 sc]— 48 sts;
Round 9: [(2 sc) in next sc, sc in next 7 sc]— 54 sts;
Round 10: [(2 sc) in next sc, sc in next 8 sc] — 60 sts;
Round 11: [(2 sc) in next sc, sc in next 9 sc]— 66 sts;

— Neck :

Round 11: [(2 sc) in next sc, sc in next 10 sc]— 72 sts Fasten off and weave in ends. Neck With the same skin color from the face, ch 9;

— Shirt :

Round 1: Sc in the 2nd chain from the hook, sc in each sc across, ch 1 and turn - 8 sc;
Round 2: Sc in each stitch across - 8 sc Fasten off and weave ends. Shirt With desired shirt color, chain 20;
Round 3: Sc in each stitch across - 8 sc Fasten off and weave ends. Shirt With desired shirt color, chain 20;
Round 4: Sc in each stitch across - 8 sc Fasten off and weave ends. Shirt With desired shirt color, chain 20;
Round 5: Sc in each stitch across - 8 sc Fasten off and weave ends. Shirt With desired shirt color, chain 20;
Round 6: Sc in each stitch across - 8 sc Fasten off and weave ends. Shirt With desired shirt color, chain 20;
Round 7: Sc in each stitch across - 8 sc Fasten off and weave ends. Shirt With desired shirt color, chain 20;
Round 8: Sc in each stitch across - 8 sc Fasten off and weave ends. Shirt With desired shirt color, chain 20;
Round 9: Sc in each stitch across - 8 sc Fasten off and weave ends. Shirt With desired shirt color, chain 20;

— Hair :

Round 1: Hdc in 3rd ch from hook, hdc in each ch across, turn — 18 hdc;
Round 2: Ch 2, hdc in each hdc across, turn.
Round 3: Ch 2, hdc in each hdc across, turn.
Round 4: Ch 2, hdc in the next 5 hdc, chain 8, rejoin, hdc in last 5 hdc, turn. Row 4: Ch 2, hdc in the next 5 hdc, hdc 8 into chain, hdc in last 5 hdc, turn. Rows 5-10: Ch 2, hdc in each sc across, turn. Fasten off and weave ends. Use tapestry needle and make french knots in various locations for the shirts’ polka-a-dot pattern. You can also leave in plain or repeat pattern changing colors every other row for a striped shirt. Fold the top corners on shirt backwards to make shoulders.

— Side Low Bun :

Round 1: Chain 8, hdc in the third chain from the hook, hdc 4, 3 hdc in the last chain and rotate your work so you are working on the other side of the chain. 4 more hdc across the bottom of the original chain, 2 more hdc in the first chain. Now you have 3 hdc on each end separated by 4 hdc. (14 hdc)
Round 2: Do not join. Make 2 hdc in the first hdc from round one. 1 hdc in the next 4 hdc, 2 hdc in each of the next three stitches, hdc 4, 2 hdc in the next 2 stitches. (20 hdc)
Round 3: Do not join. 1 hdc in the first stitch, 2 hdc in the next, hdc in the next 4 stitches, *2 hdc in the next stitch, 1 hdc in the next stitch*repeat from *-* two more times. Hdc in the next 4 stitches, 2 hdc in the next 1 hdc in the next. Repeat from *—* one more time. Finish off and weave ends. (26 hdc)

— Head :

Round 1: Work 6 sc into ring— 6 sts. Do not join, continue in spiral. Round 2: (2 sc) in each st —12 sts;
Round 3: [(2 sc) in next sc, sc in next sc] — 18 sts;
Round 4: [(2 sc) in next sc, sc in next 2 sc] — 24 sts;
Round 5: [(2sc)in next sc, sc in next3sc] —30sts;
Round 6: [(2 sc) in next sc, sc in next 4 sc] — 36 sts Pearls Using white yarn, 6 sc into magic ring. Pull tight and finish. Make as many as desired. Place earrings on side of head and necklace along top of shirt. Use hot glue or tapestry needle and yarn to put in place. Sunglasses MAKE 2 With lens color—- either brown or black;

— Make :

Round 1: Work 6 sc into ring— 6 sts. Do not join, continue in spiral.
Round 2: (2 sc) in each st —12 sts;
Round 3: [(2 sc) in next sc, sc in next sc] — 18 sts;
Round 4: [(2 sc) in next sc, sc in next 2 sc] — 24 sts Change to desired sunglass color with a slip stitch anywhere in the last round.
Round 5: 7sc, hcd in next 2 sc, 2dc in next 2 sc, hdc in next 2 sc, sc in the rest of the stitches. Finish off. Bridge With Sunglass color, chain 6, sc in second chain from hook, finish off chain with sc. Finish off and weave ends.

— Pearls :

Round 1: Sc in 2nd ch from hook, sc in each ch across, turn — 12 sc;
Round 2: Ch 1, sc in each sc across, do not turn.
Round 3: Chain 5, sc in 2nd chain from hook, sc back toward ribbon and sc into ribbon between rows 1 and 2;
Round 4: Chain 5, sc in the 2nd chain from hook, sc back toward ribbon, sl st into;

— Sunglasses :

Round 1: and fasten off, weave ends. Lashes and lips Use a tapestry needle and black yarn to stitch on lashes. Use picture as guide. Use tapestry needle and desire lip color to stitch lips. Use picture as guide. Assembly Use a hot glue gun to attach all the pieces together. You could sew as well but hot glue allows for a cleaner look and saves a lot of time!;

— Lense :

Round 1: (in magic loop) 3 tr, 3 dc, chain 1, 1 tr, chain 1, 3 dc, 3 tr, chain 2, slip stitch into magic loop. Pull tight.
Round 2: Sc into chain 3 from previous round, single crochet in the top of the original chain 3. 1 sc and 1 hdc in the first trc from previous round. 2 hdc in the next tr;

— Make :

Round 1: Work 6 sc into ring— 6 sts. Do not join, continue in spiral.
Round 2: (2 sc) in each st —12 sts;
Round 3: [(2 sc) in next sc, sc in next sc] 12 times — 18 sts;
Round 4: [(2 sc) in next sc, sc in next 2 sc] 18 times — 24 sts;
Round 5: [(2 sc) in next sc, sc in next 3 sc] 24 times — 30 sts;
Round 6: Continue with same color, 10 sc, 4 hdc, (2 hdc) in next stitch, 4 hdc, 5 sc, (25 stitches total) switch to frame color and sc all the way around. (31 stitches total) Finish off. You will repeat this again but when you are about to finish off chain 5 and connect to inner corner of the other frame in order to make the bridge and connect frames. Then chain 7 and place that chain underneath the frames a few stitches below the other bridge when glueing onto the face.

— Bridge :

Round 1: skip first chain from hook, Inc in each stitch across (4 sc)
Round 2: Sc across ( 4 sc)
Round 3: Attach green, sc across (4 sc) Finish off and weave ends. Using white yarn and a tapestry needle, sew in a few seeds. #5: Pineapple With green *chain 3, sc in the second chain from the hook, sc in the last chain and slip stitch in the last chain.* Repeat two more times. Sl St into the very first sc, finish off and weave ends. With Yellow, chain 7, hdc in the 3rd chain from the hook, hdc, dc, dc, 4 trc in the last chain from the hook, now you will be working up the other side of the chain. Dc, dc, hdc, hdc, finish off and weave ends.

Assembly Instructions

  1. Stuff each piece firmly before closing.
  2. Pin all parts in place and check the proportions against the photos.
  3. Sew parts on securely with matching yarn.
  4. Weave in all ends and shape the finished piece.

Important Notes

  • Work in a continuous spiral unless a round says otherwise.
  • Stitch counts are given at the end of each round — check them as you go.
  • Stuff firmly and evenly for a smooth finish.
  • Use a stitch marker to track the beginning of each round.

This little portrait sparkles with personality and charm, a tiny ambassador of handmade warmth. Bring it to life in your own colorway and watch it brighten any space. It’s perfect for gifting or keeping as a playful reminder to pause and crochet. Happy crafting and may your stitches be merry!

Good to know

You ask, we answer

The finished amigurumi measures approximately 25 cm tall when using the recommended yarn and hook size.

Yes, you can, but the final size and texture will change. Choose a yarn weight that matches your preferred look and adjust the hook size accordingly.

This pattern is designed with beginners in mind, requiring only basic crochet stitches and working in the round, with optional embellishments for practice.

Most crocheters complete this project in 5-7 hours, though timing varies with experience, comfort level, and how many accessories you add.

Accessories such as sunglasses, earrings, and a hair ribbon are optional but highly enhancing for personality. They can be added or omitted based on your preference.

Finished crochet girl portrait wearing sunglasses on display
Join 100k+ crocheters

Get new free patterns, stitch tips and exclusive content in your inbox.