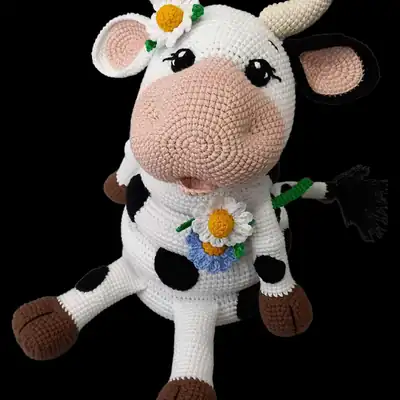
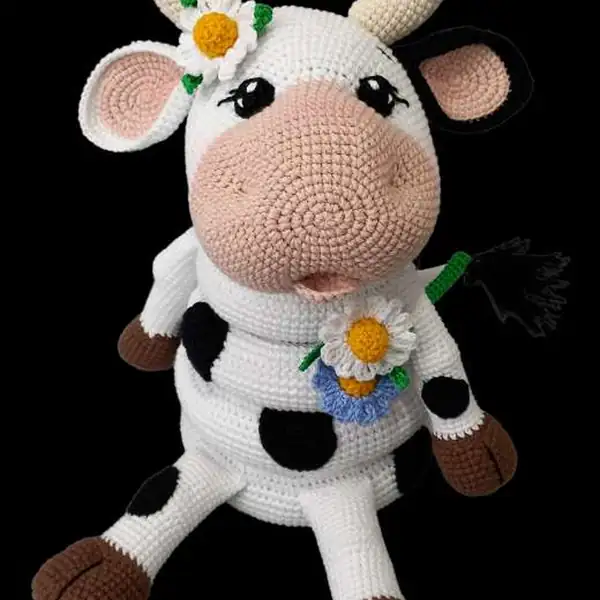
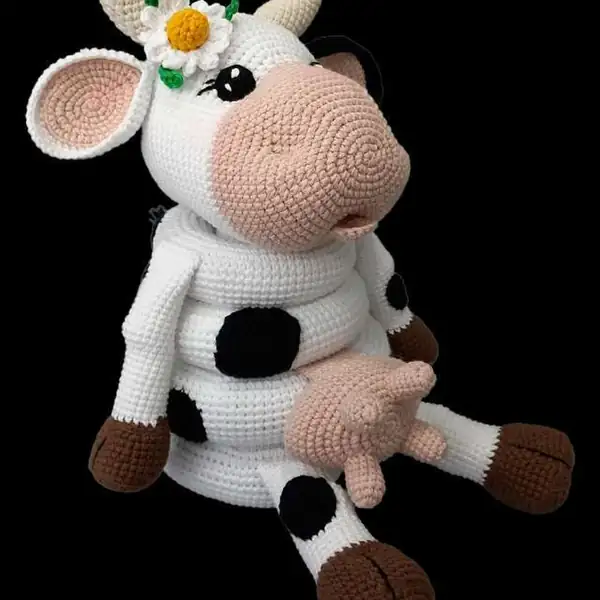
From the first slip of the crochet hook to the final whipstitch, this Cow Stacking Toy Amigurumi Pattern is built to celebrate the tactile joy of handmade play. The design centers on a snug, easy-to-hold core that supports multiple soft rings and four sturdy limbs, all worked in DK or worsted weight yarn to achieve a plush, squeezable feel. Each piece is shaped with precise rounds and invisible decreases so the limbs and muzzle disappear neatly into the cow’s contours, while colorwork brings the spots, ears, and udders to life. You’ll work the head, neck, and torso in a balanced sequence, then finish by assembling the limbs and accessories with careful pinning, seam lines, and a few well-placed slip stitches. The finished size remains approximately 21 cm tall, a size that fits neatly on a shelf or in a child’s hands for hours of stacking and imaginative play. The palette—white for the base, black for spots, brown for the body, ivory and pink accents—lends itself to playful variations while staying cohesive and adorably collectible.
— Part 1 :
Round 1: 6 sc in MR (6)
Round 2: 6 inc (12)
Round 3: 12 sc (12)
Round 4: (1 sc; inc)*6 (18)
Round 5: 18 sc (18)
Round 6: 18 sc (18)
Round 7: (2 sc; inc)*6 (24)
Round 8: 24 sc (24)
Round 9: 24 sc (24)
Round 10: 24 sc (24)
Round 11: (3 sc; inc)*6 (30)
Round 12: 30 sc (30)
Round 13: 30 sc (30)
Round 14: 30 sc (30)
Round 15: 30 sc (30)
Round 16: (4 sc; inc)*6 (36)
Round 17: 36 sc (36)
Round 18: 36 sc (36)
Round 19: 36 sc (36)
Round 20: 36 sc (36)
Round 21: 36 sc (36)
Round 22: (5 sc; inc)*6 (42)
Round 23: 42 sc (42)
Round 24: 42 sc (42)
Round 25: 42 sc (42)
Round 26: 42 sc (42)
Round 27: 42 sc (42)
Round 28: 42 sc (42)
Round 29: (6 sc; inc)*6 (48)
Round 30: 48 sc (48)
Round 31: 48 sc (48)
Round 32: 48 sc (48)
Round 33: 48 sc (48)
Round 34: 48 sc (48)
Round 35: 48 sc (48)
Round 36: 48 sc (48)
Round 37: (7 sc; inc)*6 (54)
Round 38: 54 sc (54)
Round 39: 54 sc (54)
Round 40: 54 sc (54)
Round 41: 54 sc (54)
Round 42: 54 sc (54)
Round 43: 54 sc (54)
Round 44: 54 sc (54)
Round 45: 54 sc (54)
Round 46: (8 sc; inc)*6 (60)
Round 47: FLO (9 sc; inc)*6 (66)
Round 48: 5 sc; inc; (10 sc; inc)*5; 5 sc (72)
Round 49: (11 sc; inc)*6 (78)
Round 50: 6 sc; inc; (12 sc; inc)*5; 6 sc (84)
Round 51: (13 sc; inc)*6 (90)
Round 52: 7 sc; inc; (14 sc; inc)*5; 7 sc (96)
Round 53: (15 sc; inc)*6 (102)
Round 54: 8 sc; inc; (16 sc; inc)*5; 8 sc (108)
Round 55: (17 sc; inc)*6 (114)
Round 56: 114 sc (114)
Round 57: 114 sc (114)
Round 58: 114 sc (114)
Round 59: 114 sc (114)
Round 60: 114 sc (114)
Round 61: 114 sc (114)
Round 62: 114 sc (114)
Round 63: (17 sc; dec)*6 (108)
Round 64: 8 sc; dec; (16 sc; dec)*5; 8 sc (102)
Round 65: (15 sc; dec)*6 (96)
Round 66: 7 sc; dec; (14 sc; dec)*5; 7 sc (90)
Round 67: (13 sc; dec)*6 (84)
Round 68: 6 sc; dec; (12 sc; dec)*5; 6 sc (78)
Round 69: (11 sc; dec)*6 (72)
Round 70: 5 sc; dec; (10 sc; dec)*5; 5 sc (66)
Round 71: (9 sc; dec)*6 (60)
— Part 2 :
Round 1: 6 sc in MR (6)
Round 2: 6 inc (12)
Round 3: (1 sc; inc)*6 (18)
Round 4: 1 sc; 2 inc; (4 sc; 2 inc)*2; 3 sc (24)
Round 5: 2 sc; 2 inc; (6 sc; 2 inc)*2; 4 sc (30)
Round 6: 3 sc; 2 inc; (8 sc; 2 inc)*2; 5 sc (36)
Round 7: BLO (8 sc; inc; 2 dec; inc; 22 sc) (36)
Round 8: 36 sc (36)
Round 9: 8 sc; inc; 2 dec; inc; 22 sc (36)
Round 10: 4 sc; dec; (10 sc; dec)*2; 6 sc (33)
Round 11: 7 sc; inc; 2 dec; inc; 20 sc (33)
Round 12: 33 sc (33)
Round 13: 7 sc; inc; 2 dec; inc; 20 sc (33)
Round 14: 3 sc; dec; (9 sc; dec)*2; 6 sc (30)
Round 15: BLO (3 sc; dec)*6 (24) change to white color;
Round 16: 24 sc (24)
Round 17: 24 sc (24)
Round 18: 24 sc (24)
Round 19: 24 sc (24)
Round 20: 24 sc (24)
Round 21: 24 sc (24)
Round 22: 24 sc (24)
Round 23: 24 sc (24)
Round 24: 6 sc; 4 inc; 8 sc; 2 dec; 2 sc (26)
— Part 3 :
Round 73: (8 sc; dec)*6 (54)
Round 74: (7 sc; dec)*6 (48)
Round 75: (6 sc; dec)*6 (42)
Round 76: (5 sc; dec)*6 (36)
Round 77: (4 sc; dec)*6 (30)
Round 78: (3 sc; dec)*6 (24)
Round 79: (2 sc; dec)*6 (18)
Round 80: (1 sc; dec)*6 (12)
Round 81: 6 dec (6) cut the yarn, pull off hole, hide a tail.
— Part 4 :
Round 25: 26 sc (26)
Round 26: 26 sc (26)
Round 27: 7 sc; dec; 2 sc; dec; 13 sc (24)
Round 28: 24 sc (24) fill with stuffing 2/3 of the leg;
Round 29: 24 sc (24) fill with stuffing 2/3 of the leg;
Round 30: 24 sc (24) fill with stuffing 2/3 of the leg;
Round 31: 24 sc (24) fill with stuffing 2/3 of the leg;
Round 32: 24 sc (24) fill with stuffing 2/3 of the leg;
Round 33: 24 sc (24) fill with stuffing 2/3 of the leg;
Round 34: 24 sc (24) fill with stuffing 2/3 of the leg;
Round 35: 24 sc (24) fill with stuffing 2/3 of the leg;
Round 36: 5 sc; fold in half, connect with 12 sc.
— Part 5 :
Round 1: 6 sc in MR (6)
Round 2: 6 inc (12)
Round 3: BLO 12 sc (12)
Round 4: 12 sc (12)
Round 5: 12 sc (12)
Round 6: 12 sc (12)
Round 7: 12 sc (12)
Round 8: 12 sc (12)
Round 9: 12 sc (12)
Round 10: 12 sc (12)
Round 11: 12 sc (12)
Round 12: 12 sc (12)
Round 13: (3 sc; inc)*3 (15) fill with stuffing;
Round 14: 15 sc (15)
Round 15: 15 sc (15)
Round 16: 15 sc (15)
Round 17: 15 sc (15)
Round 18: 15 sc (15)
Round 19: 15 sc (15)
Round 20: 15 sc (15)
Round 21: 15 sc (15)
Round 22: 2 sc; inc; (4 sc; inc)*2; 2 sc (18)
Round 23: 18 sc (18)
Round 24: 18 sc (18)
Round 25: 18 sc (18)
Round 26: 18 sc (18)
Round 27: 18 sc (18)
Round 28: 18 sc (18)
— Part 6 :
Round 1: 60 ch; slst in 1st ch (60)
Round 2: (9 sc; inc)*6 (66)
Round 3: 5 sc; inc; (10 sc; inc)*5; 5 sc (72)
Round 4: (11 sc; inc)*6 (78)
Round 5: 6 sc; inc; (12 sc; inc)*5; 6 sc (84)
Round 6: (13 sc; inc)*6 (90)
Round 7: 7 sc; inc; (14 sc; inc)*5; 7 sc (96)
Round 8: (15 sc; inc)*6 (102)
Round 9: 102 sc (102)
Round 10: 102 sc (102)
Round 11: 102 sc (102)
Round 12: 102 sc (102)
Round 13: 102 sc (102)
Round 14: 102 sc (102)
Round 15: 102 sc (102)
Round 16: (15 sc; dec)*6 (96)
Round 17: 7 sc; dec; (14 sc; dec)*5; 7 sc (90)
Round 18: (13 sc; dec)*6 (84)
Round 19: 6 sc; dec; (12 sc; dec)*5; 6 sc (78)
Round 20: (11 sc; dec)*6 (72)
Round 21: 5 sc; dec; (10 sc; dec)*5; 5 sc (66)
Round 22: (9 sc; dec)*6 (60)
— Part 7 :
Round 1: 48 ch; slst in 1st ch (48)
Round 2: (7 sc; inc)*6 (54)
Round 3: 4 sc; inc; (8 sc; inc)*5; 4 sc (60)
Round 4: (9 sc; inc)*6 (66)
Round 5: 5 sc; inc; (10 sc; inc)*5; 5 sc (72)
Round 6: (11 sc; inc)*6 (78)
Round 7: 6 sc; inc; (12 sc; inc)*5; 6 sc (84)
Round 8: (13 sc; inc)*6 (90)
Round 9: 90 sc (90)
Round 10: 90 sc (90)
Round 11: 90 sc (90)
Round 12: 90 sc (90)
Round 13: 90 sc (90)
Round 14: 90 sc (90)
Round 15: 90 sc (90)
Round 16: (13 sc; dec)*6 (84)
Round 17: 6 sc; dec; (12 sc; dec)*5; 6 sc (78)
Round 18: (11 sc; dec)*6 (72)
Round 19: 5 sc; dec; (10 sc; dec)*5; 5 sc (66)
Round 20: (9 sc; dec)*6 (60)
Round 21: 4 sc; dec; (8 sc; dec)*5; 4 sc (54)
Round 22: (7 sc; dec)*6 (48)
— Part 8 :
Round 1: 6 sc in MR (6)
Round 2: 6 inc (12)
Round 3: (1 sc; inc)*6 (18)
Round 4: 1 sc; 2 inc; (4 sc; 2 inc)*2; 3 sc (24)
Round 5: 2 sc; 2 inc; (6 sc; 2 inc)*2; 4 sc (30)
Round 6: BLO (6 sc; inc; 2 dec; inc; 18 sc) (30)
Round 7: 30 sc (30)
Round 8: 6 sc; inc; 2 dec; inc; 18 sc (30)
Round 9: 3 sc; dec; (8 sc; dec)*2; 5 sc (27)
Round 10: 5 sc; inc; 2 dec; inc; 15 sc (27)
Round 11: 27 sc (27)
Round 12: 2 sc;dec;1 sc;inc;2 dec;inc;dec;7 sc;dec;5 sc (24)
Round 13: BLO (2 sc; dec)*6 (18) change to white color;
Round 14: 18 sc (18)
Round 15: 18 sc (18)
Round 16: 18 sc (18)
Round 17: 18 sc (18)
Round 18: 18 sc (18)
Round 19: 18 sc (18)
Round 20: 18 sc (18)
Round 21: 18 sc (18)
Round 22: 18 sc (18)
Round 23: 18 sc (18)
Round 24: 18 sc (18)
Round 25: 5 sc; 4 inc; 5 sc; 2 dec (20)
— Part 9 :
Round 1: 36 ch; slst in 1st ch (36)
Round 2: (5 sc; inc)*6 (42)
Round 3: 3 sc; inc; (6 sc; inc)*5; 3 sc (48)
Round 4: (7 sc; inc)*6 (54)
Round 5: 4 sc; inc; (8 sc; inc)*5; 4 sc (60)
Round 6: (9 sc; inc)*6 (66)
Round 7: 5 sc; inc; (10 sc; inc)*5; 5 sc (72)
Round 8: (11 sc; inc)*6 (78)
Round 9: 78 sc (78)
Round 10: 78 sc (78)
Round 11: 78 sc (78)
Round 12: 78 sc (78)
Round 13: 78 sc (78)
Round 14: 78 sc (78)
Round 15: 78 sc (78)
Round 16: (11 sc; dec)*6 (72)
Round 17: 5 sc; dec; (10 sc; dec)*5; 5 sc (66)
Round 18: (9 sc; dec)*6 (60)
Round 19: 4 sc; dec; (8 sc; dec)*5; 4 sc (54)
Round 20: (7 sc; dec)*6 (48)
Round 21: 3 sc; dec; (6 sc; dec)*5; 3 sc (42)
Round 22: (5 sc; dec)*6 (36)
Round 26: 20 sc (20)
Round 27: 20 sc (20)
Round 28: 7 sc; 2 dec; 9sc (18)
Round 29: 18 sc (18) fold in half, connect with 9 sc.
Round 30: 18 sc (18) fold in half, connect with 9 sc.
Round 31: 18 sc (18) fold in half, connect with 9 sc.
Round 32: 18 sc (18) fold in half, connect with 9 sc.
Round 33: 18 sc (18) fold in half, connect with 9 sc.
Round 34: 18 sc (18) fold in half, connect with 9 sc.
Round 35: 18 sc (18) fold in half, connect with 9 sc.
Round 36: 18 sc (18) fold in half, connect with 9 sc.
Round 37: 18 sc (18) fold in half, connect with 9 sc.
Round 38: 18 sc (18) fold in half, connect with 9 sc.
— Part 10 :
Round 1: 6 sc in MR (6)
Round 2: 6 inc (12)
Round 3: (4 inc; 2 sc)*2 (20)
Round 4: 2 sc; 4 inc; 6 sc; 4 inc; 4 sc (28)
Round 5: 4 sc; 4 inc; 10 sc; 4 inc; 6 sc (36)
Round 6: (5 sc; inc)*6 (42)
Round 7: (6 sc; inc)*6 (48)
Round 8: (7 sc; inc)*6 (54)
Round 9: (8 sc; inc)*6 (60)
Round 10: (9 sc; inc)*6 (66)
Round 11: (10 sc; inc)*6 (72)
Round 12: 72 sc (72)
Round 13: 60 sc; BLO (8 sc); 4 sc (72)
Round 14: 72 sc (72) change to white;
Round 15: 72 sc (72) change to white;
Round 16: 72 sc (72) change to white;
Round 17: 72 sc (72) change to white;
Round 18: 72 sc (72) change to white;
Round 19: 72 sc (72)
Round 20: 22 sc; (1 sc; inc)*6; 38 sc (78)
Round 21: 22 sc; (2 sc; inc)*6; 38 sc (84)
Round 22: 84 sc (84)
Round 23: 84 sc (84)
Round 24: 84 sc (84)
Round 25: 22 sc; (3 sc; inc)*6; 38 sc (90)
Round 26: 90 sc (90)
Round 27: 90 sc (90)
Round 28: 73 sc; 18 ch(skip 18) put marker and from now;
Round 29: 90 sc (90)
Round 30: 90 sc (90)
Round 31: 90 sc (90)
Round 32: 90 sc (90)
Round 33: 90 sc (90)
Round 34: 90 sc (90)
Round 35: 90 sc (90)
Round 36: (13 sc; dec)*6 (84)
Round 37: (12 sc; dec)*6 (78)
Round 38: (11 sc; dec)*6 (72)
Round 39: (10 sc; dec)*6 (66)
Round 40: (9 sc; dec)*6 (60)
Round 41: (8 sc; dec)*6 (54)
Round 42: (7 sc; dec)*6 (48)
Round 43: (6 sc; dec)*6 (42)
Round 44: (5 sc; dec)*6 (36)
Round 45: (4 sc; dec)*6 (30)
Round 46: (3 sc; dec)*6 (24)
Round 47: (2 sc; dec)*6 (18)
Round 48: (1 sc; dec)*6 (12)
Round 49: 6 dec (6) fasten off.
— crochet in rounds :
Round 1: BLO 36 sc (36)
Round 2: 36 sc (36)
Round 3: 36 sc (36)
Round 4: 36 sc (36)
Round 5: (4 sc; dec)*6 (30)
Round 6: 30 sc (30)
Round 7: 30 sc (30)
Round 8: (3 sc; dec)*6 (24)
Round 9: 24 sc (24)
Round 10: 24 sc (24)
Round 11: (2 sc; dec)*6 (18)
Round 12: 18 sc (18)
Round 13: (1 sc; dec)*6 (12)
Round 14: 6 dec (6) fasten off, push it inside of the head.
— Part 12 :
Round 1: 6 sc in MR (6)
Round 2: 4 inc, turn (8)
Round 3: 1 ch, (1 sc; inc)*4; turn (6)
Round 4: 1 ch, 12 sc fasten off, leave a long tail for sewing.
— Part 13 :
Round 1: 6 sc in MR (6)
Round 2: 6 inc (12) fasten off, leave a long tail for sewing.
— Part 14 :
Round 1: 6 sc in MR (6)
Round 2: 6 sc (6)
Round 3: 6 inc (12)
Round 4: 12 sc (12)
Round 5: inc; 3 sc; 2 dec; 3 sc; inc (12)
Round 6: inc; 3 sc; 4 hdc; 3 sc; inc (14)
Round 7: inc; 4 sc; 2 dec; 4 sc; inc (14)
Round 8: inc; 4 sc; 4 hdc; 4 sc; inc (16)
Round 9: inc; 5 sc; 2 dec; 5 sc; inc (16)
Round 10: inc; 5 sc; 4 hdc; 5 sc; inc (18)
Round 11: inc; 6 sc; 2 dec; 6 sc; inc (18)
Round 12: inc; 6 sc; 4 hdc; 6 sc; inc (20)
Round 13: inc; 7 sc; 2 dec; 7 sc; inc (20)
Round 14: 8 sc; 4 hdc; 8 sc (20)
Round 15: 8 sc; 2 dec; 8 sc (18)
Round 16: 7 sc; 4 hdc; 7 sc (18) fill with stuffing;
Round 17: BLO (1 sc; dec)*6 (12)
Round 18: 6 dec (6) fasten off, leave a long tail for sewing.
— Part 15 :
Round 1: 6 sc in MR (6)
Round 2: 6 inc (12)
Round 3: 4 inc; 2 sc; 4 inc; 2 sc (20)
Round 4: 2 sc; 4 inc; 6 sc; 4 inc; 4 sc (28)
Round 5: 4 sc; 4 inc; 10 sc; 4 inc; 6 sc (36)
Round 6: 7 sc; 2 inc; 16 sc; 2 inc; 9 sc (40)
Round 7: BLO (10 sc; 2 inc; 18 sc; 2 inc; 8 sc) (44)
Round 8: 11 sc; 2 inc; 20 sc; 2 inc; 9 sc (48)
Round 9: 48 sc (48)
Round 10: BLO 10 sl st, fold and sew 4 sc, cut the yarn, leave;
— Part 16 :
Round 1: 6 sc in MR (6)
Round 2: 6 inc (12)
Round 3: (4 inc; 2 sc)*2 (20)
Round 4: 2 sc; 4 inc; 6 sc; 4 inc; 4 sc (28)
Round 5: 4 sc; 4 inc; 10 sc; 4 inc; 6 sc (36)
Round 6: 36 sc (36)
Round 7: 6 sc; 4 inc; 14 sc; 4 inc; 8 sc (44)
Round 8: 44 sc (44)
Round 9: 8 sc; 4 inc; 18 sc; 4 inc; 10 sc (52)
Round 10: 52 sc (52)
Round 11: 52 sc (52)
Round 12: 52 sc (52)
Round 13: 52 sc (52)
Round 14: BLO (10 sc; 2 dec; 22 sc; 2 dec;
Round 15: 9 sc; 2 dec; 20 sc; 2 dec; 11 sc(44)
Round 16: 8 sc; 2 dec; 18 sc; 2 dec; 10 sc(40)
Round 17: 7 sc; 2 dec; 16 sc; 2 dec; 9 sc (36)
Round 18: 6 sc; 2 dec; 14 sc; 2 dec; 8 sc (32)
Round 19: make 6 sc fill with stuffing,;
— Part 17 :
Round 1: 10 sc, turn (10)
Round 2: 1 ch, 10 sc, turn (10)
Round 3: 1 ch, 10 sc, turn (10)
Round 4: 1 ch, 10 sc, turn (10)
Round 5: 1 ch, 10 sc, turn (10)
Round 6: 1 ch, 10 sc, turn (10)
Round 7: 1 ch, 10 sc, turn (10)
Round 8: 1 ch, 10 sc, turn (10)
Round 9: 1 ch, 10 sc, turn (10)
Round 10: 1 ch, 10 sc, turn (10)
Round 11: 1 ch, 10 sc, turn (10)
Round 12: 1 ch, 10 sc, turn (10)
Round 13: 1 ch, 10 sc, turn (10)
Round 14: 1 ch, 10 sc, turn (10)
Round 15: 1 ch, 10 sc, turn (10)
Round 16: 1 ch, 10 sc, turn (10)
Round 17: 1 ch, 10 sc, turn (10)
Round 18: 1 ch, 10 sc, turn (10)
Round 19: 1 ch, 10 sc, turn (10)
Round 20: 1 ch, 10 sc, turn (10)
Round 21: 1 ch, 10 sc, turn (10)
Round 22: 1 ch, 10 sc, turn (10)
— Part 18 :
Round 1: 10 sc, turn (10)
Round 2: 1 ch, 10 sc, turn (10)
Round 3: 1 ch, 10 sc, turn (10)
Round 4: 1 ch, 10 sc, turn (10)
Round 5: 1 ch, 10 sc, turn (10)
Round 6: 1 ch, 10 sc, turn (10)
Round 7: 1 ch, 10 sc, turn (10)
— Part 19 :
Round 1: 6 sc in MR (6)
Round 2: 6 inc (12)
Round 3: 12 sc (12)
Round 4: 12 sc (12)
Round 5: 12 sc (12)
Round 6: 12 sc (12)
Round 7: 12 sc (12)
— Part 20 :
Round 1: 6 ch, turn (6)
Round 2: inc; 3 sc; 3 sc in 1st ch; 4 sc (12)
Round 3: 2 inc; 3 sc; 3 inc; 3 sc; inc (18)
Round 4: (1 sc; inc)*2; 3 sc; (1 sc; inc)*3; 3 sc; 1 sc; inc (24)
Round 5: (2 sc; inc)*2; 3 sc; (2 sc; inc)*3; 3 sc; 2 sc; inc (30)
Round 6: (3 sc; inc)*2; 3 sc; (3 sc; inc)*3; 3 sc; 3 sc; inc (36)
— Part 21 :
Round 1: 6 sc in MR (6)
Round 2: 6 inc (12)
Round 3: 4 inc; 2 sc; 4 inc; 2 sc (20)
Round 4: 2 sc; 4 inc; 6 sc; 4 inc; 4 sc (28)
Round 5: 9 sc; 4 inc; 12 sc fasten off, leave long tail.
— Part 22 :
Round 1: 6 sc in MR (6)
Round 2: 6 inc (12)
Round 3: 2 inc; 4 sc; 2 inc; 4 sc (16)
Round 4: 4 inc; 4 sc; 4 inc; 2 sc; 2 inc (26)
Round 5: inc; 9 sc; 3 sl st fasten off, leave long tail.
— Part 23 :
Round 1: 6 sc in MR (6)
Round 2: (2 inc; 1 sc)*2 (10)
Round 3: 1 sc; 2 inc; 3 sc; 2 inc; 2 sc (14)
Round 4: 1 sc; 4 inc; 3 sc; 4 inc; 2 sc (18)
— Part 24 :
Round 1: 6 sc in MR (6)
Round 2: 2 inc; 2 sc; 2 inc (10)
Round 3: 1 sc; 2 inc; 2 sc; 3 inc; 1 sc (14) fasten off,;
— Part 25 :
Round 1: 6 sc in MR (6)
Round 2: 6 inc (12)
Round 3: 12 sc (12)
Round 4: 12 sc (12)
Round 5: 12 sc (12)
Round 6: FLO 12 sc (12)
Round 7: BLO 6 dec (6) fasten off or;
— Part 26 :
Round 7: a. FLO (4 sc; 9 ch turn, 8sc, slst;
— Part 27 :
Round 6: a. FLO (3 ch; 1 tr; 3 ch; sl st in;
In the end, this Cow Stacking Toy Amigurumi Pattern offers a balanced blend of technique, texture, and play value. The toy grows with you—from mastering the magic ring to the satisfying snap of stacked rings around a sturdy axis. Its soft yarn, careful shaping, and optional details like safety eyes and Velcro udders invite a calm, focused crochet experience that yields a durable, delightful companion for children and collectors alike. May your yarn fly true, your colorwork sing with crisp edges, and your cow stand proudly as countless towers rise in joyful arrangement.