Crochetologist
Free Crochet Pattern
Beautiful Detailed Adorable

Carrot Lip Balm Holder Amigurumi Pattern

Finished carrot lip balm holder on a wooden surface
4.4Rating
2-3 HoursTime
Beginner FriendlySkill
Highlights

What makes it special

Made with Love

An adorable friend to cherish, handcrafted with love to bring comfort and joy for years to come.

Bite-Sized Project

Finishes in 2-4 hours—perfect for an afternoon of creative relaxation.

Beginner Friendly Level

This project suits beginners who want to practice working in the round, mastering MR and simple increases, and learn basic seaming while finishing a cute functional amigurumi carrot. It emphasizes careful counting, tidy finishing, and gentle shaping over complex textures, making it accessible for a first or second crochet project with a small but satisfying result.

This crochet carrot lip balm holder is designed as a pocket-sized friend with a practical twist. It doubles as a tiny gift and a desk companion, offering a squeezable crocheted body and a leafy crown that feels friendly in hand.

About This Carrot Lip Balm Holder Amigurumi Pattern

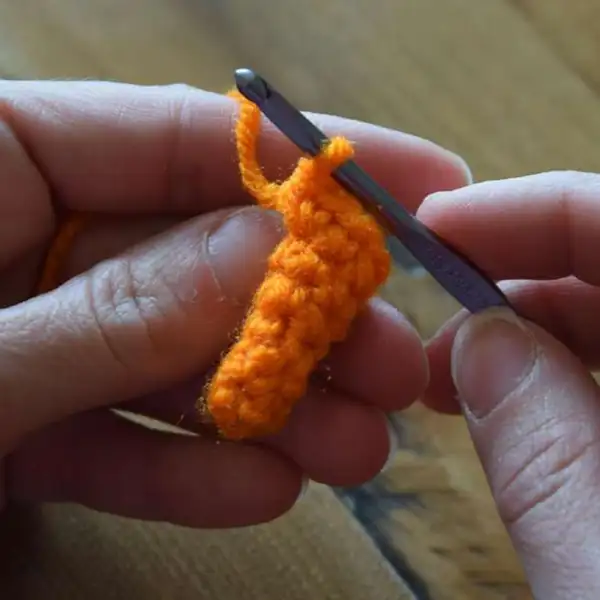
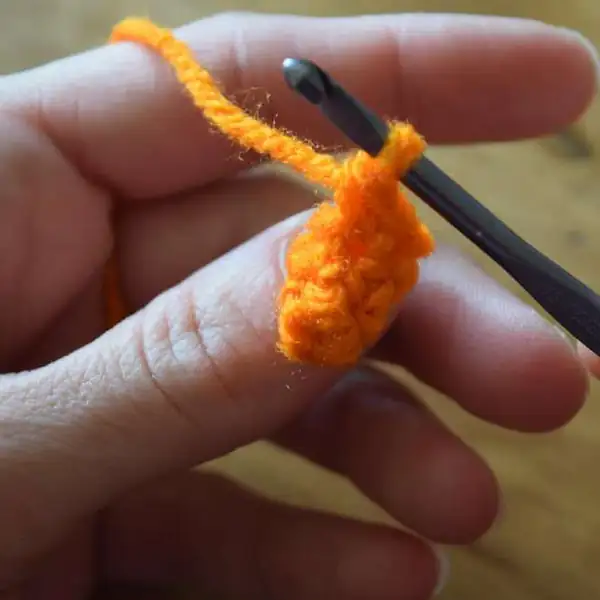
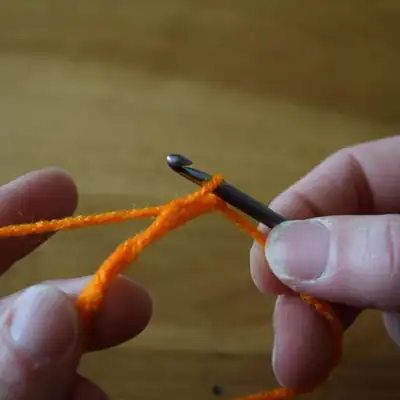
This carrot lip balm holder starts with a small orange body worked in continuous rounds to create a tapered shape resembling a carrot. The top is worked separately to form a lid, then attached to complete the carrot profile. The green crown is created as a separate piece of I-cord style strands that are threaded and tied onto the top to simulate leafy greens. The whole piece is stuffed lightly to maintain a soft, squeezable feel while keeping the lip balm nestled securely inside.

The pattern guides you through evenly increasing rounds to widen the body, followed by a few rounds of even stitches to establish a smooth surface. The lid portion mirrors the body’s construction but finishes with a longer, rounded top for an authentic carrot silhouette. Finishing touches include attaching the greens so they cascade naturally from the lid, then securing everything neatly for sewing and gifting.

In this design, you’ll practice: magic ring, single crochet in the round, increasing stitches for shaping, simple finishing techniques, and careful stuffing for a balanced, plush feel. The result is a compact, decorative item that doubles as a practical lip balm holder and a charming small gift idea.

Close-up of top lid being attached to carrot body

As you crochet, you’ll build confidence with consistently counting stitches and keeping rounds in check to ensure the carrot’s symmetry. The top portion is designed to sit neatly over the balm, while the greens are added with careful attachment so they stay secured during use or transport. The finished carrot is comfortable to hold, with stitches that feel sturdy yet soft to the touch, making it a little treasure to keep at your desk or favorite handbag.

This project is ideal for quick finishes, but still offers a moment of mindful crafting. It’s a wonderful gift option because it disguises a lip balm as a cheerful accessory, encouraging small acts of kindness through handmade gifting. The compact size makes it easy to personalize with color tweaks or tiny facial features if you want to experiment with expressions in future patterns.

Stitches & Skills You'll Use

Stitches and skills you’ll use include: MR - magic ring, SC - single crochet, INC - increase, DEC - decrease, slst - slip stitch, BLO - back loops only, FLO - front loops only, CH - chain, and basic seaming. You’ll work the body in continuous rounds to avoid seam interruptions and achieve a smooth exterior. The top lid uses the same shaping logic as the body but ends with a slst join to finish, ensuring a clean edge. The green strands are created separately and attached to the top with a knot and weave—a small but important detail for a natural leaf look.

Color changes are not required in this design, but you may choose to feature a different green for the crown or add a tiny painted facial feature if you’re feeling playful. The handy lip balm slip-fit means you’ll want to stuff just enough to retain shape while allowing the balm to fit without resistance. Following the round-by-round instructions precisely helps maintain consistency across your project.

Assembly emphasizes precise alignment: position the lid, then attach the leaves in a fan-like pattern so they appear sunlit and vibrant. This approach makes the carrot look balanced and friendly, with the greens offering a little extra pop of color against the orange body. The techniques encouraged here are basic yet effective for creating a charming amigurumi that serves a dual function, making it a coveted gift for many occasions.

Why You'll Love This Carrot Lip Balm Holder Amigurumi Pattern

This pattern blends cheerful form with practical function in a compact, approachable project. The playful carrot shape makes a bright desk companion, while the lip balm holder remains discreet and easy to use. The construction uses familiar techniques that early crocheters can master, yet the result feels polished and thoughtful—an ideal project for gifting or personal whimsy. The greens, created as flexible strands, attach in a way that allows the crown to sway softly with use, enhancing the overall charm without complicating the process.

Colour & Yarn Inspiration

Consider a bright orange carrot paired with a lime green crown for a zesty, high-contrast look that pops in photos. For a more rustic vibe, use a deeper carrot color paired with olive greens and a natural-tan lip balm cap.

Substituting a lighter peach carrot with a mossy green crown gives the piece a playful, spring-forward aesthetic, while a neon orange and electric green combo creates a bold, modern take that’s sure to stand out. If you want a softer, vintage vibe, try a creamy carrot with sage greens and a brown lip balm cap.

Carrot lip balm holder completed and ready to gift

Switch Things Up

You can customize the carrot by swapping colors to suit different personalities or decor styles. Try a peppermint green crown with a tangerine carrot for a playful autumn vibe. For a larger piece, substitute bulky yarn and a bigger hook, then adjust the round counts to keep the proportions. You’ll end up with a chunky carrot that reads as a whimsical desk accessory while still fitting a standard lip balm snugly.

For a more dramatic look, experiment with a two-tone orange by alternating rounds of two slightly different shades. You can also adjust the greens by choosing olive, lime, or teal for a tropical or modern feel. If you want extra personality, add tiny facial features with discreet embroidery after finishing, or leave the surface blank for a minimalist style that blends into a work area.

Consider creating several carrots with complementary color schemes and grouping them as a playful desk display or a small garland for seasonal decor. If you want to stage a photoshoot or product shot, pose the greens with a light bend by threading a slim, flexible material through the crown before attaching, then carefully adjusting during styling.

For structure, you can insert a small amount of flexible wire into the crown before attaching, allowing you to pose the greens for display photos or gentle movement during use. Experiment with greens beyond Spring Green to achieve a tropical or autumnal look; olive, lime, moss, and forest tones can dramatically shift the overall mood.

Color-blocking is another avenue—use two shades of orange for a striped carrot or add a white tip for a garnish-like finish. Remember to weave in tails neatly and verify the lid sits securely before gifting to ensure a tidy, polished presentation.

Ways to Use & Gift It

Give this carrot lip balm holder as a cheerful desk companion for coworkers or teachers who deserve a thoughtful handmade treat. It’s perfect for spring birthdays or as a sweet ‘just because’ gift that fits inside a gift bag or card slot.

Pair it with a coordinating lip balm or a small notepad to create a mini desk kit, or stack a few in a small box with a handwritten note for a friendly gift set. The compact size makes it suitable for students or roommates who appreciate small, useful handmade items that add personality to a space.

Common Mistakes & How to Fix Them

Not marking the starting round when transitioning from the body to the lid can cause misalignment; place a stitch marker at the beginning of each round to stay on track. Overstuffing the carrot leads to a stiff, unnatural shape that obscures seam lines; stuff gradually and test fit inside the lip balm holder to maintain softness. Inconsistent tension while increasing rounds can create an uneven surface; keep a steady tension and pause to count stitches at the end of each round. Forgetting to weave in ends before assembly can leave loose threads that snag during use; secure ends as you finish each section to avoid loose tails.

Maker's Notes

When I made this project, I used worsted weight yarn in orange and green with a 3.75 mm hook. It took about 2.5 hours including assembly and weave-ins. The key learning curve was keeping tension even during the increases to avoid dents along the body, and I noticed beginners often pause to count stitches at the end of each round. The lip balm fit snugly but easily when stuffed with a moderate amount of fiberfill; I’d recommend a light touch when filling the crown area to maintain a soft and balanced shape.

I tried a substitution: Substituting DK weight yarn with a 3.5 mm hook produced a noticeably smaller carrot silhouette, roughly shrinking the overall height and circumference and altering the lid fit. Returning to the original worsted weight preserved proportions and ensured the lid alignment remained clean. When using bulkier yarn, you’ll need to adjust round counts to maintain the same visual proportions and stack height.

Carrot Lip Balm Holder Amigurumi Pattern

Make this cheerful carrot lip balm holder with our free crochet pattern—complete rounds, materials, and tips. Perfect for gifting and everyday whimsy. Start crocheting today!

Beginner Friendly 2-3 Hours
Pattern at a glance
Skill level
Beginner Friendly
Time to make
2-3 Hours
Hook size
3.75 mm (F/5)
Yarn weight
Worsted weight / #4
Finished size
Approx. 5 inches long / 12.7 cm; approx. 3 inches around / 7.6 cm
Gauge
5 sc = 1 inch; 6 rounds = 1 inch
Yarn used
Orange: 40 g (150 m); Green: 18 g (60 m); Total: 58 g (210 m)

Materials Needed

Main Fabric
  • 01
    Orange Worsted weight yarn (4) - approximately 40 g for the carrot body
  • 02
    Green Worsted weight yarn (4) - approximately 15 g for the leaf crown
  • 03
    Lip balm holder: standard size lip balm (not yarn) to gauge the fit
Tools Required
  • 01
    Size F/5/3.75 mm crochet hook
  • 02
    Scissors
  • 03
    Tapestry needle
  • 04
    Measuring tape
  • 05
    Stitch markers (optional for marking rounds)

— Directions :

Round 1: Make a magic ring, ch 1, work 4 sc in magic ring, pull ring closed. (4 sc)
Round 2: Sc in each st around. (4 sc)
Round 3: Sc in each st around. (4 sc)
Round 4: 2 sc in first st, sc in next st, 2 sc in next st, sc in next st. (6 sc)
Round 5: Sc in each st around. (6 sc)
Round 6: Sc in each st around. (6 sc)
Round 7: 2 sc in first st, sc in next 2 sts, 2 sc in next st, sc in next 2 sts. (8 sc)
Round 8: Sc in each st around. (8 sc)
Round 9: Sc in each st around. (8 sc)
Round 10: 2 sc in first st, sc in next 3 sts, 2 sc in next st, sc in next 3 sts. (10 sc)
Round 11: Sc in each st around. (10 sc)
Round 12: Sc in each st around. (10 sc)
Round 13: 2 sc in first st, sc in next 4 sts, 2 sc in next st, sc in next 4 sts. (12 sc)
Round 14: Sc in each st around. (12 sc)
Round 15: Sc in each st around. (12 sc)
Round 16: Sc in each st around. (12 sc)
Round 17: Sc in each st around. (12 sc)
Round 18: Sc in each st around. (12 sc)
Round 19: Sc in each st around. (12 sc)
Round 20: Sc in each st around, slst to first st of round, fasten off, weave in end. (12 sc)

— Top/Lid Of Carrot :

Round 1: Make a magic ring, ch 1, work 6 sc in magic ring, pull ring closed. (6 sc)
Round 2: 2 sc in each st around. (12 sc)
Round 3: Sc in each st around. (12 sc)
Round 4: Sc in each st around. (12 sc)
Round 5: Sc in each st around. (12 sc)
Round 6: Sc in each st around. (12 sc)
Round 7: Sc in each st around. (12 sc)
Round 8: Sc in each st around, slst to first st of round, fasten off, weave in end. (12 sc)

— Part 3 :

Round 3: Insert your hook under the closed magic ring (first round) of the carrot top and pull through a loop (the fold of the green strands). Bring the ends of the green strands through the loop and pull tightly against the top of the carrot. The green strands should now be attached to the carrot top.

Assembly Instructions

  1. Attach the carrot body and lid by aligning the opening of the lid with the top edge of the body and sewing securely using whip stitch.
  2. Position the green leaf strands on the carrot lid between rounds 1-3 of the lid, spacing them evenly, then sew firmly to the crown so they fan outward.
  3. Insert the lip balm and test fit; adjust stuffing as needed so the balm slides in smoothly and remains stable when carried.
  4. Stuff the carrot gently to maintain a plush feel, then close the final rounds and weave in any remaining yarn tails.

Important Notes

  • Use stitch markers to keep track of your rounds, especially during color changes and shaping sections.
  • Stuff firmly but not too tightly for the best shape and structure - overstuffing can distort your work.
  • Pin all parts in place before sewing to ensure correct positioning and symmetry.
  • Weave in ends as you go to avoid a tedious finishing session at the end.

This carrot lip balm holder is a cheerful, pocket-friendly gift that carries a touch of whimsy. It doubles as a quirky desk companion and a thoughtful small present. The combination of bright orange and leafy greens makes it instantly recognizable and fun. I hope your finished piece brings smiles and a sense of pride to your handmade gifting repertoire.

Good to know

You ask, we answer

The finished carrot measures approximately 5 inches long and about 3 inches around, not including the green strands on top.

Yes, you can swap orange for another bright hue and green for a contrasting crown color; keep the yarn weight and hook size consistent to maintain the pattern’s proportions.

Absolutely. The project uses basic in-the-round stitches with simple increases and a small amount of seaming, making it a friendly entry into amigurumi basics.

Most crocheters finish in about 2-3 hours, though time can vary with experience and how exact you want the stuffing and finishing to be.

Green leaf strands being prepared for attachment
Join 100k+ crocheters

Get new free patterns, stitch tips and exclusive content in your inbox.