Crochetologist
Free Crochet Pattern
Beautiful Detailed Adorable

Calico Cat Amigurumi Pattern

Front view of finished calico cat amigurumi with tan patch and red collar
4.3Rating
2-4 HoursTime
Beginner FriendlySkill
Highlights

What makes it special

Made with Love

Delightful animal designs with sweet details that capture the essence of your favorite woodland and farmyard friends.

Bite-Sized Project

This compact amigurumi typically takes a focused afternoon to finish, including assembly and embroidery, making it perfect for a gift-made-in-a-day project.

Beginner Friendly Level

Suited to advanced-beginner crocheters, this pattern teaches magic ring starts, working in the round, colour changes, invisible finish and basic embroidery while requiring attention to consistent tension and seaming placement.

There is a particular joy in finishing a tiny handmade companion in an afternoon: this calico cat amigurumi is the kind of project that delivers that immediate, heartwarming satisfaction. Its soft, rounded silhouette and subtle patched colours make it feel like a small treasure to hold, while the embroidered face and little bell turn it into a character that seems ready to purr on your shelf.

This pattern is ideal when you want a quick, personal gift or a decorative accent that fits into a drawer or desk. The simplicity of the shapes combined with the tiny decorative details means the make is approachable but still delightful to personalise, and the finished cat will carry a visible touch of handcrafted charm wherever you place it.

About This Calico Cat Amigurumi Pattern

Make a small, squishy calico cat amigurumi about 6 cm tall using fingering/4-ply cotton yarn and a 2.0 mm hook. The pattern includes instructions for head and body worked in the round, separate ears, muzzle, front legs, paws, a striped tail and an optional flat base for a single toy or a long starting tail for making a reversible pair. Techniques used include magic ring, single crochet, invisible finish, surface slip stitches and bobble stitch details.

This charming little cat is finished with embroidered eyes, a tiny bell on a collar and delicate paw pads for personality.

Working on this calico cat pattern feels like sculpting with yarn — you build the shape round by round and watch features emerge as parts are joined. The construction alternates simple colour panels so you can create the calico patches by changing yarns and finishing each switch cleanly rather than carrying floats, which keeps the fabric slightly flexible and easy to join. Assembly is an enjoyable, tactile stage: placing the ears, muzzle and paws in proportion transforms the soft dome of head-and-body into a recognisably feline face.

Because the pattern uses small counts and short rounds, each shaping step gives immediate visual feedback; increases and decreases change the silhouette quickly, which helps with learning to judge stuffing levels. The written notes recommend invisible finish for tidy closures and surface slip stitches for the collar detail; both finishes improve the finished look and teach useful finishing skills that carry over to other amigurumi projects.

Throughout you manage small components such as bobble paw pads and a tiny bell, which are satisfying to construct and let you practise tension control, neat colour joins and embroidery. The result is a small, characterful plush that looks far more complex than the stitches used.

Side view of calico cat amigurumi showing striped tail and sewn-on paw

Designed for makers who enjoy small, detail-rich projects, this pattern provides clear round-by-round stitch counts and a short list of special stitches with photographic guidance. It includes options for making a single standing base or leaving long starting tails to join two cats into a reversible plush, so you can choose a quick single toy or a slightly more involved two-sided piece.

The layout groups pieces logically: head and body are worked as the main continuous shape, while ears, muzzle, legs, paws and tail are made separately and sewn on; concise assembly notes help you place each element by referencing rounds to ensure correct alignment.

Stitches & Skills You'll Use

This pattern relies primarily on single crochet worked in a continuous spiral, which is the backbone of amigurumi shaping and perfect for forming compact, sculpted pieces. You will use the magic ring to start small circles cleanly, increases (inc and inc3) to widen sections, and single-crochet decreases (dec) to taper and shape the head and body. The pattern also uses BLO and FLO selectively to create a defined collar row where surface detailing is added.

Special techniques include the invisible finish for closing small openings cleanly and bobble stitches for the textured paw pads; the bobble is formed by working incomplete double crochets joined at the top to create a raised nub that you later embroider. Surface slip stitches are used to add the collar line by working a chain on top of the fabric, a simple technique that adds a professional flourish without adding bulk.

Embroidery skills are required to stitch eyes, nose and mouth lines; these are straightforward single-strand stitches that reward careful placement. Together these stitches teach beginners how shaping, finishing and small textured details combine to create personality in miniature toys.

Why You'll Love This Calico Cat Amigurumi Pattern

I absolutely love this pattern because it delivers a surprising amount of character from a compact number of stitches and simple techniques. I enjoy the pacing: the short rounds make progress feel constant and the colour patches allow small moments of creative decision-making. Sewing the muzzle, ears and paws in place always feels rewarding; the cat takes on expression with just a few embroidered lines and a tiny bell, and that hands-on finishing is where I feel most connected to the piece. Producing a complete amigurumi in a single afternoon is deeply satisfying, and I especially appreciate how the instructions teach invisible finishes and surface slip stitches that lift the look of the finished cat. Sharing the finished calico on a shelf or gifting it to a friend always brings delighted reactions, which reminds me why I design and make small toys like this.

Colour & Yarn Inspiration

The calico pattern invites layered colour thinking: use white as the primary canvas and create character with two accent patches in tan and black for a classic calico look, while peach provides soft contrast on the nose and paw pads. If you’d like a pastel version, substitute the tan with a muted apricot and the black with a gentle grey; this gives the same patchwork effect but reads softer for nurseries and pastel-themed gifts. A bright red collar creates a strong focal point while a warm mustard or teal collar can make the design feel more modern.

Yarn fibre will also change the result: cotton blend keeps crisp stitch definition and is easy to embroider on, while a soft acrylic blend will yield a fluffier, slightly larger cat. For an heirloom, choose a mercerised cotton in vibrant shades that maintain colour saturation after handling; for a toy intended for little hands go with machine-washable acrylic for easy care. Try contrasting thread colours for paw-pad embroidery to highlight tiny details and add personality.

Assembly view showing base and body rounds of the calico cat amigurumi

Switch Things Up

I like to change patch placement to create personalities: move the tan patch to one cheek or add a black ear to give the cat a quirky look.

Try varying the collar colour and swapping the bell for a tiny felt bow if you want a softer, non-metallic finish that’s quieter for children.

I often increase the paw pad size slightly by adding one extra bobble stitch round to make chunky, playful pads that are easy to embroider.

Make a miniature keychain version by using thinner yarn and a 1.5 mm hook, then leave a short loop at the top to attach a jump ring and keychain clasp.

I sometimes combine two cats into a reversible pair and experiment with mirrored patch layouts so that both sides look balanced once joined together.

For a sitting pose with more stability, I sew an internal felt disc into the base before closing and skip the cardboard for a softer stand.

I occasionally embroider whisker dots instead of long lines for a minimalist expression; this subtle change shifts the character noticeably.

If you want a plush that’s more cuddly than decorative, use a softer, slightly thicker cotton-blend and increase stuffing for a plush-bodied feel.

I also experiment with adding a tiny scarf or crocheted bow around the neck to mark seasonal gifts or to personalise colours for recipients.

Finally, try stitching different facial expressions by adjusting the placement of embroidered eyes and mouth; a higher, closer pair of eyes will look more alert, while lower, wider eyes seem sleepier and sweeter.

Ways to Use & Gift It

This calico cat makes an ideal small gift for many occasions: tuck it into a birthday card as a surprise keepsake, include it as a small baby shower favor (using embroidery rather than safety eyes for safety), or present it as a handmade stocking filler at the holidays. Because the finished toy is small and lightweight, it’s perfect for adding to care packages or attaching to a bouquet as a lasting memento that won’t be discarded. Personalising the collar colour and embroidering initials can transform the piece into a bespoke present for a loved one.

For display, place a trio of differently patched cats on a shelf for an eye-catching vignette, or make a set in seasonal palette swaps to use as table decorations. If you want to give an interactive gift, add a tiny loop so the cat becomes a keychain or bag charm; choose sturdier yarn and a secure metal clasp to make it durable for everyday carry.

Common Mistakes & How to Fix Them

Working too loosely when using a 2.0 mm hook and four-ply cotton causes stuffing to show through; remedy by switching to a slightly smaller hook or tightening your tension and checking gauge before continuing. Carrying yarn across colour changes creates visible tension and puckering on the calico patches; instead cut the yarn and join a new piece at each colour change and weave in neatly to avoid tightening rounds. Forgetting stitch counts after colour changes leads to missed increases or stray stitches; place a stitch marker at the start of each round, and recount every several rounds until your confidence grows. Overstuffing the head or body distorts the silhouette and makes seaming difficult; stuff gradually, shaping as you go, and aim for firm but springy stuffing so seams lie flat. Using embroidery yarn or multiple plies for small facial details can look bulky; use a single ply of black or peach yarn for eyes, nose and tiny mouth lines to keep proportions delicate and neat. Skipping the invisible finish when closing a small opening can leave a visible tail or hole; follow the invisible finish instructions carefully and pull the tail snugly to close the last stitches cleanly.

Maker's Notes

When I made the original sample I used a 4-ply cotton blend and a 2.0 mm hook and completed the piece in about three hours, including embroidery and assembly. The dense fabric created by the small hook kept stuffing from showing and made seams behave predictably. In testing I noticed beginners most often stumble around the colour-change section between rounds R7 and R14 where multiple short colour panels meet; here, cutting and rejoining yarn cleanly avoids uneven tension.

Another common sticking point is working the BLO round at R15 for the collar area; this requires awareness of loop selection so the surface slip stitch sits neatly. Allow time for practising the invisible finish on a scrap piece before closing the main body to ensure a tidy closure.

I tried a substitution: I substituted a soft DK cotton on a 3.0 mm hook for a slightly larger, cuddlier version and observed a height increase from roughly 6 cm to about 8.5 cm; the resulting fabric was looser, requiring more stuffing and a sturdier base to maintain an upright posture. The embroidered details appeared smaller relative to the body, so I enlarged the paw bobbles by one increment for balance. This substitution is pleasant when you want a softer toy but expect more time for filling and slight adjustments to proportions.

Calico Cat Amigurumi Pattern

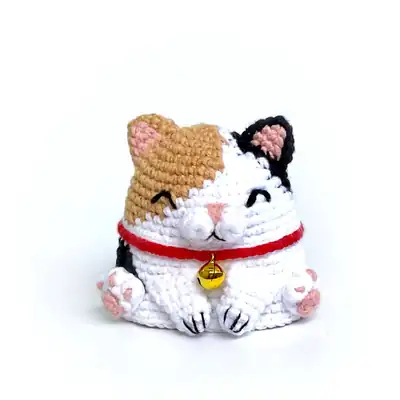
Make this tiny calico cat with our free crochet amigurumi pattern — full materials, stitches and assembly steps included. Start crocheting your own charming cat today.

Beginner Friendly 2-4 Hours
Pattern at a glance
Skill level
Beginner Friendly
Time to make
2-4 Hours
Hook size
2.0 mm
Yarn weight
4 ply (fingering/sport)
Finished size
Approx. 6 cm / 2.3 in tall
Gauge
Approx. 26 sc x 30 rounds = 10 cm (4 in) using 4-ply cotton on 2.0 mm hook; work tight so stuffing does not show.
Yarn used
Approx. 40 g total (approx. 140 meters / 153 yards)

Materials Needed

Main Fabric
  • 01
    4-ply cotton blend yarn (fingering/sport), main white colour approximately 20g
  • 02
    Tan / light beige 4-ply cotton, approximately 15g for patches and lower body
  • 03
    Black 4-ply cotton, approximately 10g for ear, tail stripes and embroideries
  • 04
    Peach 4-ply cotton, approximately 5g for paw pads and nose
  • 05
    Red 4-ply cotton, small amount for collar detail (about 3g)
  • 06
    Small golden bell, diameter 7 mm, one piece
Tools Required
  • 01
    Crochet hook size 2.0 mm
  • 02
    Tapestry needle and embroidery needle
  • 03
    Scissors
  • 04
    Stitch marker
  • 05
    Polyester stuffing (fiberfill)
  • 06
    Small golden bell (7 mm diameter)
  • 07
    Small piece of cardboard or rigid plastic for base (optional)

— Part 1 :

Round 3: Yarn over and pull through all 4 loops to close your bobble stitch.
Round 4: Make a sl st at the next st.

— Part 2 :

Round 1: 6sc in MR (6)
Round 2: 3inc, 2inc, inc (12)
Round 3: [sc, inc]x3, sc, inc, sc, inc, sc, inc (18)
Round 4: [sc, inc, sc]x2, sc, inc, 2sc, inc, 2sc, inc, 2sc, inc, sc (24)
Round 5: [3sc, inc]x2, 3sc, inc, sc, 2sc, inc, 3sc, inc, 3sc, inc (30)
Round 6: [2sc, inc, 2sc]x2, 2sc, inc, 4sc, inc, 4sc, inc, sc, 3sc, inc, 2sc (36)
Round 7: sc, 4sc, inc, 5sc, inc, 3sc, 2sc, inc, 3sc, 2sc, inc, 5sc, inc, 5sc, inc (42)
Round 8: 2sc, 14sc, 8sc, 8sc, 10sc (42)
Round 9: 3sc, inc, 6sc, inc, 4sc, 2sc, inc, 6sc, inc, 6sc, inc, 6sc, inc, 3sc (48)
Round 10: 4sc, 12sc, 14sc, 4sc, 14sc (48)
Round 11: 5sc, 10sc, 33sc (48)
Round 12: 6sc, 7sc, 35sc (48)
Round 13: 8sc, 4sc, 36sc (48)
Round 14: [7sc, inc]x6;
Round 15: BLO 54sc (54)
Round 16: 8sc, 8sc, 38sc (54)
Round 17: 7sc, 10sc, 31sc, 6sc (54)
Round 18: 6sc, 12sc, 28sc, 8sc (54)
Round 19: 2sc, 3sc, 12sc, 18sc, 5sc, 4sc, 10sc (54)
Round 20: 4sc, inc, 8sc, inc, sc, 7sc, inc, 8sc, inc, 2sc, 6sc, inc, 3sc, 5sc, inc, 4sc (60)
Round 21: 4sc, 13sc, 20sc, 8sc, 5sc, 10sc (60)
Round 22: 5sc, 11sc, 22sc, 6sc, 7sc, 9sc (60)

— Part 3 :

Round 1: 6sc in MR (6)
Round 2: sc, inc, sc, inc, sc, inc (9)
Round 3: 2sc, inc, sc, sc, inc, 2sc, inc (12)
Round 4: 3sc, inc, sc, 2sc, inc, 3sc (13), leave the;

— Part 4 :

Round 1: 8sc in MR (8)
Round 2: 8sc (8)
Round 3: 8sc (8)
Round 4: 3sc, inc, 4sc (9)
Round 5: 4sc, inc, 4sc (10)

— Part 5 :

Round 1: 6sc in MR (6), join to the first sc with a sl st.
Round 2: BLO, loosely 6sl st (6), join to the first st with;
Round 3: 3inc, loosely 3sl st (9), join to the first sc with;
Round 4: [bobble st, sl st]x3 (6), leave remaining;

— Part 6 :

Round 1: 5sc in MR (5)
Round 2: : 5sc (5)
Round 3: : 5sc (5)
Round 4: 2sl st, 3sc (5)
Round 5: 5sc (5)
Round 6: 2sl st, 3sc (5)
Round 7: 5sc (5)
Round 8: 2sl st, 3sc (5)
Round 9: : 5sc (5)
Round 10: : 5sc (5)
Round 11: : 5sc (5)
Round 12: : 5sc (5)
Round 13: sl st, 3sc, sl st (5)
Round 14: 5sc (5)
Round 15: sl st, 3sc, sl st (5)

— Part 7 :

Round 1: 6sc in MR (6)
Round 2: 6inc (12)
Round 3: [sc, inc]x6;
Round 4: [sc, inc, sc]x6;
Round 5: [3sc, inc]x6;
Round 6: [2sc, inc, 2sc]x6;
Round 7: [5sc, inc]x6;
Round 8: [3sc, inc, 3sc]x6;
Round 9: [7sc, inc]x6;
Round 10: [4sc, inc, 4sc]x6;

— Part 8 :

Round 3: Yarn over and pull through all 4 loops to close your bobble stitch.
Round 4: Make a sl st at the next st.

— Part 9 :

Round 1: : 6sc in MR (6)
Round 2: : 6inc;
Round 3: : [sc, inc]x6;
Round 4: : [sc, inc, sc]x6;
Round 5: : [3sc, inc]x6;
Round 6: : [2sc, inc, 2sc]x6;
Round 7: : [5sc, inc]x6;
Round 8: : 42sc (42)
Round 9: : [3sc, inc, 3sc]x6;
Round 10: : 48sc (48)
Round 11: : 48sc (48)
Round 12: : 48sc (48)
Round 13: : 48sc (48)
Round 14: : [7sc, inc]x6;
Round 15: : BLO 54sc (54)
Round 16: : 54sc (54)
Round 17: : 54sc (54)
Round 18: : 54sc (54)
Round 19: : 54sc (54)
Round 20: : [4sc, inc, 4sc]x6;
Round 21: : 60sc (60)
Round 22: : 60sc (60)

— Part 10 :

Round 1: 6sc in MR (6)
Round 2: sc, inc, sc, inc, sc, inc (9)
Round 3: 2sc, inc, sc, sc, inc, 2sc, inc (12)
Round 4: 3sc, inc, sc, 2sc, inc, 3sc (13), leave the;

— Part 11 :

Round 1: 8sc in MR (8)
Round 2: 8sc (8)
Round 3: 8sc (8)
Round 4: 3sc, inc, 4sc (9)
Round 5: 4sc, inc, 4sc (10)

— Part 12 :

Round 1: 6sc in MR (6), join to the first sc with a sl st.
Round 2: BLO, loosely 6sl st (6), join to the first st with;
Round 3: 3inc, loosely 3sl st (9), join to the first sc with;
Round 4: [bobble st, sl st]x3 (6), leave remaining;

— Part 13 :

Round 1: 5sc in MR (5)
Round 2: : 5sc (5)
Round 3: : 5sc (5)
Round 4: 2sl st, 3sc (5)
Round 5: 5sc (5)
Round 6: 2sl st, 3sc (5)
Round 7: 5sc (5)
Round 8: 2sl st, 3sc (5)
Round 9: : 5sc;
Round 10: : 5sc;
Round 11: : 5sc;
Round 12: : 5sc;
Round 13: sl st, 3sc, sl st (5)
Round 14: 5sc (5)
Round 15: sl st, 3sc, sl st (5)

— Part 14 :

Round 1: 6sc in MR (6)
Round 2: 6inc (12)
Round 3: [sc, inc]x6;
Round 4: [sc, inc, sc]x6;
Round 5: [3sc, inc]x6;
Round 6: [2sc, inc, 2sc]x6;
Round 7: [5sc, inc]x6;
Round 8: [3sc, inc, 3sc]x6;
Round 9: [7sc, inc]x6;
Round 10: [4sc, inc, 4sc]x6;

— Part 15 :

Round 3: Yarn over and pull through all 4 loops to close your bobble stitch.
Round 4: Make a sl st at the next st.

— Part 16 :

Round 1: : 6sc in MR (6)
Round 2: : 6inc (12)
Round 3: : [sc, inc]x6;
Round 4: : [sc, inc, sc]x6;
Round 5: : [3sc, inc]x6;
Round 6: : [2sc, inc, 2sc]x6;
Round 7: : [5sc, inc]x2, 4sc, sc, inc, 2sc, 3sc, inc, [5sc, inc]x2;
Round 8: : 16sc, 9sc, 17sc (42)
Round 9: : [3sc, inc, 3sc]x2, sc, 2sc, inc, 6sc, inc, sc, 2sc, [3sc, inc, 3sc]x2 (48)
Round 10: : 16sc, 15sc, 17sc (48)
Round 11: : 16sc, 15sc, 17sc (48)
Round 12: : 16sc, 15sc, 17sc (48)
Round 13: : 17sc, 13sc, 18sc (48)
Round 14: : [7sc, inc]x2, 3sc, 4sc, inc, 4sc, 3sc, inc, [7sc, inc]x2;
Round 15: : BLO 54sc (54)
Round 16: : 54sc (54)
Round 17: : 54sc (54)
Round 18: : 54sc (54)
Round 19: : 54sc (54)
Round 20: : [4sc, inc, 4sc]x6;
Round 21: : 60sc (60)
Round 22: : 60sc (60)

— Part 17 :

Round 1: 6sc in MR (6)
Round 2: sc, inc, sc, inc, sc, inc (9)
Round 3: 2sc, inc, sc, sc, inc, 2sc, inc (12)
Round 4: 3sc, inc, sc, 2sc, inc, 3sc (13), leave the;

— Part 18 :

Round 1: 8sc in MR (8)
Round 2: 8sc (8)
Round 3: 8sc (8)
Round 4: 3sc, inc, 4sc (9)
Round 5: 4sc, inc, 4sc (10)

— Part 19 :

Round 1: 6sc in MR (6), join to the first sc with a sl st.
Round 2: BLO, loosely 6sl st (6), join to the first st with;
Round 3: 3inc, loosely 3sl st (9), join to the first sc with;
Round 4: [bobble st, sl st]x3 (6), leave remaining;

— Part 20 :

Round 1: 5sc in MR (5)
Round 2: : 5sc (5)
Round 3: : 5sc (5)
Round 4: 2sl st, 3sc (5)
Round 5: 5sc (5)
Round 6: 2sl st, 3sc (5)
Round 7: 5sc (5)
Round 8: 2sl st, 3sc (5)
Round 9: : 5sc (5)
Round 10: : 5sc (5)
Round 11: : 5sc (5)
Round 12: : 5sc (5)
Round 13: sl st, 3sc, sl st (5)
Round 14: 5sc (5)
Round 15: sl st, 3sc, sl st (5)

— Part 21 :

Round 1: 6sc in MR (6)
Round 2: 6inc (12)
Round 3: [sc, inc]x6 (18)
Round 4: [sc, inc, sc]x6 (24)
Round 5: [3sc, inc]x6 (30)
Round 6: [2sc, inc, 2sc]x6 (36)
Round 7: [5sc, inc]x6 (42)
Round 8: [3sc, inc, 3sc]x6 (48)
Round 9: [7sc, inc]x6 (54)
Round 10: [4sc, inc, 4sc]x6 (60)

— Part 22 :

Round 3: Yarn over and pull through all 4 loops to close your bobble stitch.
Round 4: Make a sl st at the next st.

— Part 23 :

Round 1: : 6sc in MR (6)
Round 2: : 6inc;
Round 3: : [sc, inc]x6;
Round 4: : [sc, inc, sc]x6;
Round 5: : [3sc, inc]x6;
Round 6: : [2sc, inc, 2sc]x6;
Round 7: : [5sc, inc]x6;
Round 8: : 42sc (42)
Round 9: : 3sc, inc, [6sc, inc]x2, sc, 3sc, 2sc, [inc, 6sc]x2, inc, 3sc (48)
Round 10: : 21sc, 5sc, 22sc (48)
Round 11: : 20sc, 8sc, 20sc (48)
Round 12: : 19sc, 10sc, 19sc (48)
Round 13: : 19sc, 10sc, 19sc (48)
Round 14: : [7sc, inc]x2, 2sc, 5sc, inc, 6sc, sc, inc, [7sc, inc]x2;
Round 15: : 20sc, 13sc, 21sc (54)
Round 16: : 22sc, 9sc, 23sc (54)
Round 17: : 25sc, 4sc, 25sc (54)
Round 18: : 54sc (54)
Round 19: : 54sc (54)
Round 20: : [4sc, inc, 4sc]x6;
Round 21: : 60sc (60)
Round 22: : 60sc (60)

— Part 24 :

Round 1: 6sc in MR (6)
Round 2: sc, inc, sc, inc, sc, inc (9)
Round 3: 2sc, inc, sc, sc, inc, 2sc, inc (12)
Round 4: 3sc, inc, sc, 2sc, inc, 3sc (13), leave the;

— Part 25 :

Round 1: 8sc in MR (8)
Round 2: 8sc (8)
Round 3: 8sc (8)
Round 4: 3sc, inc, 4sc (9)
Round 5: 4sc, inc, 4sc (10)

— Part 26 :

Round 1: 6sc in MR (6), join to the first sc with a sl st.
Round 2: BLO, loosely 6sl st (6), join to the first st with;
Round 3: 3inc, loosely 3sl st (9), join to the first sc with;
Round 4: [bobble st, sl st]x3 (6), leave remaining;

— Part 27 :

Round 1: 5sc in MR (5)
Round 2: : 5sc (5)
Round 3: : 5sc (5)
Round 4: 2sl st, 3sc (5)
Round 5: 5sc (5)
Round 6: 2sl st, 3sc (5)
Round 7: 5sc (5)
Round 8: 2sl st, 3sc (5)
Round 9: 5sc (5)
Round 10: : 5sc (5)
Round 11: : 5sc (5)
Round 12: 5sc (5)
Round 13: sl st, 3sc, sl st (5)
Round 14: 5sc (5)
Round 15: sl st, 3sc, sl st (5)

— Part 28 :

Round 1: 6sc in MR (6)
Round 2: 6inc (12)
Round 3: [sc, inc]x6 (18)
Round 4: [sc, inc, sc]x6 (24)
Round 5: [3sc, inc]x6 (30)
Round 6: [2sc, inc, 2sc]x6 (36)
Round 7: [5sc, inc]x6 (42)
Round 8: [3sc, inc, 3sc]x6 (48)
Round 9: [7sc, inc]x6 (54)
Round 10: [4sc, inc, 4sc]x6 (60)

— Part 29 :

Round 3: Yarn over and pull through all 4 loops to close your bobble stitch.
Round 4: Make a sl st at the next st.

— Part 30 :

Round 1: : 6sc in MR (6)
Round 2: : 6inc;
Round 3: : [sc, inc]x6;
Round 4: : [sc, inc, sc]x6;
Round 5: : [3sc, inc]x6;
Round 6: : [2sc, inc, 2sc]x6;
Round 7: : [5sc, inc]x6;
Round 8: : 20sc, 2sc, 20sc (42)
Round 9: : 3sc, inc, [6sc, inc]x2, sc, 4sc, sc, [inc, 6sc]x2, inc, 3sc (48)
Round 10: : 21sc, 6sc, 21sc (48)
Round 11: : 20sc, 8sc, 20sc (48)
Round 12: : 19sc, 10sc, 19sc (48)
Round 13: : 18sc, 12sc, 18sc (48)
Round 14: : [7sc, inc]x2, sc, 6sc, inc, 7sc, [inc, 7sc]x2, inc (54)
Round 15: : BLO 20sc, 13sc, 21sc (54)
Round 16: : 22sc, 9sc, 23sc (54)
Round 17: : 25sc, 4sc, 25sc (54)
Round 18: : 54sc (54)
Round 19: : 54sc (54)
Round 20: : [4sc, inc, 4sc]x6;
Round 21: : 60sc (60)
Round 22: : 60sc (60)

— Part 31 :

Round 1: 6sc in MR (6)
Round 2: sc, inc, sc, inc, sc, inc (9)
Round 3: 2sc, inc, sc, sc, inc, 2sc, inc (12)
Round 4: 3sc, inc, sc, 2sc, inc, 3sc (13), leave the;

— Part 32 :

Round 1: 8sc in MR (8)
Round 2: 8sc (8)
Round 3: 8sc (8)
Round 4: 3sc, inc, 4sc (9)
Round 5: 4sc, inc, 4sc (10)

— Part 33 :

Round 1: 6sc in MR (6), join to the first sc with a sl st.
Round 2: BLO, loosely 6sl st (6), join to the first st with;
Round 3: 3inc, loosely 3sl st (9), join to the first sc with;
Round 4: [bobble st, sl st]x3 (6), leave remaining;

— Part 34 :

Round 1: 5sc in MR (5)
Round 2: : 5sc (5)
Round 3: : 5sc (5)
Round 4: 2sl st, 3sc (5)
Round 5: 5sc (5)
Round 6: 2sl st, 3sc (5)
Round 7: 5sc (5)
Round 8: 2sl st, 3sc (5)
Round 9: : 5sc (5)
Round 10: : 5sc (5)
Round 11: : 5sc (5)
Round 12: : 5sc (5)
Round 13: sl st, 3sc, sl st (5)
Round 14: 5sc (5)
Round 15: sl st, 3sc, sl st (5)

— Part 35 :

Round 1: 6sc in MR (6)
Round 2: 6inc (12)
Round 3: [sc, inc]x6 (18)
Round 4: [sc, inc, sc]x6 (24)
Round 5: [3sc, inc]x6 (30)
Round 6: [2sc, inc, 2sc]x6 (36)
Round 7: [5sc, inc]x6 (42)
Round 8: [3sc, inc, 3sc]x6 (48)
Round 9: [7sc, inc]x6 (54)
Round 10: [4sc, inc, 4sc]x6 (60)

Assembly Instructions

  1. Attach the muzzle to the head centred between rounds R11 and R13, making sure it is approximately five stitches wide; sew with the long tail using whipstitch and do not stuff the muzzle.
  2. Position ears on the head between rounds R4 and R8, spacing them symmetrically and sewing through the base of each ear with small whipstitches so they sit slightly forward.
  3. Sew front legs to the body between rounds R17 and R22 with a slight forward tilt so the cat can sit; reinforce with several secure passes of yarn for durability.
  4. Place paws beside the front legs between rounds R18 and R22 and stitch them in place; embroider paw pads using the peach tail on each bobble stitch as indicated.
  5. Attach the tail at the back of the body centred at about round R21 and stitch firmly through several rounds to prevent wobble during play.
  6. Sew the flat base piece to the back loops of the final body round if making a single toy, inserting a small cardboard disc inside before closing to help the toy stand evenly.
  7. Attach the small bell to the collar area at the middle front of round R17-R18 using a short loop of yarn or a tiny metal ring so the bell hangs securely from the collar.

Important Notes

  • Work all parts with consistent tension so seams and joins match; test your tension on a small swatch before beginning the head and body.
  • Use a stitch marker to mark the start of each round and recount periodically to avoid losing or gaining stitches during colour changes.
  • When changing colours for the calico patches, cut and join a new length of yarn rather than carrying the unused colour to avoid tightened rounds and distorted fabric.
  • Stuff gradually and shape as you go; overstuffing will distort the silhouette and make invisible finish closures harder to achieve cleanly.
  • If making a reversible amigurumi, leave the longer starting tail (about 50 cm) as instructed to facilitate joining two mirrored bodies together.

Thank you for choosing this little calico cat amigurumi pattern — it was written to make a small joyous project you can finish in an afternoon. Make it as a quick gift, a shelf friend, or as part of a reversible pair with a matching opposite-side cat; I hope the tiny embroidered face and paw pads give it a personality you love. Enjoy stitching the finishing details and wear the satisfaction of a handmade companion that brightens a desk or a present. Happy crocheting!

Good to know

You ask, we answer

The finished amigurumi measures approximately 6 cm (2.3 inches) tall when worked with 4-ply cotton yarn and a 2.0 mm hook, which gives the dense fabric needed for stuffing and shaping.

Yes, you can make a reversible double-sided cat by working two mirrored bodies and joining them together; leave a long starting tail if you plan to join pieces and follow the reversible amigurumi joining instructions for a neat seam.

Using the recommended 2.0 mm hook helps produce the tight stitches required so stuffing does not show; you can experiment with a slightly smaller hook if your tension is loose, but gauge and finished size will change.

This pattern uses embroidered eyes made with black yarn at around round R10 to achieve a soft look compatible with small children; embroidered eyes are recommended for safety and to match the plush aesthetic.

Work the provided circular base, place a disc of cardboard or rigid plastic inside the bottom for stability, then sew the base to the back loops of the last round of the body, stuffing as you go to maintain a flat, standing base.

Pause and recount across the entire round; look for missed increases or accidental chains, remove the last few stitches if necessary and rework the round, marking the beginning of the round with a stitch marker to keep orientation.

Close-up of the cat muzzle and embroidered nose on the calico amigurumi
Join 100k+ crocheters

Get new free patterns, stitch tips and exclusive content in your inbox.