Crochetologist
Free Crochet Pattern
Beautiful Detailed Adorable

Cactus Frog with Removable Pot Amigurumi Pattern

Lime green cactus frog amigurumi head with pink flower crown
4.4Rating
5-7 HoursTime
IntermediateSkill
Highlights

What makes it special

Made with Love

Small, sweet, and gift-worthy creations that fit perfectly in the palm of your hand with detailed charm.

Weekend Treat

Takes 5-7 hours, a satisfying weekend project that balances shaping, color work, and final assembly into a charming toy.

Intermediate Level

This pattern is ideal for crocheters who enjoy working in the round, performing color changes, and shaping with invisible decreases, culminating in a charming cactus frog that sits proudly on a surface or in a small display moment. The difficulty remains approachable for those familiar with basic amigurumi techniques, yet it rewards careful planning of color changes and tidy finishing without introducing advanced stitches or textures. Readers will benefit from a clear flow of steps, a consistent color plan, and a well-organized sequence that supports steady progress. By focusing on shaping through controlled increases and decreases, the pattern yields a balanced figure with a friendly facial expression and a crown that sits naturally atop the head. The piece is portable, durable, and suitable for gifting or personal display, offering a satisfying build for crocheters at intermediate beginner level and above.

With the Cactus Frog pattern, whimsy meets craft in a compact, approachable project that rewards careful technique and bright color play. The design invites crocheters to explore rounds, color changes, and careful assembly to create a character with personality that looks delightful on a shelf or in a desk display.

Designed for crocheters who enjoy the rhythm of working in rounds, switching colors, and maintaining neat finishes, this piece emphasizes a friendly face, precise proportions, and a tidy seam line. The result is a cuddly amigurumi that reads as both creature and plant—a small character with a big sense of charm.

Each step invites steady progress, from foundational chain setup through the final embroidery, and the finished piece rewards patience with a durable, lovable sculpture that can function as decor, a desk companion, or a thoughtful handmade gift.

About This Cactus Frog with Removable Pot Amigurumi Pattern

Beginning with a lime-green head and body, the pattern guides you through round-by-round shaping, careful stuffing to preserve a cuddly silhouette, and deliberate color changes that stay visually balanced. The bloom on the crown is crocheted separately and attached with precision so petals sit in a natural, layered arrangement. The subtle texture comes from alternating simple stitches and controlled transitions, rather than any specialized technique that would complicate the build.

The final assembly emphasizes neat seams, secure embroidery, and careful placement of features to maintain a friendly, expressive face. This project rewards neat finishing and patient shaping, resulting in a compact toy with a two-part personality: a frog companion and a plant-inspired crown that completes the look.

Frog seated in removable brown pot

Execution relies on a consistent tension and a defined color plan—lime for the body, white for subtle belly detailing, pink for the bloom, and brown or earth-toned accents to ground the overall look. The petals are formed with a back-loop-only edge to create a textured line, then completed in the front loop to achieve a two-tone effect that remains understated. The crown’s petals are kept small and evenly spaced to preserve symmetry and a natural layering appearance.

Across the build, you’ll weave in tails as you go so there are no stray ends to tuck after assembly. A stitch marker helps you count rounds and keep color changes aligned with your planned progression. The technique set remains approachable: simple increases and decreases to shape, careful eye placement for a friendly expression, and a light facial feature embroidery to suggest a nose and mouth. This section also covers balancing stuffing to keep the head pleasantly round without creating gaps and ensuring the crown sits securely on top without distorting the head shape.

Stitches & Skills You'll Use

The core stitches start with a magic ring to initialize the head, followed by careful increases to create a rounded crown and settled decreases to shape the sides. A simple single crochet forms the main texture, with color changes carried through the rounds and tails managed to prevent loose ends from showing before assembly. The crown uses back-loop-only work along the edge of each petal to create a subtle texture, then is completed in the standard loop to preserve the overall silhouette.

Eye placement relies on a measured approach: place the eyes at a symmetrical point on the head and secure with a tight backing to maintain a friendly expression. Embroidery for a tiny nose and a gentle smile is kept minimal and neat, avoiding heavy embroidery that could stiffen the fabric. The finishing step includes a careful weave of all tails along the inside of the piece and a final check for seam alignment so the outer shape remains smooth. The overall technique set is accessible to crocheters who are comfortable with rounds, color changes, and basic increases/decreases, providing a polished yet approachable result.

Why You'll Love This Cactus Frog with Removable Pot Amigurumi Pattern

This pattern blends two beloved motifs—an amigurumi creature and a tiny plant-inspired crown—into a single, irresistibly playful piece. The lime body paired with a bright pink crown feels joyful and bright, making it an ideal desk companion or a sunlit shelf accent. The bloom texture adds character without complicating construction, which is particularly satisfying for crocheters who enjoy clear rounds, color changes, and orderly assembly.

The crown adds a distinct personality that elevates the project from a simple toy to a small character with a story. The color plan remains approachable, and the assembly flow is designed to reward steady progress, with every round contributing to the overall form. The final piece sits friendly and balanced, inviting interaction and admiration from friends and family alike.

Colour & Yarn Inspiration

Experiment with color contrasts: a deeper lime body with a lighter belly, or swap the pink crown for coral or lavender to craft new mood palettes. Keep the tail ends tidy by matching the accent color to the crown so the transition reads cohesive. The plant-inspired crown can be a single shade or a gentle gradient to echo natural petals; the possibilities invite experimentation while keeping the project accessible.

For grounding, consider earth tones for any stand-related accents, such as browns or soft terracottas, or invert with a bold blue for a contemporary look. Variegated yarn on the body adds subtle texture without altering the shape, so you can enjoy color variety without additional shaping work. White highlights on the belly or crown edges create crisp definition without complicating the pattern.

Flower crown and pot complete

Switch Things Up

Color play is a fast way to transform the mood of this piece. Try a teal body with a purple bloom for a bold, modern feel, or opt for a mint body with a peach crown for a softer, nursery-friendly aesthetic. The construction remains the same; the look shifts through color choices rather than structural changes.

For display size, switch to a heavier cotton and a larger hook to produce a larger sculpture that can sit prominently on a shelf, while maintaining proportional rounds and a gentle overall shape. Conversely, lighter yarn with a smaller hook yields a compact, pocket-sized version that still holds the same character. Consider tweaking facial expression by adjusting eye placement or the line of the mouth to suggest curiosity, mischief, or serenity—small changes that give the piece a distinct personality.

Seasonal or thematic twists can be achieved by adjusting crown color or petal hues—red petals for a festive look, gold accents for a celebratory feel, or cool blues for a winter vibe. The pattern’s versatility shines when you test different fiber blends and brands to observe how texture and drape influence the finished form; document these substitutions to inform future projects and pattern notes.

Ways to Use & Gift It

Gift this pocket-sized cactus frog to plant lovers who appreciate handmade whimsy. It makes a cheerful desk companion, a bright room accent, or a thoughtful token for teachers and students who enjoy crafts and textures.

Pair it with a small seed packet, a scented sachet, or a tiny plant-themed card for a mini gift set. Its compact size and sturdy construction make wrapping straightforward, and the removable crown-like accessory adds a playful element that travels well and remains durable for years of display and hugging.

Common Mistakes & How to Fix Them

Skipping color changes can lead to mismatched petal edges; to fix, rework the round using a marker and ensure the color is carried cleanly without skipping planned color transitions.

Overstuffing the head causes a stiff, non-pliable look; stuff gradually and shape with your hands to maintain a rounded form that still compresses slightly for a cuddly feel.

Uneven tension at joins creates visible seams; keep tension consistent across rounds and use a whipstitch for a smoother, nearly invisible seam line when attaching parts.

Misplacing the safety eyes results in an odd expression; mark their position carefully and double-check symmetry before securing to ensure a friendly gaze.

Maker's Notes

During test stitches, gauge consistency was checked against the final piece by crocheting swatches in the same weight yarn and comparing the resulting round sizes to ensure the head remained round and not flat at the top. A 3.5 mm hook with DK-weight cotton produced a size that sits well on a shelf and matches the expected amigurumi scale. Consistency in tension was emphasized to prevent gaps at color changes, especially where the crown attaches to the head. Tension may vary with different yarn brands, so it’s helpful to crochet a few practice rounds before committing to the main project.

Working in continuous spirals helps avoid visible joins that can interrupt the smooth surface of the head and crown. Using a stitch marker consistently across color changes prevents round counts from drifting and keeps the final shape balanced. It is advisable to check the alignment of petals after the crown is attached, adjusting loop tension slightly if necessary to maintain an even circular crown with a natural layering effect.

I tried a substitution: Substituting yarn brands and fiber blends changes the texture and stiffness of the final piece. Cotton blends tend to hold crisp edges and a firmer shape, which suits the rounded head and defined crown. Wool blends soften the texture and may require a slightly looser tension to preserve roundness. If a heavier cotton is used, stepping up the hook size by one size helps maintain proportion and prevents the head from looking crowded or flat-shouldered. When using variegated yarn for the body, monitor color transition timing to ensure the petal crown remains visually anchored to the head. If the transition feels abrupt, add an extra round before color changes or introduce a tiny accent color to bridge the shift. Document any substitutions in a pattern note so future versions maintain consistency with your preferred yarns. Substituting a different weight yarn without adjusting hook size can lead to an overall scale change; to preserve the same look, recalculate the number of rounds in the head and crown to maintain proportional dimensions. If necessary, rework the starting magic ring size or the initial rounds to achieve a similar circumference on the head and a balanced crown.

Cactus Frog with Removable Pot Amigurumi Pattern

Make this bright cactus frog amigurumi with our free crochet pattern—includes materials, rounds, and finishing tips. Start crocheting today!

Intermediate 5-7 Hours
Pattern at a glance
Skill level
Intermediate
Time to make
5-7 Hours
Hook size
3.5 mm (E)
Yarn weight
Cotton Worsted / #4
Finished size
Approx 9 cm tall
Gauge
2.0 stitches per mm with 3.5 mm hook; 8x8 cm square approx.
Yarn used
Main color lime ~60 g; white ~15 g; pink ~20 g; yellow ~15 g; brown ~25 g

Materials Needed

Main Fabric
  • 01
    Yarn: Cotton yarn (worsted weight) in lime, pink, white, yellow, and brown
  • 02
    Color A: Lime green - main color for Head & Body
  • 03
    Color B: White - belly detailing
  • 04
    Color C: Pink - flower crown/petal accents
  • 05
    Color D: Yellow - petal highlights
  • 06
    Color E: Brown - pot color
Tools Required
  • 01
    Crochet hook size 3.5mm (E)
  • 02
    Yarn needle for sewing and weaving in ends
  • 03
    Polyester stuffing
  • 04
    Safety eyes 6mm
  • 05
    Stitch markers
  • 06
    Scissors

— Body :

Round 1: 8sc in a MR (8)
Round 2: 8inc (16)
Round 3: (sc, inc) x8 (24)
Round 4: (2sc, inc) x8 (32)
Round 5: (3sc, inc) x8 (40)
Round 6: 16sc, inc, 5hdc-inc, inc, 17x (47)
Round 7: BLO: 21sc, 3dec, 20sc (44)
Round 8: (3sc, inc) x2, 12sc, 2dec, 12sc, (3sc, inc) x2 (46)
Round 9: 46sc (46)
Round 10: 46sc (46)
Round 11: (3sc, dec) x2, 10sc, dec, 2sc, dec, 10sc, (3sc, dec) x2 (40)
Round 12: (2sc, dec) x10 (30)
Round 13: 30sc (30)
Round 14: (sc, dec) x10 (20)
Round 15: 10dec (10)
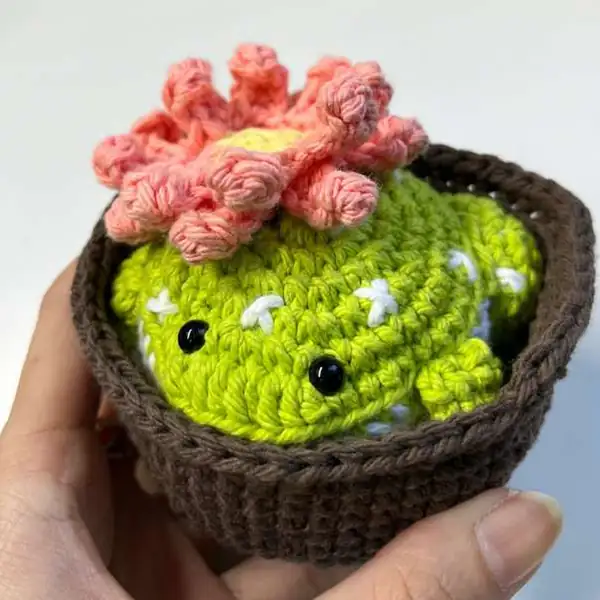
Round 16: 3 dec. F.O You don’t have to finish this round. Close the body by using needle and cut the yarn. Hide the end inside the body. (Please ignore the color, those are the pictures show the shape of the body)
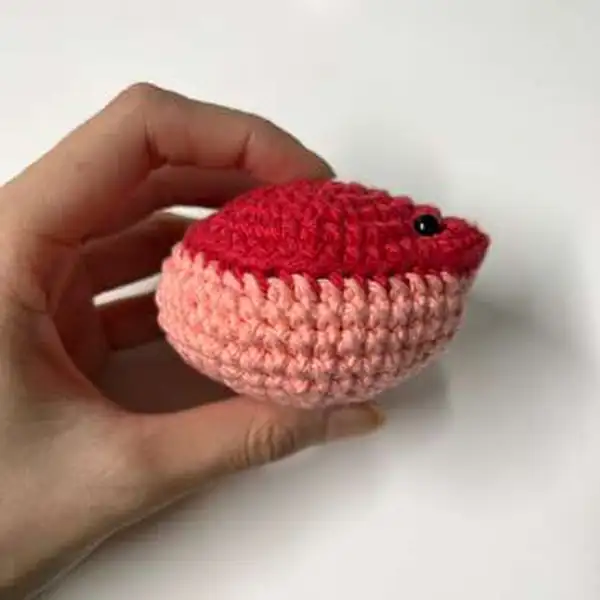
— Head And Body :

Round 1: 6sc in a MR (6)
Round 2: 6inc (12)
Round 3: (sc, inc) x6 (18)
Round 4: 18sc (18) F.O Leave long end to connect with the body.

— Legs :

Round 1: 8sc in a MR (8)
Round 2: do not break the working yarn, continue to work the toes with it: chain 3, turn work, start from the second chain from the hook, hdc, 1 slst in the chain, 1 slst on the MR)x3, 4sc, slst on the last stitch. (8) F.O Leave long end to connect with the back legs.

— Back Legs X2 :

Round 1: 5sc in a MR (5)
Round 2: inc, 2sc, inc, sc (7)
Round 3: 7sc (7) F.O Do not close the piece. Do not stuff the piece. Leave long end to connect with the body.
Round 4: 7sc (7) F.O Do not close the piece. Do not stuff the piece. Leave long end to connect with the body.
Round 5: 7sc (7) F.O Do not close the piece. Do not stuff the piece. Leave long end to connect with the body.
Round 6: 7sc (7) F.O Do not close the piece. Do not stuff the piece. Leave long end to connect with the body.
Round 7: 7sc (7) F.O Do not close the piece. Do not stuff the piece. Leave long end to connect with the body.
Round 8: 7sc (7) F.O Do not close the piece. Do not stuff the piece. Leave long end to connect with the body.
Round 9: 7sc (7) F.O Do not close the piece. Do not stuff the piece. Leave long end to connect with the body.
Round 10: 7sc (7) F.O Do not close the piece. Do not stuff the piece. Leave long end to connect with the body.

— Base :

Round 1: BLO: 6sc in a MR (6)
Round 2: BLO: 6inc (12)
Round 3: BLO: (sc, inc) x6 (18)
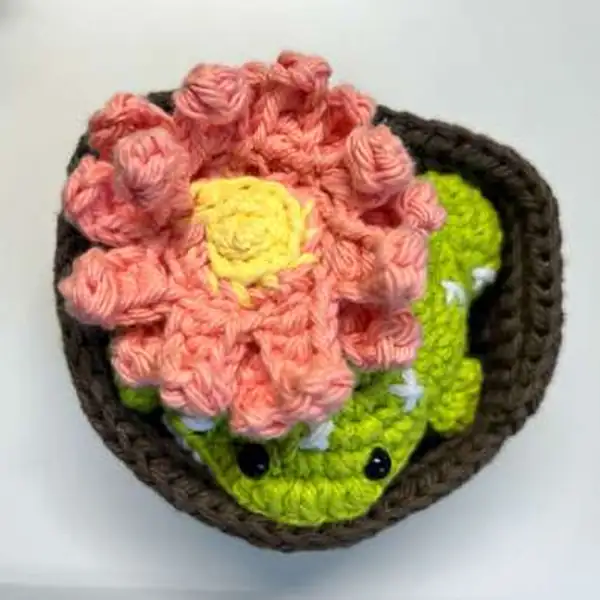
Round 4: BLO: slst, (chain 5, start from the 2nd chain from the hook, 4hdc along the chain, skip 1 stitch, slst on the next stitch of the base) x 8. After you finished all the petals in the back loop (8 petals), change to the front loop and do the same step (8 petals). F.O the last stitch. At the end you should have 16 petals. Leave long end to sew into the frog’s body.

— Toes X2 :

Round 1: 8sc in a MR (8)
Round 2: 8inc (16)
Round 3: (sc, inc) x8 (24)
Round 4: (2sc, inc) x8 (32)
Round 5: (3sc, inc) x8 (40)
Round 6: (4sc, inc) x8 (48)
Round 7: (5sc, inc) x8 (56)
Round 8: BLO: 56sc (56)
Round 9: 56sc (56)
Round 10: 56sc (56)
Round 11: 56sc (56)
Round 12: 56sc (56)
Round 13: 56sc (56)
Round 14: 56sc (56)
Round 15: FLO: 56hdc (56), slst to the first stitch. F.O Leave long end and sew around the pot to secure and hide the end. Cut off the yarn.

Assembly Instructions

  1. Attach back legs to the body on the sides of the thighs, stuffing before closing completely.
  2. Sew the toes to the bottom of the back legs with three toes extending outward.
  3. Sew the front legs two stitches away from the back legs, then tuck the tips into the belly.
  4. Embroider the white X motif around the frog body for added texture.
  5. Attach the flower to the side or top of the frog, as you prefer, ensuring it is securely fastened.
  6. Position the frog in the pot; secure and weave ends neatly to complete the cactus frog in its removable pot.

Important Notes

  • Use stitch markers to keep track of rounds, especially during color changes and shaping sections, so round counts stay consistent.

  • Stuff gradually to maintain round shapes without overstuffing or distorting the silhouette, and adjust stuffing density as you approach the crown to keep crown placement stable.

  • Weave in ends as you go to keep finishing neat and to avoid an untidy seam line that might show after assembly.

  • Keep tension even throughout; tightening at the wrong times can affect round size and facial proportions, so test tension on a swatch before starting the main piece.

  • Place safety eyes at a visually pleasing location and secure backing well, then embroider a small nose between the eyes and a gentle mouth to maintain a friendly expression.

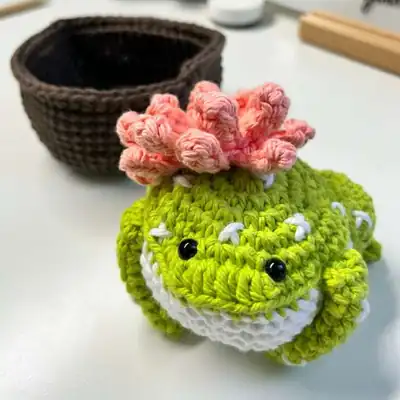
This cactus frog is a playful, compact creation that brightens any space. Its two-part look—the frog body with a floral crown—offers personality and charm suitable for desk shelves, classroom displays, or cozy corners that crave color and whimsy. The finish emphasizes neat seams and steady embroidery, delivering a durable sculpture built to be enjoyed for years. As you stitch and stuff, you’ll notice the careful details—the bloom crown, the gentle belly accents, and the friendly face inviting hugs. Share the finished piece with friends and family to brighten their day, and revel in the satisfaction of creating a handcrafted keepsake that captures both playfulness and care. From the first loop to the final seam, this project provides a balanced blend of challenge and charm, keeping your hands busy and your imagination engaged. Happy crocheting!

Good to know

You ask, we answer

A 3.5 mm hook with Worsted / DK yarn gives a dense fabric that holds its shape and hides the stuffing.

Yes — it uses a small set of common stitches and gives a stitch count at the end of every round, so it is easy to follow even if you are newer to amigurumi.

Absolutely. Use a larger hook and heavier yarn for a bigger piece, or go smaller for a mini — just keep your gauge tight.

Place a marker at the first stitch of each round and move it up as you go; check the count printed at the end of each round.

Toes and back legs being stitched
Join 100k+ crocheters

Get new free patterns, stitch tips and exclusive content in your inbox.