Crochetologist
Free Crochet Pattern
Beautiful Detailed Adorable

Bunny Baby Rattle Amigurumi Pattern

Two completed bunny baby rattle amigurumi pieces in cream yarn with pink collars held by a hand, showing front view of heads and wooden teether rings
4.1Rating
2-3 HoursTime
Beginner FriendlySkill
Highlights

What makes it special

Small, sweet, and gift-worthy creations that fit perfectly in the palm of your hand with detailed charm.

Bite-Sized Project

This rattle is designed as a short, focused crochet session that you can finish in an afternoon using a 2.00 mm hook and sport-weight yarn.

Beginner Friendly Level

This project suits crafters comfortable with magic ring, single crochet, increases and decreases, working in the round and basic seaming — perfect for beginners stepping up to small amigurumi.

This Bunny Baby Rattle is a tiny, tactile crochet project built around a 6 cm wooden ring and a soft stuffed head, perfect for gifting to newborns and toddlers who love to explore textures. It has a soothing rattle hidden inside the head and a chewy wooden ring that supports early teething in a secure, handmade form.

Designed for makers who enjoy compact amigurumi, the pattern balances straightforward single crochet rounds with simple shaping for ears, a wrapped body that hugs the teether, and a charming decorative collar and flower to personalize each toy.

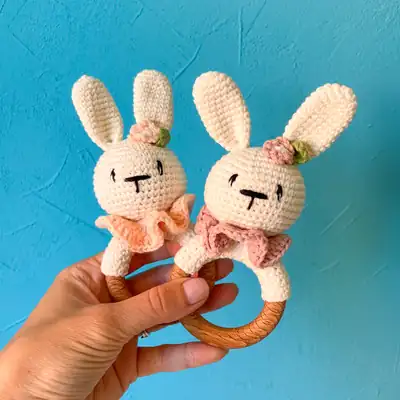
About This Bunny Baby Rattle Amigurumi Pattern

Make a soft, baby-safe bunny rattle with a teether wooden ring using sport-weight yarn and a 2.00 mm hook. This pattern guides you through crocheting the head, ears, body wrap, collar and a tiny flower, with instructions tailored for small hands and a secure wooden ring finish. Clear stitch counts and photo references make assembly straightforward, and the pattern includes material lists and safety tips for making a durable, chew-friendly toy.

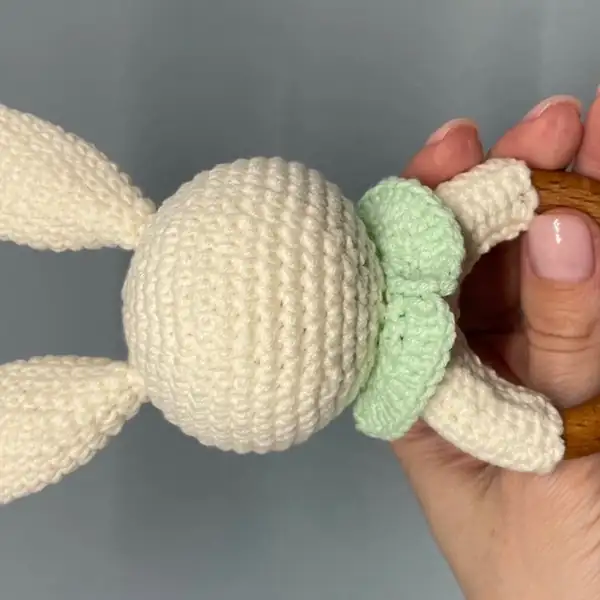
This pattern creates a pocket-sized bunny rattle designed around a 6 cm wooden teether ring, with a stuffed head that holds a 24 mm rattle ball and a wrapped body that hugs the ring securely.

The project uses sport/baby weight yarn (Yarn Art Jeans recommended), a 2.00 mm hook, and simple amigurumi shaping: magic ring starts, rounds of single crochet with planned increases and decreases, and a small ruffled collar and flower for decoration.

You will stitch the head in spiral, crochet two identical ears, work a small rectangular panel to wrap and cover the ring, and finish with embroidered facial details and a tightly-sewn flower accent for safety and charm.

Sleeping baby reaching for a bunny baby rattle amigurumi lying beside them, showing scale and ring size

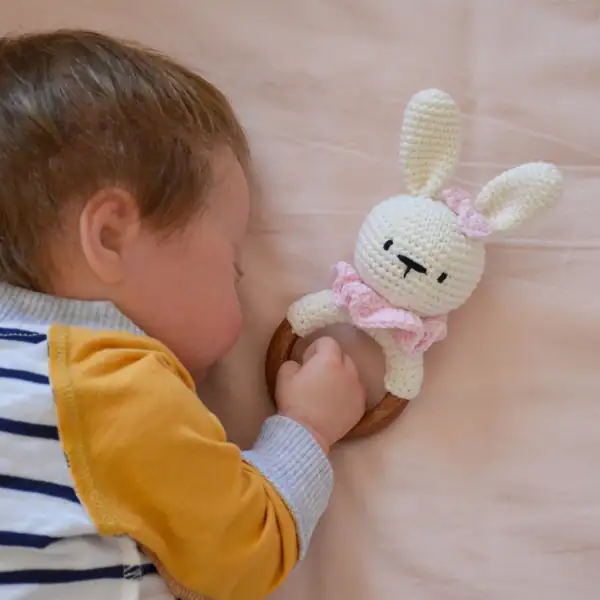
The finished toy measures about 6 cm across the rattle and about 14 cm high including the ring, making it ideal for infants to grasp and chew as they develop motor skills.

The pattern includes clear notations for stitch counts, photographs for reference and gentle assembly tips so you can position ears, collar and flower accurately while keeping all parts firmly attached for safe baby play.

Stitches & Skills You'll Use

The main stitches and techniques used to make the Bunny Baby Rattle are the magic ring to begin the head and ears, single crochet worked in spiral for smooth shaping, increases and decreases for sculpting the head circumference, and rows of single crochet to create the flat strip that wraps the wooden ring. You will also use back loop only (BLO) occasionally for subtle shaping, and slip stitches to finish edges neatly. The flower makes use of higher stitches like half double crochet, double crochet and treble crochet for a layered petal effect.

Beginners will particularly benefit from practicing the magic ring and working small rounds in spiral, because those skills control how the head closes around the rattle ball; the pattern provides exact stitch counts for each round so you can verify your work as you go. Seaming and sewing require basic hand-stitching techniques to attach ears and the wrapped ring securely, which I describe step-by-step for reliable results.

If you are comfortable with consistent tension and counting, the remainder of the stitches are approachable: the collar is a short row project with simple double crochet increases to form a ruffle, and the flower uses a short chain base with grouped stitches to create petals that are rolled and sewn into a neat blossom. These small decorative skills are a fun way to practice transitions between stitch heights while building a safe, finished toy for babies.

Why You'll Love This Bunny Baby Rattle Amigurumi Pattern

Colour & Yarn Inspiration

Neutral cream or soft ivory for the main body paired with a pastel collar — dusty rose, mint, or peach — creates a timeless baby aesthetic that works well for both boys and girls and photographs beautifully for shop listings. Using Yarn Art Jeans in color 05 for the main pieces gives a clean, classic look; for the collar and flower choose a slightly textured accent yarn in a coordinating hue so the ruffle reads clearly against the smooth head fabric.

If you want a modern, gender-neutral palette try mustard yellow with slate gray accents or a soft teal with warm sand; cotton or cotton-blend sport yarns give a matte finish that reads as natural and baby-friendly. When selecting substitutes, note that cotton will produce a firmer, slightly heavier rattle, while acrylic blends offer softer textures and easier washing; adjust your hook choice to maintain tight stitches and a secure fabric around the rattle ball and wooden ring.

Step-by-step assembly photos showing the wrapped wooden ring and attached head of the bunny amigurumi from the back and front

Switch Things Up

I like to change up the look of the Bunny Baby Rattle by swapping the collar color and flower yarn for seasonal variations; for spring I use pale pinks and mint greens, and for winter I pick warm neutrals.

I often alter the size by testing different yarn weights and hook sizes: switching to DK yarn and a 3.0 mm hook creates a slightly larger rattle that is still comfortable for older infants to grip.

I sometimes convert the rattle into a keyring or bag charm by using a smaller wooden ring and a sturdier yarn, then reinforcing attachment points with extra stitches so it will withstand everyday wear.

I add embroidery variations on the muzzle to change the bunny's expression, trying shorter or longer vertical nose stitches to create sleepy, curious, or smiling personalities for a small collection of toys.

I encourage using cotton blends for a softer, natural feel, and when I want a plush texture I pick a fluffier sport yarn that still holds the rattle ball securely inside the head.

I have experimented with adding a small velcro-backed felt accessory instead of a fixed flower so parents can remove it before washing or replace it with seasonal charms.

I sometimes use contrast edging on the collar by switching color every few stitches to give the ruffle a delicate two-tone effect that reads well from a distance.

I occasionally skip the rattle ball and add a few small bells or a crinkle fabric inside an additional lining to make alternative sensory toys for slightly older babies.

I recommend trying different wood finishes for the ring: smooth, food-safe sealed wood is great for teething, while darker-stained rings offer a more vintage aesthetic for nursery displays.

Ways to Use & Gift It

This Bunny Baby Rattle makes a thoughtful newborn or baby shower gift because it combines a teether and a sensory rattle in one compact piece that is easy for little hands to hold; present it tucked into a small gift box with a matching muslin cloth and a note about the natural wooden ring used for teething. Parents appreciate handmade baby items that are washable and thoughtfully assembled, so include care instructions and a brief materials list to reassure them that the wooden ring is food-safe and the rattle ball is securely enclosed.

Make a themed gift set by crocheting a matching lovey, a pair of tiny booties, or a coordinating hat in the same yarn colors, and wrap everything together with a ribbon for a cohesive presentation. Alternatively, stitch up two rattles in contrasting pastel shades and give them as sibling gifts or use one as a shelf-display nursery ornament while keeping the other for everyday play.

Common Mistakes & How to Fix Them

Not securing the rattle ball inside the head tightly enough; place the rattle inside before final stuffing, add firm stuffing around it and close the head with small, even decreases to trap it securely. Leaving long tails unfastened on the wooden ring covering can cause gaps later; weave the tails through multiple stitches and sew the wrap firmly along the ring until there are no loose ends visible. Skipping stitch counts while increasing or decreasing leads to lopsided shaping; mark the start of rounds and count your stitches at the end of each round to verify the total matches the pattern. Using a hook that is too large for sport yarn will create loose stitches that reveal stuffing; switch to a tighter hook such as the recommended 2.00 mm to keep the fabric dense and baby-safe. Overstuffing the head makes attachment to the wrapped ring difficult and changes proportions; stuff gradually and aim for a firm but slightly compressible head that still allows sewing into the body opening. Not sewing the ears and collar tightly will let small parts detach during play; pin pieces in position with sewing pins and use small, secure whipstitches to fasten all decorative elements tightly to the head and collar.

Maker's Notes

When I made the first sample I used Yarn Art Jeans in the recommended color and a 2.00 mm hook and completed the rattle in about 2.5 hours across two short sessions, stuffing and assembly included. I discovered that the critical moments for new makers are rounds 9–15 of the head where the stitch count holds the shape while you increase evenly, and the seam where the wrapped ring meets the head because misalignment there shows immediately. Beginners often try to overstuff the head thinking it will make the toy firmer; instead I stuff firmly but in small increments so the rattle ball stays centered and the head retains a smooth, round silhouette.

When wrapping the wooden ring, take pains to keep the wrap even and to stitch the seam with small, reinforcing stitches so the ring does not shift or reveal gaps after stitching. I recommend pausing to place and pin the ears before final sewing and double-checking facial embroidery placement between rounds 11 and 12 to keep the muzzle symmetrical.

I tried a substitution: I tested this pattern using a DK-weight cotton yarn with a 3.0 mm hook and found the finished rattle increased in overall size by roughly 20–30 percent; the head became slightly squarer and required firmer stuffing, and the wooden ring felt proportionally smaller, so I recommend increasing the ring diameter if you upsize the yarn for balanced proportions.

Bunny Baby Rattle Amigurumi Pattern

Free round-by-round crochet pattern for Bunny Rattle with Teether Ring, with full stitch counts.

Beginner Friendly 2-3 Hours
Pattern at a glance
Skill level
Beginner Friendly
Time to make
2-3 Hours
Hook size
2.00 mm (B/1)
Yarn weight
Sport / #2 (Baby weight)
Finished size
Approx. 6 cm / 2.5 in across the ring; approx. 14 cm / 5.5 in in total height including ring
Gauge
Approximately 24 sts x 25 rows = 10 cm (4 in) in single crochet using sport yarn and a 2.00 mm hook; fabric should be dense so stuffing or rattle pieces do not show through.
Yarn used
Approx. 90 yards (82 m) main color + 5–10 yards (5–9 m) accent colors; total yarn ~95–100 yards (87–91 m).

Materials Needed

Main Fabric
  • 01
    Yarn Art Jeans (color 05) — approx. 90 yards (sport/baby weight) for main body and head
  • 02
    Yarn Art Jeans (any contrasting color) — approx. 5 yards for collar and flower decorations
  • 03
    Suggested yarn alternatives: sport-weight or baby-weight acrylic/cotton blends (approx. 90 yards main color, 5–10 yards accent)
Tools Required
  • 01
    Crochet hook size 2.00 mm
  • 02
    6 cm (2.5 in) wooden ring for teether
  • 03
    24 mm (1 in) rattle ball
  • 04
    Polyester fiberfill stuffing
  • 05
    Sewing needle for finishing
  • 06
    Sewing pins for positioning pieces
  • 07
    Scissors
  • 08
    Stitch marker (optional)

— Part 1 :

Round 1: 6 sc in Magic ring [fig 1] (6)
Round 2: 6 inc (12)
Round 3: (1 sc, inc) * 6 (18)
Round 4: (2 sc, inc) * 6 (24)
Round 5: (3 sc, inc) * 6 (30)
Round 6: (4 sc, inc) *6 [fig 2] (36)
Round 7: (5 sc, inc) * 6 (42)
Round 8: (6 sc, inc) * 6 (48)
Round 9: 48 sc [fig 3];
Round 10: 48 sc [fig 3];
Round 11: 48 sc [fig 3];
Round 12: 48 sc [fig 3];
Round 13: 48 sc [fig 3];
Round 14: 48 sc [fig 3];
Round 15: 48 sc [fig 3];
Round 16: (6 sc, dec) * 6 (42)
Round 17: (5 sc, dec) * 6 (36)
Round 18: (4 sc, dec) * 6 (30)
Round 19: (3 sc, dec) * 6 (24)
Round 20: (2 sc, dec) * 6 (18)
Round 21: (1 sc, dec) * 6 (12)
Round 22: (sc) * 6 (6)

— Part 2 :

Round 1: 6 sc in Magic ring (6)
Round 2: 6 inc (12)
Round 3: (2 sc, inc) * 4 (16)

— Part 3 :

Round 12: (6 sc, dec) * 2 (14)
Round 13: 14 sc;
Round 14: (4 sc, dec) * 2 (12)
Round 15: 12 sc;
Round 16: (4 sc, dec) * 2 (10)

— Part 4 :

Round 1: ch 2, 1 dc in the 20th ch, *2 dc in the next st* till the end,;
Round 2: ch 2, *2 dc in the next st* till the end.

— Part 5 :

Round 1: ch 1, 4 sc in one ch, sl-st, 4 hdc in one ch, sl-st, 4 dc in one;

Assembly Instructions

  1. Attach the crocheted head to the middle top of the wrapped wooden ring body; align the bottom of the head with the top center of the ring wrap and sew through the head rounds around the ring opening with small, tight stitches until secure.
  2. Fold each ear lengthwise to form a shallow dimple, position each ear between rounds 4 and 5 of the head and pin them symmetrically before sewing; use several anchor stitches at the base to ensure they cannot be pulled off.
  3. Wrap the rectangular body panel evenly around the wooden ring and stitch its long edges together to form a snug tube; then whipstitch the tube closed around the ring and weave in the starting and ending tails.
  4. Position the collar between the head and the wrapped ring, sew its ends together to form a ring and tack it to the head in several places to prevent it dangling and to hide the seam between head and body.
  5. Sew the small flower onto the head near one ear and embroider nose and eyes between the 11th and 12th rounds, making sure facial features are centered and symmetrical before securing threads and trimming excess.

Important Notes

  • Always use a tight gauge so the stuffing and rattle cannot be felt through the stitches; switch to a smaller hook if your fabric feels loose.
  • Sew all pieces tightly and double-stitch high-stress joins because this toy is intended for babies who will grip and chew the ring.
  • Place the rattle ball inside the head before final stuffing and check its position frequently while closing the head so it remains centered.
  • Wrap and sew the wooden ring completely so there are no exposed gaps of wood; test the ring after assembly to make sure nothing comes loose.
  • Follow the stitch counts provided for the head and ears exactly to maintain symmetrical shaping and consistent fit over the wooden ring.

This little Bunny Baby Rattle was designed to be both a soothing teether and a tiny companion that fits perfectly in baby hands. It combines a solid wooden ring with a soft, securely-stuffed head so little ones can explore different textures and calm teething gums. Make one in neutral yarn for a classic baby gift or in brighter accent colors to match a nursery.

Good to know

You ask, we answer

The finished rattle measures approximately 6 cm (2.5 in) across the wooden ring and about 14 cm (5.5 in) high including the head and ring when using the recommended yarn and 2.00 mm hook.

Yes, you may substitute other yarn weights, but this will change the finished size and density; if you use thicker yarn choose a larger ring and adjust stitch counts or a smaller hook to keep the fabric safe and tight.

The pattern uses a wooden teether and securely enclosed rattle ball; however, always use natural, unfinished wood rings intended for teethers and sew parts tightly, and never leave a baby unattended with handmade toys.

Basic amigurumi skills such as the magic ring, working in spiral, increases and decreases, and simple seaming are helpful; an advanced beginner can complete the rattle with patience and by following the step-by-step photos provided.

Spot clean with a damp cloth for small stains and avoid immersing the wooden ring; if full washing is necessary, remove the wooden ring and rattle ball first and hand wash the crochet pieces in lukewarm water then air dry thoroughly.

Most makers finish this project in roughly 2–3 hours as a bite-sized afternoon make, depending on your crochet speed and time spent on embroidery and assembly.

Close-up of a single crochet ear piece for the bunny amigurumi held in hand during assembly, demonstrating stitch texture
Join 100k+ crocheters

Get new free patterns, stitch tips and exclusive content in your inbox.