Crochetologist
Free Crochet Pattern
Beautiful Detailed Adorable

Biscuits Amigurumi Pattern

stack of crocheted biscuit amigurumi on a plate showing Choc Chip and Oreo styles
4.8Rating
2-3 HoursTime
Beginner FriendlySkill
Highlights

What makes it special

Made with Love

Small, sweet, and gift-worthy creations that fit perfectly in the palm of your hand with detailed charm.

Bite-Sized Project

Finishes in 2-3 hours depending on how many biscuits you make, since each small cookie is worked in a few short rounds and requires only minimal sewing to assemble.

Beginner Friendly Level

Ideal for makers comfortable with the magic ring, double crochet rounds, joining with slip stitch and basic sewing; this pattern introduces layering and simple shaping while remaining accessible to new crocheters.

These crochet biscuits are tiny, tactile treats made for makers who love quick projects and pretty colourwork, and they are the perfect excuse to sit down with a cuppa. The pack includes instructions for a Choc Chip cookie, a heart-centred Jammie Dodger and a sandwich Oreo, each crafted in flat discs so you can make several in an evening without fuss. Working with Paintbox Simply DK and a 4.0 mm hook gives a satisfying density to the stitches and neat, defined edges that sit beautifully in a small decorative jar or on a tea tray.

If you enjoy little surprises and small handmade gifts, these biscuits are ideal because they combine straightforward double crochet rounds with a few fun finishing touches like stitched-on choc chips and a shaped heart centre. You do not need to stuff any pieces, which speeds up finishing and keeps the shapes true to the cookie inspiration. Whether you are making a set to sell at a craft fair or a tiny collection to tuck into a present, the pattern is designed for cheerfully efficient making and attractive results.

About This Biscuits Amigurumi Pattern

Make a stack of crochet biscuits inspired by classic treats: a Choc Chip cookie, a Jammie Dodger with a heart centre, and a sandwich-style Oreo. Sized for display or gifting, these flat, decorative amigurumi biscuits use DK yarn and a 4.0 mm hook for quick, satisfying makes. The patterns are written in UK terminology with clear round-by-round instructions and simple assembly notes that help you layer and stitch pieces neatly.

Perfect for small handmade gifts, play food, or a set to keep on a tea tray.

This collection teaches you to crochet three flat biscuit designs — Choc Chip, Jammie Dodger and Oreo — using Paintbox Simply DK and a 4.0 mm hook, making each piece quick to work and fun to arrange.

The Choc Chip uses random stitched-on chips, the Jammie Dodger has a sewn heart-shaped centre created from a small circle, and the Oreo stacks three layers to create the sandwich look without padding that would distort the biscuit edges.

The instructions are presented in UK terms and include all materials, round counts and finishing notes so you can easily replicate each biscuit in coordinated colours.

single Jammie Dodger crochet biscuit with a red heart centre on a floral plate

You will make top and base discs for each biscuit, then add surface details or a centre and sew layers together for the finished look.

The pattern emphasizes consistent tension and careful joining so the top and base sit neatly when sewn wrong sides together.

Stitches & Skills You'll Use

The core stitches and techniques used in this biscuit set are deliberately simple to keep the pattern approachable while teaching useful assembly skills. You will use the magic circle to start small round centres, chains to begin rounds where noted, and double crochet worked in rounds to create flat discs that increase smoothly from the centre outward. Slip stitches are used to join rounds neatly so the biscuit retains a clean outer edge. These stitches together allow you to shape three distinct biscuit styles from the same basic construction.

Beyond the basic loops and joins, the pattern introduces surface stitching for the Choc Chip decoration and a cast-on tail method for shaping the Jammie Dodger centre into a heart, which is an accessible way to learn small shaping without complicated increases. Beginners will also practise matching top and base discs so the seam is even when you join wrong sides together, and learners will gain confidence with simple sewing techniques to stack the Oreo layers without compressing the cream centre.

For anyone new to amigurumi-like projects, these biscuits are a friendly first step because they rely on tension control, even increases and careful joining rather than three-dimensional stuffing or intricate shaping, and those core skills are widely transferable to a range of crochet makes.

Why You'll Love This Biscuits Amigurumi Pattern

I absolutely love these little crochet biscuits because they are such a cheerful, low-pressure project that still delivers a lovely finished set you can display or give away. I enjoyed picking the colour names and arranging the pieces on a vintage plate to photograph, and the simple rounds meant I could work one while watching a short programme. Sewing the Jammie Dodger heart into place felt like a tiny triumph, and stitching the Oreo layers without squashing the cream centre taught me useful assembly control.

I find it rewarding that the same set of basic rounds yields three distinct biscuit types through small finishing choices. Working with Paintbox Simply DK on a 4.0 mm hook created a satisfying texture and reliable size every time I made a batch. Sharing these as gifts has been fun because recipients are surprised at how detailed but undemanding the pattern is, and I keep recommending it to friends who want a quick handmade treat.

Colour & Yarn Inspiration

The Paintbox Simply DK palette used in the original pattern provides a warm tea-time palette, but these biscuits respond beautifully to colour substitutions and playful contrasts. Try a trio of biscuit tones — a pale oat for base, a caramel for top, and a darker brown for chips — to evoke classic bakery colours, or choose pastel shades like blush, mint and lemon for a lighter, nursery-friendly set. Using a pop colour for the Jammie Dodger centre, such as raspberry or coral, creates an attractive focal point, while a stark white or cream for Oreo filling will clearly separate the sandwich layers visually.

Changing fibre can also influence the biscuit look; a cotton DK will produce crisp, matte discs with a clean edge that feels slightly cooler to the touch, whereas acrylic gives a softer, slightly glossier finish and is easier to wash. If you want a cosy, chunky biscuit for decor, try substituting a thicker yarn with an appropriately larger hook and keep an eye on the stitch count so the dimensions remain balanced between top and base. Mix-and-match colourways across a batch for curated tins with variety and visual interest.

close-up of an Oreo-style crochet biscuit showing the cream centre and layered edge amigurumi

Switch Things Up

I like to change colours to create themed biscuit sets, so I sometimes swap the main biscuit colour for warm cinnamon or pale oat shades to echo autumn tones.

I often scale the pattern by changing yarn weight and hook size; using a 3.5 mm hook with DK gives a slightly smaller biscuit, while a 5 mm hook and aran yarn makes a chunkier decorative biscuit perfect for a cushion embellishment.

I sometimes replace the sewn jam heart with a tiny embroidered flower in red or pink for a spring collection and stitch small french knots as jam seeds for texture.

If I want a keychain, I stitch two matching biscuits together and insert a thin plastic keyring loop between the layers before closing the seam so the biscuit hangs neatly without damage.

For a more realistic Oreo, I add an extra round to the cream centre in E and use a contrasting textured stitch to suggest piped cream, which gives more depth.

I also experiment with surface embroidery for choc chips using a darker brown and tiny satin stitches to make a little shine on each chip that catches the light.

To make a durable play set, I reinforce joins with an extra pass of sewing thread and knot securely, which holds up better to handling by small children.

Sometimes I mix yarn types, pairing a cotton DK for a crisp edge with acrylic for the centre, which creates a subtle difference in sheen across layers that looks charming on display.

When I want to gift-wrap a set, I stitch a small loop into the seam to hang the biscuit on a ribbon, turning the biscuit into a tiny ornament for a present tag.

I also enjoy making a matching tin by crocheting a larger round and lining a small box, which creates a themed gift package and elevates presentation for markets or holiday gifting.

Ways to Use & Gift It

These small crochet biscuits make delightful stocking fillers, versatile package toppers, or a sweet addition to a handmade tea-themed gift set. I like to pair a trio of biscuits with a small jar of hot chocolate powder and a handwritten recipe card to create a cosy present for a friend who enjoys baking or afternoon tea rituals. Because they are small and lightweight, you can fit several into a decorative tin to create an inexpensive yet thoughtful gift that looks special on a kitchen shelf or windowsill.

Beyond single gifts, these biscuits are excellent for party favours: make sets in different colourways to suit a baby shower, birthday party, or bridal event and present them in organza bags tied with ribbon. They also work well as craft fair items where customers favour small, affordable handmade pieces; bundle several together and display them on a vintage cake stand to attract attention. Finally, make a year-round ornament set by adding a hanging loop during assembly and present them as tree decorations or unique gift tags paired with small baked goods for an extra personal touch.

Common Mistakes & How to Fix Them

Skipping the instruction to fasten off and sew in ends at the end of each top or base often leaves loose tails; always secure tails promptly and weave them into the stitch path to prevent unraveling. Placing choc chips only near the centre of the Choc Chip cookie can look crowded and unnatural; distribute a few embroidered chips into round 7 so the decoration spreads toward the edge. Joining two pieces without matching the rounds precisely can cause a wavy edge and uneven seam; count stitches and align starting points before you join with slip stitch. Using inconsistent tension between the top and base discs produces mismatched sizes when you join them together; maintain the same hook and wrist tension for both pieces to ensure a snug seam. Sewing too close to the very edge when stacking the Oreo layers will flatten the cream centre; leave a small border and stitch through the layers a few millimetres in from the edge to preserve depth. Not leaving a long cast-on tail for the Jammie Dodger top makes shaping the heart centre difficult; cast on a long tail and use it to shape and secure the heart while sewing.

Maker's Notes

When I tested the pattern I used Paintbox Simply DK and a 4.0 mm hook and made three full sets over two evenings, which took about 2-3 hours per set including assembly and weaving in ends. I noticed that beginners commonly struggle around the increase rounds where pattern repeats build the disc (especially rounds that move from 21 to 28 stitches), so I recommend pausing and counting after each increase round to keep the stitch counts accurate. Another area that slows newer makers is the join of top and base; I found it helps to pin or hold both pieces together and count stitches before working the joining dc around.

The Jammie Dodger heart shaping can feel fiddly first time; leaving a long cast-on tail and using it to secure and shape the heart makes this much easier. For testing I made one Choc Chip, two Jammie Dodgers and an Oreo and noted that matching tension between top and base is essential for a neat seam.

I tried a substitution: I tried this pattern using the same DK yarn with a 3.5 mm hook and ended up with slightly smaller biscuits: the Choc Chip measured about 8 cm instead of the 9 cm specified, giving a slightly denser fabric and crisper edge which worked well for keychains but changed the intended scale of the set.

Biscuits Amigurumi Pattern

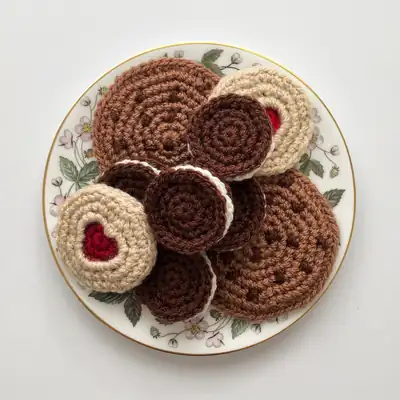
Make adorable crochet biscuits with this free crochet pattern for Choc Chip, Jammie Dodger and Oreo amigurumi cookies; full materials, instructions and assembly tips included.

Beginner Friendly 2-3 Hours
Pattern at a glance
Skill level
Beginner Friendly
Time to make
2-3 Hours
Hook size
4.0 mm (G/6)
Yarn weight
DK / #3
Finished size
Choc Chip 9 cm / 3.5 in diameter; Jammie Dodger 6 cm / 2.4 in diameter; Oreo 5 cm / 2 in diameter
Gauge
Approx. 12 dc x 8 rounds = 4 cm (worked in dc rounds using DK yarn and 4.0 mm hook; adjust tension so edges sit flat and no stuffing is used)
Yarn used
Approx. 40 g total across all colours (~110 m / 120 yds)

Materials Needed

Main Fabric
  • 01
    Paintbox Yarns Simply DK (100% Acrylic; 276m/302yds per 100g ball)
  • 02
    A: Soft Fudge - 10g (main biscuit colour for Choc Chip)
  • 03
    B: Coffee Bean - 10g (dark biscuit or Oreo top/base)
  • 04
    C: Vanilla Cream - 10g (Jammie Dodger base and top)
  • 05
    D: Red Wine - 5g (centre heart for Jammie Dodger)
  • 06
    E: Champagne White - 5g (Oreo cream centre)
Tools Required
  • 01
    Crochet hook size 4.0 mm (G/6)
  • 02
    Tapestry needle for sewing in ends and joining layers
  • 03
    Scissors

— Top and base (make two) :

Round 1: with A dc7 into magic circle, join with ss to 1st dc (7).
Round 2: ch1, 2dc into same st, 2dc into each st around, join with ss to 1st dc (14).
Round 3: ch1, dc into same st, 2dc in next st, *dc, 2dc in next st* repeat from * to * 6 times, join with ss to 1st dc (21).
Round 4: ch1, dc into same st, dc, 2dc in next st, *dc2, 2dc in next st* repeat from * to * 6 times, join with ss to 1st dc (28).
Round 5: ch1, dc into same st, dc2, 2dc in next st, *dc3, 2dc in next st* repeat from * to * 6 times, join with ss to 1st dc (35).
Round 6: ch1, dc into same st, dc3, 2dc in next st, *dc4, 2dc in next st* repeat from * to * 6 times, join with ss to 1st dc (42).
Round 7: ch1, dc into same st, dc4, 2dc in next st, *dc5, 2dc in next st* repeat from * to * 6 times, join with ss to 1st dc (49). Fasten off and sew in ends.

— Base :

Round 1: with C dc7 into magic circle, join with ss to 1st dc (7).
Round 2: ch1, 2dc into same st, 2dc into each st around, join with ss to 1st dc (14).
Round 3: ch1, dc into same st, 2dc in next st, *dc, 2dc in next st* repeat from * to * 6 times, join with ss to 1st dc (21).
Round 4: ch1, dc into same st, dc, 2dc in next st, *dc2, 2dc in next st* repeat from * to * 6 times, join with ss to 1st dc (28).
Round 5: ch1, dc into same st, dc2, 2dc in next st, *dc3, 2dc in next st* repeat from * to * 6 times, join with ss to 1st dc (35). Fasten off and sew in ends.
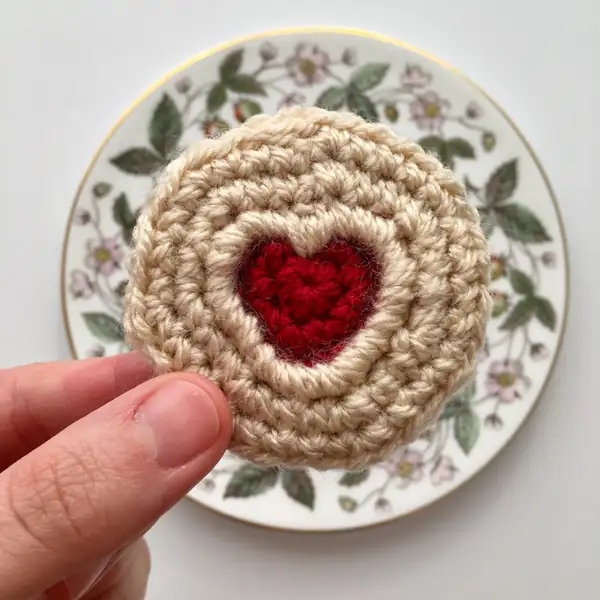
— Centre :

Round 1: with D dc7 into magic circle, join with ss to 1st dc (7).
Round 2: ch1, 2dc into same st, 2dc into each st around, join with ss to 1st dc (14).
Round 3: ch1, dc into same st, 2dc in next st, *dc, 2dc in next st* repeat from * to * 6 times, join with ss to 1st dc (21).
Round 4: ch1, dc into same st, dc, 2dc in next st, *dc2, 2dc in next st* repeat from * to * 6 times, join with ss to 1st dc (28). Fasten off and sew in ends.

— Top :

Round 1: with C ch14, join ends with ss, ch1 and dc21 into the circle, join with ss to 1st dc (21).
Round 2: ch1, dc into same st, dc, 2dc in next st, *dc2, 2dc in next st* repeat from * to * 6 times, join with ss to 1st dc (28).
Round 3: ch1, dc into same st, dc2, 2dc in next st, *dc3, 2dc in next st* repeat from * to * 6 times, join with ss to 1st dc (35). Fasten off and sew in end.

— Top and base (make two) :

Round 1: with B dc7 into magic circle, join with ss to 1st dc (7).
Round 2: ch1, 2dc into same st, 2dc into each st around, join with ss to 1st dc (14).
Round 3: ch1, dc into same st, 2dc in next st, *dc, 2dc in next st* repeat from * to * 6 times, join with ss to 1st dc (21).
Round 4: ch1, dc into same st, dc, 2dc in next st, *dc2, 2dc in next st* repeat from * to * 6 times, join with ss to 1st dc (28). Fasten off and sew in ends.

— Centre :

Round 1: with E dc7 into magic circle, join with ss to 1st dc (7).
Round 2: ch1, 2dc into same st, 2dc into each st around, join with ss to 1st dc (14).
Round 3: ch1, dc into same st, 2dc in next st, *dc, 2dc in next st* repeat from * to * 6 times, join with ss to 1st dc (21).
Round 4: ch1, dc into same st, dc, 2dc in next st, *dc2, 2dc in next st* repeat from * to * 6 times, join with ss to 1st dc (28). Fasten off and sew in ends.

Assembly Instructions

  1. Choc Chip: With wrong sides together, align the top and base discs and join them using colour A by inserting your hook through both layers and working dc around; join with ss to the first dc and fasten off, sewing in tails neatly.
  2. Jammie Dodger: Use the long cast-on tail left from the top piece to stitch the top and centre together, shaping the central hole into a heart by pulling and securing a couple of extra small stitches to form the V at the top.
  3. Jammie Dodger final join: With wrong sides together, use colour A to sew the top and base around the outer edge so the heart centre sits flush and the biscuit has an even rim.
  4. Oreo: Stack base (upside down), cream centre, and top right side up, then carefully sew around the outer edge using colour B, taking care not to catch the cream centre stitches too close to the edge to avoid flattening the layer.
  5. Finish: For all biscuits, weave in ends close to the stitch path, trim excess tails, and press lightly with a cool iron over a cloth if needed to flatten any uneven joins.

Important Notes

  • Work with consistent tension so that the tops and bases match in diameter; mismatched pieces will make joining awkward and produce a wavy seam.
  • Leave a long cast-on tail for the Jammie Dodger top so you can use it to shape and secure the heart centre during joining and sewing operations.
  • Embroider or stitch choc chips onto the right side of the Choc Chip top and include a few chips in the outer round so the decoration appears naturally scattered.
  • When stacking the Oreo, avoid sewing too near the inner cream so the sandwich retains some height and does not become flattened during assembly.
  • Fasten off and sew in ends immediately after finishing each piece to keep your workspace tidy and prevent accidental unraveling later.

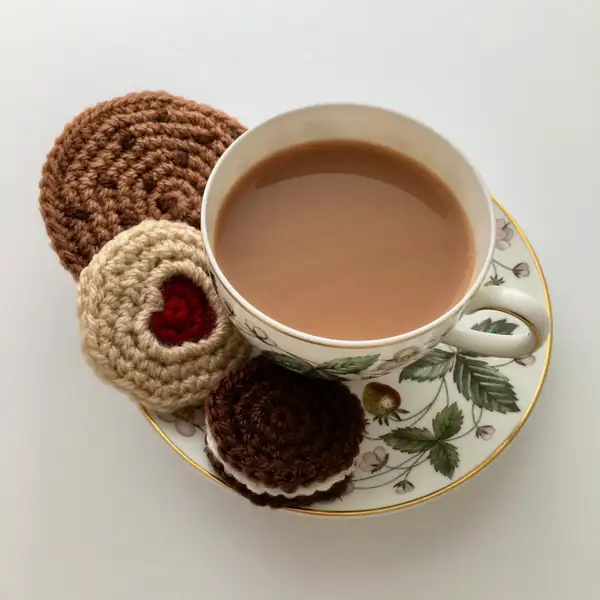
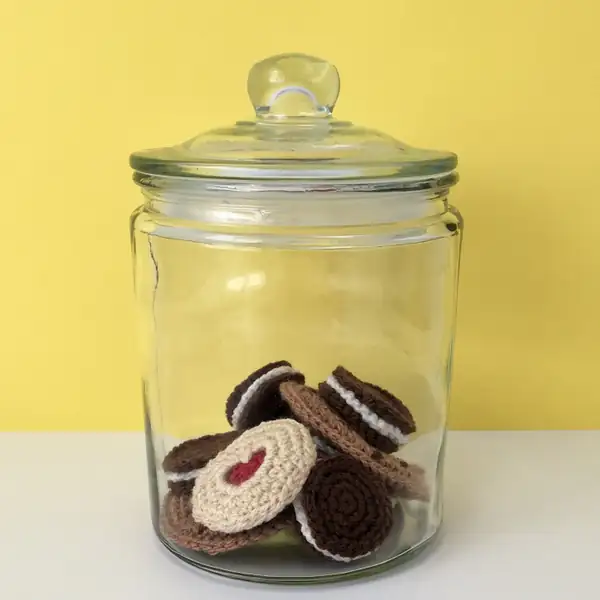
These tiny crochet biscuits bring a smile whether displayed on a shelf or given as a little handmade gift. They pair perfectly with a cup of tea and a handwritten note for someone special. The set is compact and collectible — make a full tin to brighten a kitchen or to tuck into a stocking at holiday time.

Good to know

You ask, we answer

The finished biscuits measure approximately: Choc Chip 9 cm diameter, Jammie Dodger 6 cm diameter, and Oreo 5 cm diameter when made with Paintbox Simply DK and a 4.0 mm hook.

Yes, you can substitute yarn but expect changes in final size and texture; use an appropriately sized hook for the yarn weight to maintain the biscuit proportions described in the pattern.

No special skills are required; shaping the heart uses basic crochet circles and a long cast-on tail to pull and stitch the centre into a heart shape while joining the top to the centre.

Stitch the chips randomly onto the right side of the Choc Chip top and include a few in the outermost round so the chips are distributed across the surface rather than clustered in the centre.

No stuffing is used; the biscuit shapes are formed by flat crochet rounds and assembled in layers so stuffing is unnecessary and would distort the flat edges.

Hand-wash gently in lukewarm water with mild detergent and reshape while damp; acrylic is durable but avoid high heat when drying to prevent slight warping.

three small crochet biscuits arranged on a plate: Choc Chip, Jammie Dodger and Oreo amigurumi
Join 100k+ crocheters

Get new free patterns, stitch tips and exclusive content in your inbox.