Crochetologist
Free Crochet Pattern
Beautiful Detailed Adorable

Bepo the Little Hippo Amigurumi Pattern

Grey hippo head with blue hat amigurumi (front view)
4.8Rating
8-10 HoursTime
IntermediateSkill
Highlights

What makes it special

Made with Love

An adorable friend to cherish, handcrafted with love to bring comfort and joy for years to come.

All-Day Adventure

Takes 8-10 hours, ideal for a weekend project that unfolds in several sessions as you switch colors and sew the parts together with mindful patience.

Intermediate Level

This project sits at an intermediate level, suitable for crocheters who are comfortable working in the round with a small hook, executing color changes, and performing careful seaming to join limbs and features neatly. The challenge lies in keeping the color transitions clean, maintaining even tension across multiple sections, and aligning joints so the figure sits stably on a variety of surfaces. While no advanced stitches are required, a steady pace, careful counting, and an organized workspace will help you finish with a polished result.

Meet Bepo, a soft, curious hippo crafted for calm making sessions and cozy snuggles. This project invites you to slow down and enjoy the rhythm of crocheting a small companion that blends simple color changes with gentle shaping. The result is a hand‑made, huggable friend whose striped torso reads playful without being flashy, and whose round head and limbs feel lovingly plush in the hand. Bepo is designed to be approachable for makers who value even tension, careful assembly, and a finished toy that rewards patience as much as speed.

Beyond the stitches, this pattern emphasizes the satisfaction of planning ahead: choosing color order, keeping the yarn neat as you switch hues, and placing each feature with intention so the final figure sits and photographs nicely. Whether you’re gifting a child, a friend, or yourself, the little hippo embodies a quiet kind of joy that travels well and stands up to daily play. The design invites you to treasure the making process as much as the finished keepsake, turning a small project into a memorable crochet moment.

About This Bepo the Little Hippo Amigurumi Pattern

Bepo is crocheted in four colors of Katia Panama cotton yarn, chosen for a crisp, breathable texture and a soft hand. A 2 mm hook is recommended to achieve a tight, even fabric that holds stuffing well without gapping. You begin each section with a magic ring to create a smooth, unified start for rounds that progressively form the head, the striped torso, and the short limbs. The stripes are created by deliberate color changes at clear points, making the progression easy to track and adjust if desired.

The pattern uses invisible decreases to maintain a rounded shape at the crown and snout, and a series of controlled increases to expand the head without creating bulges. The torso stripes emerge through a sequence of color flips that are planned from the outset, which helps to keep the color transitions neat and the fabric tension even where colors meet. The legs and arms are formed as small, crocheted components that are then attached with a whipstitch and minimal stuffing, ensuring they stay soft and flexible for posing. Ears are shaped with subtle front/back loop work to coax gentle curvature and a relaxed silhouette.

Assembly requires sewing the ears, arms, legs, and tail to precise locations, followed by deliberate stuffing to balance softness with shape. The design favors a straightforward approach to joining parts, using a consistent placement plan so the piece looks balanced on any surface. Facial features are added with embroidery threads and small safety eyes, chosen to keep the face calm and friendly without overwhelming the plush form. The finished toy is robust for play, but light and cuddly enough to be carried in arms or tucked into a child’s bed for comforting stories.

Close-up of nostrils and eyes on hippo amigurumi

The process emphasizes modular construction: establish a stable head first, then craft a striped trunk as a separate module, followed by limbs as individual components. Each module is completed and inspected before attachment, which reduces frustration by allowing you to adjust symmetry and proportion in discrete steps. This approach helps maintain a confident, upright stance when Bepo sits and avoids awkward tilts when placed on a shelf or nestled against a pillow.

Throughout the work, you’ll experience the tactile pleasure of cotton yarn against the hook, the satisfying snap of a finish that comes from careful tension control, and the small, satisfying details—the face stitched with care, tiny nostrils, and subtly textured ears—that give Bepo its distinct personality. Even when you’re new to in‑the‑round crochet, the rounds are laid out to be approachable: follow the scripting order, count thoughtfully, and allow space to adjust as you sew and stuff. When complete, this hippo becomes a cherished keepsake that invites hugs, storytelling, and quiet moments of crafting joy.

Stitches & Skills You'll Use

Key techniques you’ll use include the magic ring to start rounds, single crochet, increases and decreases to shape the head and body, and back/front loop (BLO/FLO) work to add gentle texture to the limbs. Color changes create the torso stripes, and slip stitches are employed for neat finishing touches along seam lines. You’ll place small safety eyes at measured points and perform careful embroidery to add subtle eyes and nostrils that give Bepo character without dominating the plush form. The assembly requires attaching limbs and head with precise stitching to maintain symmetry and a plush feel when handled.

The magic ring provides a flexible entry for rounds that grow from a compact circle into the rounded head and the elongated striped body. Increases are balanced to preserve proportion and avoid bulges at the crown or neck. Invisible decreases help create a continuous snout line and a friendly expression, while BLO work on the limbs adds a tangible, pillow-like texture that reads as soft without bulk. Color changes are managed with clean joins and carried strands kept tidy to prevent tangling at color junctions. Final assembly relies on a sequence of small, deliberate stitches to secure each part while maintaining a seamless amigurumi silhouette.

From the first stitch to the last seam, every technique in this project serves the goals of form, function, and delight. The combination of rounded shaping and careful seaming yields a toy that sits firmly on a surface with balanced limbs and a head that stays centered when displayed. The result is beginner‑friendly yet enriching, helping you grow confidence in in‑the‑round crochet, colorwork, and basic articulation through stitching rather than any advanced, secret stitch.

Why You'll Love This Bepo the Little Hippo Amigurumi Pattern

This pattern rewards a steady, mindful pace and rewards careful color changes with clean, readable stripes on the torso. The modular construction helps you stay organized and reduces the sense of overwhelm, especially for handmade toy projects that involve multiple components. The finishing sequence prioritizes softness and security—every seam is deliberate, every joint is reinforced enough to withstand daily play, and facial features are scaled to enhance expression without overpowering the gentle shape.

Crafting Bepo develops confidence in in‑the‑round shaping, color management, and simple assembly, making it a satisfying bridge project for crocheters progressing from basic amigurumi to more complex, multi‑component figures. The finished piece sits securely on a shelf yet remains soft and squeezable, offering a reliable sense of accomplishment that comes from a well‑executed design rather than a single dramatic technique.

Colour & Yarn Inspiration

Consider pale neutrals for a soft, modern look or bright pastels for a playful vibe. If you seek sophistication, substitute bright blues with teals and add a charcoal accent for depth. A single-color hippo offers a clean, contemporary aesthetic, while a gradient yarn can provide subtle shading along the body’s curves. Replacing gray with taupe or beige yields a warmer, Montessori-friendly palette, and a sunny yellow or coral trim can serve as a travel-friendly accent that reads cheerful in photos.

Substituting yarn types—moving from pure cotton to a cotton/acrylic blend—will influence drape and softness. Test a small swatch to see how the fabric behaves when stuffed and sewn and adjust your tension accordingly. For durability, choose a stronger cotton blend and reinforce the major joints with additional, tiny stitches. Always tailor the color choices to the recipient’s age and preferences, and consider embroidering eyes as an alternative to safety eyes for very young children.

Whole hippo toy with striped torso and legs

Switch Things Up

Switching color palettes is a simple but powerful way to tailor Bepo’s mood. Try a rosy palette using pinks and soft grays for a gentle, welcoming look, or opt for a seaside scheme with pale blues, aquas, and a touch of sand for a calmer vibe. You can experiment with yarn weights to alter size: heavier cotton or a DK weight yields a larger, cuddlier version, while a finer yarn creates a more compact, delicate feel. If you want more poseability, consider inserting a tiny, removable wire armature inside the limbs before finishing the seams, ensuring you can adjust posture while preserving softness and safety for children.

Embroidery offers another path to personality—tiny smiles, eyebrows, or freckles near the snout can alter Bepo’s expression. Accessories like a crocheted scarf or a mini hat in coordinating colors can tailor the character to a season or event, turning a simple toy into a themed companion. The joy of customization lies in making a unique character rather than reproducing the same design exactly each time.

You can vary the hat size or stripe width to affect surface interest. For extra texture, try a cuff in a single color at the hat’s base or an extra pass of rounds with a larger hook to emphasize the stripe pattern. These adjustments keep the project engaging while staying faithful to the design’s charm.

For gift-ready versions, you can tailor the finish by adjusting the eye style or mouth embroidery to a closed-mouth expression. The pattern supports a timeless look suitable for children and adults alike. Regardless of the variation you choose, the result remains a warm, imaginative companion that carries handmade warmth to every home.

Ways to Use & Gift It

Present Bepo as a thoughtful baby shower keepsake, a first birthday gift, or a cheerful desk buddy for someone who loves handmade decor. The soft cotton texture makes him safe for little hands and comforting for quiet moments.

Display him on a bookshelf, a bedside table, or a reading nook to spark imaginary adventures and lullaby-like stories. For an extra gesture, crochet a small striped family of companions, each with distinct stripe patterns and facial touches, to form a tiny menagerie that can be gifted and displayed together.

Common Mistakes & How to Fix Them

Overtightening the yarn when sewing limbs can warp the form and create stiff joints; maintain gentle tension and use a smaller needle tip to weave seams smoothly. Skipping a round or miscounting stitches at color changes leads to misaligned stripes; mark the color-change points with a small stitch marker to stay precise. Stuffing too aggressively causes distortion in the head and muzzle; fill gradually in small amounts as you shape the snout and cheeks. Letting ends fray at the join lines causes visible gaps; secure and weave in all ends before final assembly, then trim flush. Neglecting to secure halo seam lines around the hat or ears may result in shifting; anchor with several small stitches to hold shapes firmly.

Maker's Notes

In my build of Bepo, I chose a 2.0 mm hook with sport-weight cotton and experimented with several color configurations to understand how stripe width and color balance interact with the head‑to‑torso proportions. The process took roughly nine hours spread across three sessions, with a focus on maintaining steady tension and avoiding puckering at color junctions. I found that carrying the carry yarn neatly on the wrong side during color changes reduced tangling and kept stripes crisp.

Aligning the head and neck snugly while keeping the neck opening flexible enough to stuff required patient adjustments during the closing stages. The final stuffing was deliberate but modest, preserving a plush silhouette without distorting features like the muzzle or ears.

I tried a substitution: Replacing the original yarn with a DK weight and moving to a 2.5 mm hook produced a hippo that stood about 2 to 3 cm taller and appeared looser in the body. I corrected by shortening a few rounds in the head and trunk while increasing stuffing density slightly to maintain the intended curvature. The stripe width expanded proportionally, altering the visual rhythm of the torso. The overall charm remained strong, but the proportions shifted enough that you should recalculate your starting chain length and review the placement of limbs if you swap weights. In general, matching the yarn weight to the hook size is the single most reliable way to preserve scale and texture across substitutions.

Bepo the Little Hippo Amigurumi Pattern

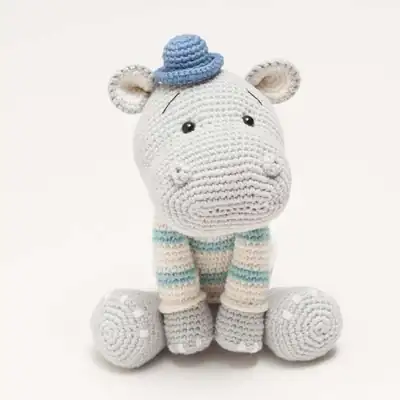
Make Bepo the Little Hippo with our free crochet pattern—complete round-by-round instructions, materials and tips. Start crocheting today!

Intermediate 8-10 Hours
Pattern at a glance
Skill level
Intermediate
Time to make
8-10 Hours
Hook size
2.0 mm (B/1)
Yarn weight
Sport / #2
Finished size
Approx. 14.5 cm tall sitting
Gauge
Not specified; approximately 7 SC x 7 rounds per 2.5 cm square with 2.0 mm hook
Yarn used
Total yarn around 240 g (approx. 180-250 g depending on tension and color distribution)

Materials Needed

Main Fabric
  • 01
    Katia Panama 100% cotton yarn, Sport weight (#2), grey - 60g
  • 02
    Katia Panama 100% cotton yarn, Sport weight (#2), cream - 60g
  • 03
    Katia Panama 100% cotton yarn, Sport weight (#2), light blue - 60g
  • 04
    Katia Panama 100% cotton yarn, Sport weight (#2), blue - 60g
  • 05
    Total around 240g, depending on tension
Tools Required
  • 01
    Crochet hook size 2.0 mm (B/1)
  • 02
    Safety eyes 6 mm (2 pieces)
  • 03
    Polyester fiberfill
  • 04
    Tapestry needle
  • 05
    Scissors
  • 06
    Stitch markers
  • 07
    Pins for assembly

— Nostrils :

Round 1: start 6 sc in a magic ring (6)
Round 2: sc in all 6 st (6)

— Head :

Round 1: make a chain of 12 Rnd 2: start crocheting in the second loop from the hook. 10 sc, 3 sc in the last loop of the chain. Turn your work round so that you can now crochet on the other side of the chain, 9 sc and increase in the last chain (24)
Round 3: inc, 9 sc, (inc) x 3, 9 sc, (inc) x 2 (30)
Round 4: (1 sc, inc) x 2, 9 sc, (1 sc, inc) x 3, 10 sc, inc (36)
Round 5: (2 sc, inc) x 2, 9 sc, (2 sc, inc) x 3, 11 sc, inc (42)
Round 6: (3 sc, inc) x 2, 9 sc, (3 sc, inc) x 3, 12 sc, inc (48)
Round 7: (4 sc, inc) x 2, 9 sc, (4 sc, inc) x 3, 13 sc, inc (54)
Round 8: sc in all 54 st (54)
Round 9: sc in all 54 st (54)
Round 10: sc in all 54 st (54)
Round 11: sc in all 54 st (54)
Round 12: sc in all 54 st (54)
Round 13: sc in all 54 st (54)
Round 14: sc in all 54 st (54)
Round 15: (7 sc, dec) x 6 (48)
Round 16: (3 sc, inc) x 6, 24 sc (54)
Round 17: (4 sc, inc) x 6, 24 sc (60)
Round 18: sc in all 60 st (60)
Round 19: sc in all 60 st (60)
Round 20: sc in all 60 st (60)
Round 21: sc in all 60 st (60)
Round 22: sc in all 60 st (60)
Round 23: sc in all 60 st (60)
Round 24: sc in all 60 st (60)
Round 25: (8 sc, dec) x 6 (54)
Round 26: sc in all 54 st (54)
Round 27: (7 sc, dec) x 6 (48)
Round 28: sc in all 48 st (48)
Round 29: (6 sc, dec) x 6 (42)
Round 30: (5 sc, dec) x 6 (36)
Round 31: (4 sc, dec) x 6 (30)
Round 32: (3 sc, dec) x 6 (24)
Round 33: (2 sc, dec) x 6 (18)
Round 34: (1 sc, dec) x 6 (12)
Round 35: 6 dec (6)

— Ears :

Round 1: start 6 sc in a magic ring (6)
Round 2: inc in all 6 st (12)
Round 3: (1 sc, inc) x 6 (18)
Round 4: (2 sc, inc) x 6 (24)

— Arms :

Round 1: start 6 sc in a magic ring (6)
Round 2: inc in all 6 st (12)
Round 3: (1 sc, inc) x 6 (18)
Round 4: (2 sc, inc) x 6 (24)
Round 5: sc in all 24 st through both parts (24)
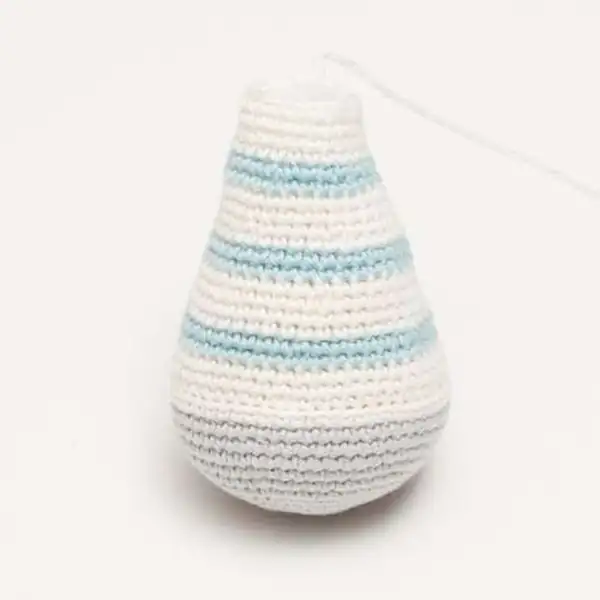
— Body :

Round 1: start 6 sc in a magic ring (6)
Round 2: inc in all 6 st (12)
Round 3: (1 sc, inc) x 6 (18)
Round 4: (2 sc, inc) x 6 (24)
Round 5: (3 sc, inc) x 6 (30)
Round 6: (4 sc, inc) x 6 (36)
Round 7: (5 sc, inc) x 6 (42)
Round 8: (6 sc, inc) x 6 (48)
Round 9: (7 sc, inc) x 6 (54)
Round 10: sc in all 54 st (54)
Round 11: sc in all 54 st (54)
Round 12: sc in all 54 st (54)
Round 13: sc in all 54 st (54)
Round 14: sc in all 54 st (54)
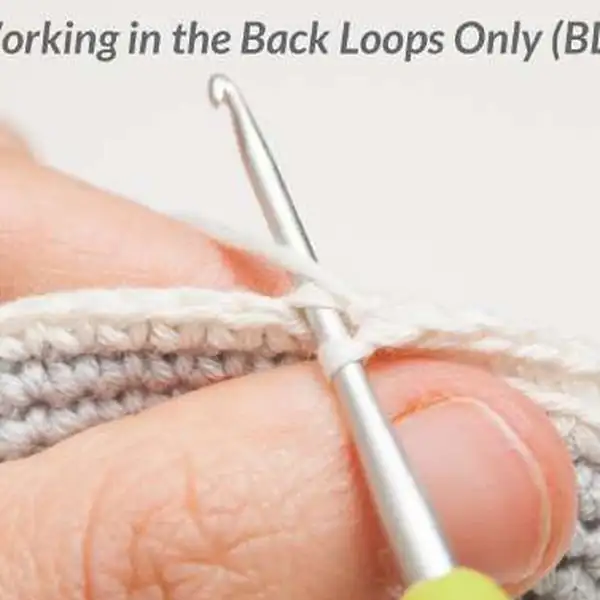
Round 15: BLO sc in all 54 st (54)
Round 16: (7 sc, dec) x 6 (48)
Round 17: sc in all 48 st (48)
Round 18: sc in all 48 st (48)
Round 19: (6 sc, dec) x 6 (42)
Round 20: sc in all 42 st (42)
Round 21: sc in all 42 st (42)
Round 22: sc in all 42 st (42)
Round 23: (5 sc, dec) x 6 (36)
Round 24: sc in all 36 st (36)
Round 25: sc in all 36 st (36)
Round 26: sc in all 36 st (36)
Round 27: (4 sc, dec) x 6 (30)
Round 28: sc in all 30 st (30)
Round 29: sc in all 30 st (30)
Round 30: sc in all 30 st (30)
Round 31: (3 sc, dec) x 6 (24)
Round 32: sc in all 24 st (24)
Round 33: sc in all 24 st (24)
Round 34: sc in all 24 st (24)
Round 35: sc in all 24 st (24)

— Arm :

Round 1: start 6 sc in a magic ring (6)
Round 2: inc in all 6 st (12)
Round 3: (1 sc, inc) x 6 (18)
Round 4: (2 sc, inc) x 6 (24)
Round 5: BLO sc in all 24 st (24)
Round 6: (6 sc, dec) x 3 (21)
Round 7: sc in all 21 st (21)
Round 8: sc in all 21 st (21)
Round 9: (5 sc, dec) x 3 (18)
Round 10: sc in all 18 st (18)
Round 11: sc in all 18 st (18)
Round 12: BLO sc in all 18 st (18)
Round 13: sc in all 18 st (18)
Round 14: sc in all 18 st (18)
Round 15: sc in all 18 st (18)
Round 16: (4 sc, dec) x 3 (15)
Round 17: sc in all 15 st (15)
Round 18: sc in all 15 st (15)
Round 19: sc in all 15 st (15)
Round 20: sc in all 15 st (15)
Round 21: sc in all 15 st (15)
Round 22: (3 sc, dec) x 3 (12)
Round 23: sc in all 12 st (12)
Round 24: sc in all 12 st (12)
Round 25: sc in all 12 st (12)
Round 26: sc in all 12 st (12)
Round 27: sc in all 12 st (12)
Round 28: (2 sc, dec) x 3 (9)
Round 29: sc in all 9 st (9)
Round 30: Flatten the top of the arm and sc through both layers to close. Fasten off, leaving a long tail for sewing.

— Leg :

Round 1: start 6 sc in a magic ring (6)
Round 2: inc in all 6 st (12)
Round 3: (1 sc, inc) x 6 (18)
Round 4: (2 sc, inc) x 6 (24)
Round 5: (3 sc, inc) x 6 (30)
Round 6: (4 sc, inc) x 6 (36)
Round 7: BLO sc in all 36 st (36)
Round 8: sc in all 36 st (36)
Round 9: sc in all 36 st (36)
Round 10: (4 sc, dec) x 6 (30)
Round 11: sc in all 30 st (30)
Round 12: sc in all 30 st (30)
Round 13: sc in all 30 st (30)
Round 14: (3 sc, dec) x 6 (24)
Round 15: sc in all 24 st (24)
Round 16: sc in all 24 st (24)
Round 17: sc in all 24 st (24)
Round 18: sc in all 24 st (24)
Round 19: (2 sc, dec) x 6 (18)
Round 20: sc in all 18 st (18)
Round 21: sc in all 18 st (18)
Round 22: sc in all 18 st (18)
Round 23: sc in all 18 st (18)
Round 24: (1 sc, dec) x 6 (12)
Round 25: sc in all 12 st (12)
Round 26: sc in all 12 st (12)
Round 27: Flatten the top of the leg and sc through both layers to close. Fasten off, leaving a long tail for sewing.

— Tail :

Round 1: start 6 sc in a magic ring (6)
Round 2: sc in all 6 st (6)
Round 3: sc in all 6 st (6)
Round 4: sc in all 6 st (6)
Round 5: sc in all 6 st (6)

— Hat :

Round 1: start 6 sc in a magic ring (6)
Round 2: inc in all 6 st (12)
Round 3: (1 sc, inc) x 6 (18)
Round 4: sc in all 18 st (18)
Round 5: sc in all 18 st (18)
Round 6: sc in all 18 st (18)
Round 7: sc in all 18 st (18)
Round 8: sc in all 18 st (18)
Round 9: working in Front Loops Only (FLO) inc in all 18 st (36)
Round 10: sc in all 36 st (36)

Assembly Instructions

  1. Attach nostrils to the head between rounds 6-8 with 12 stitches between them and secure well.
  2. Sew the eyebrows with black embroidery thread 3 rounds above each eye to create expression.
  3. Join inner and outer ears, then fuse them to the head between rounds 28-29, placing the 'right' sides outward and spacing evenly.
  4. Sew the body to the head at round 8 from the last round; align so the neck sits properly against the head.
  5. Attach arms to both sides of the body 1 row below the head; place them symmetrically, then sew legs to the bottom of the body.
  6. Sew the tail to the body on round 4 and shape, then stuff lightly before final assembly.
  7. Stuff all parts moderately, then sew the hat to the head and adjust for a snug fit.

Important Notes

  • Use stitch markers to keep track of your rounds, especially during color changes and shaping sections.
  • Stuff firmly but not too tightly for the best shape and structure - overstuffing can distort your work.
  • Pin all parts in place before sewing to ensure correct positioning and symmetry.
  • Weave in ends as you go to avoid a tedious finishing session at the end.
  • Work with consistent tension throughout for even, professional-looking results.

This little hippo is ready to become a cherished companion. Its cotton yarn and soft stuffing make it incredibly cuddly, while the stripes add whimsy and charm. May every stitch bring a smile to the maker and the recipient alike. Whether you’re gifting or keeping, Bepo invites stories, quiet coffee breaks, and moments of crafting joy. The pattern’s thoughtful construction ensures a durable keepsake that stands up to gentle play and daily admiration. May your crochet journey be as warm as this hippo’s first hug. Happy crocheting, and may your new friend bring warmth and delight to every day.

Good to know

You ask, we answer

The finished hippo stands about 14.5 cm tall when sitting, using the recommended Katia Panama yarn and a 2 mm hook.

Yes, but the final size and texture will change. If you switch yarn weights, adjust your hook size accordingly and be prepared for proportion shifts.

This project is best for an intermediate crocheter who is comfortable with magic rings, color changes, and careful assembly.

Most crocheters finish this project in about 8-10 hours, though time varies with experience and pace.

Hippo ears and hat detail
Join 100k+ crocheters

Get new free patterns, stitch tips and exclusive content in your inbox.