Crochetologist
Free Crochet Pattern
Beautiful Detailed Adorable

Ball of Almost Any Size Amigurumi Pattern

Colorful ball set of different sizes arranged on white fabric, amigurumi ball shapes.
4.7Rating
8-10 HoursTime
Beginner FriendlySkill
Highlights

What makes it special

Made with Love

A mini friend to carry anywhere, providing comfort and companionship in a perfectly portable size.

All-Day Adventure

Requires 8-10 hours, making it a relaxing, immersive project you can complete in a single long session or over a weekend.

Beginner Friendly Level

Designed for hands-on learners who want to practice in-the-round crochet, simple increases and decreases, and careful stuffing; this pattern suits curious beginners who seek a flexible, scalable amigurumi project. The structure is approachable, with clear stage-by-stage progress that builds confidence in measuring, matching halves, and finishing cleanly. The project scales smoothly, inviting experimentation with size while reinforcing solid crochet fundamentals.

From the first slip of yarn to the final neat seam, this project invites crocheters to think in three simple shapes: the top circle, a stretchable middle, and the bottom circle. The result is a sphere that sits nicely on a shelf, fits in a pocket, or becomes a playful desk companion. Clear, repeatable steps emphasize precise counting, even tension, and careful stuffing so the finished ball reads as a compact, hand-crafted toy rather than a loose assembly. This guide is crafted for makers who enjoy math-minded crochet and want a scalable, gift-ready sphere that remains approachable across size ranges.

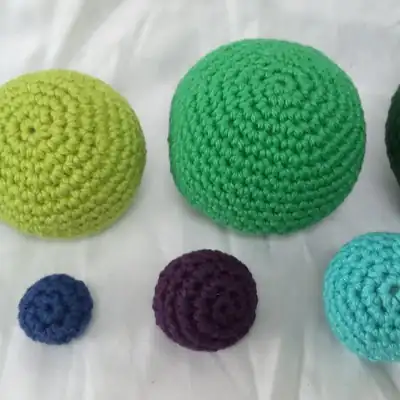
About This Ball of Almost Any Size Amigurumi Pattern

What you’re making here is a ball—an amigurumi sphere that scales from tiny to substantial. It is built from three clear sections: a top circle that starts the sphere, a middle filling that defines the height, and a bottom circle that closes the shape. The pattern uses a straightforward math-based method to determine how many rows are needed in the top section to reach a desired circumference, and it then doubles that sizing with a matching bottom circle. The middle section remains unshaped to preserve height, and the final assembly brings everything together into a smooth, compact sphere. The instructions emphasize technique clarity and careful stuffing so that the finished ball holds its shape and feels pleasing in hand. The approach relies on familiar amigurumi basics—working in the round, making a magic ring start, controlled increases, and deliberate decreases—without introducing any unorthodox stitches.

Yarn choice and hook size are intentionally flexible to support scaling. A balanced combination like a DK-weight cotton with a 3.5 mm hook works well, but the same method translates to sport weight or worsted with matching hook adjustments. The design rewards thoughtful color planning and meticulous tension, allowing the color story to evolve while the structural steps stay constant. This is a compact project that invites precise counting and careful finishing, ideal for someone who enjoys both math and texture in a hand-crafted toy.

As you work, foundational crochet techniques come into play—working in the round, starting with a magic ring, controlled increases and decreases, and careful color management. The top and bottom circles define the sphere, while the middle section maintains height to match the circumference. The interplay between geometric sizing and tactile finish creates a sphere that feels balanced in hand, whether perched on a shelf or carried in a pocket. Each completed size teaches a new nuance in alignment and proportion, inviting experimentation without sacrificing core technique.

Close-up of a small purple crochet ball with visible stitch texture.

Two key ideas define this pattern: size control and neat finishing. Size control comes from the way the top circle’s rounds are planned, using a base of six stitches and increasing in a staggered fashion to craft a smooth dome without bulges. The middle section proceeds in a straightforward, unshaped sequence to preserve height while adding volume. Finishing relies on mindful stuffing and an approach to wiring the seam so that the transition between halves reads cleanly. The aim is a sphere that holds its shape evenly and feels solid in hand rather than floppy or lumpy. This design invites experimentation while offering solid, repeatable results that can be replicated across sizes. The relationship between circumference and row count becomes a practical tool for planning a family of sizes without altering the core method.

Whether gifting a tiny ball for a keychain or crocheting a larger sphere as a decorative piece, the pattern remains approachable and forgiving. The structure supports gentle play and display alike, making it suitable for a desk, shelf, or a pocket friend. With practice, the rounds become more precise, and the process of scaling—by adjusting the top and bottom circle counts while keeping the middle height consistent—becomes a reliable skill that translates to several sizes in one project.

Stitches & Skills You'll Use

The core technique set centers on the magic ring start, a simple chain foundation, and double crochet stitches that form the body’s fabric. Increases are used to shape the domed top and bottom circles with careful spacing to avoid bulges, typically by placing two double crochets into the next stitch. The middle section uses a straightforward row-by-row sequence to maintain height without altering circumference. Layered stuffing helps keep the silhouette smooth and minimizes wiggly pockets. Counting stitches precisely and keeping track of where increases occur is essential so the last round aligns with the starting round. Alignment of the two halves during assembly is a small, essential skill for a clean final look. These elements combine to deliver a reliable, scalable toy pattern that remains straightforward and accessible for repeated use.

In addition to the standard stitches, the pattern highlights the logic of scaling. By understanding the link between circumference and row count, you can estimate the number of rounds needed for different sizes. This practical concept enables a family of sizes without rewriting core instructions. The technique encourages steady counting, consistent tension, and thoughtful joining—habits that elevate any crochet project from good to excellent. The aim is clarity: sizing should be predictable, and the assembly should be forgiving yet precise, so the final sphere feels cohesive rather than disjointed.

Finishing finesse includes weaving in tails as you go and ensuring each seam line sits flush against the body. The result is a compact sphere with a polished texture that reads as a single unit rather than as separate pieces stitched together. Mastery comes with practice: the more rounds completed, the steadier the tension, and the more confident the joins become. The approach is consistently practical, focusing on what a crocheter can accomplish in a standard home setup rather than on any rare or hypothetical technique.

Why You'll Love This Ball of Almost Any Size Amigurumi Pattern

This pattern appeals to makers who enjoy watching geometry translate into a tangible object. The clean separation into top, middle, and bottom sections makes sizing intuitive, while the straightforward rounds encourage steady counting and consistent tension. Finishing matters, and the pattern emphasizes a neat seam, even stuffing, and careful alignment of halves, which collectively yield a ball that reads polished and satisfying in the hand. The process rewards careful planning and measured execution, with a clear payoff in the form of a compact toy that can become a keychain charm, a decorative piece, or a comforting pocket friend. The design supports experimentation with color and scale without compromising the fundamental steps, inviting crocheters to explore variations while preserving a dependable method.

Colour & Yarn Inspiration

Color ideas form the heart of this project. Start with a bold, high-contrast palette to make the ball stand out on a shelf, or opt for soft pastels for a nursery-friendly appearance. For seasonal vibes, transition from warm oranges and yellows to cream or taupe to evoke autumn tones. Two-tone effects can emphasize the sphere’s geometry, with a main color for the middle and contrasting hues for the top and bottom circles.

Substitutions open creative avenues: blend fibers for texture—cotton DK with a touch of acrylic adds resilience and shine, while pure wool delivers a premium drape and a snug feel. If a fuzzy finish is desired, boucle or faux-fur accents offer a tactile contrast. Color choices influence how the shape reads, so feel free to experiment with shading and gradients until a preferred look emerges.

Set of four crochet balls arranged by size on a plain surface.

Switch Things Up

This design offers abundant flexibility for customization. Swap colorways to reflect a favorite character or mood, or test a quick color fade to create a playful transition across the sphere. For a plushier finish, switch to a slightly heavier yarn or tighten the fabric by using a marginally smaller hook. This simple adjustment can increase the squish factor without changing the fundamental steps.

Consider building a small family of balls in a coordinated color scheme for a display shelf or learning corner. Use contrasting colors to emphasize the sphere’s geometry and help learners see how circumference relates to height. For a playful transformation, stitch a tiny face on the top circle and attach two small ears to the sides, turning the ball into a friendly character that travels in a pocket or accompanies storytime.

Pair the ball with a crocheted accessory, such as a mini hat or scarf, to complete a color story for gifting. A tiny prop—like a miniature flag or a pretend leaf—adds whimsy and can turn the sphere into a tiny treasure. Exploring texture through subtle surface stitches or slight variation in stitch height can add tactile interest, especially for sensory play. These variations stay within the pattern’s ordinary techniques, offering new looks without creating a new stitch family.

Texture and color choices influence how the shape is perceived, so experimentation with shading and gradients can yield a distinctive look while keeping the core steps intact. The outcome remains a balanced, round ball that is satisfying to crochet and delightful to display or share.

Ways to Use & Gift It

Gift ideas abound with Ball of Almost Any Size. A tiny ball can become a keychain charm, a pocket toy for a friend, or a thoughtful stocking stuffer. A mid-sized ball can sit on a desk or shelf, adding a pop of color to a workspace or nursery. For celebrations, assemble a small set of balls in complementary colors as a charming, handmade centerpiece for a table or decorative gift ensemble.

Pair the ball with a matching crocheted prop, such as a tiny hat or scarf, to create a coordinated gift package. Attach a small tag with a hand-written message for a personal touch. The joy of giving handmade items lies in the care invested and the little details that bring a smile. This ball pattern is a flexible, thoughtful choice for both gifts and personal projects, adaptable to different ages and settings.

Common Mistakes & How to Fix Them

Avoid letting tension vary dramatically around any round; irregular tension can create small ridges at the edges where the rounds meet. Work with a consistent hand and pause to smooth the fabric before moving on.

Do not skip a step in stuffing order; stuffing in small amounts ensures a round silhouette and prevents wiggly pockets at the seam. Stop to check symmetry before continuing toward the next stage.

Remember to mark the start of each round; losing track during the long transition from top to middle to bottom increases the risk of misalignment and a misshapen final sphere.

Winding in tails in a single long tail can create a tail that protrudes; instead, weave in tails gradually as you work to keep the finish neat and flush against the body.

Scale or gauge adjustments should be tested with a quick swatch; skipping gauge checks can lead to a circumference mismatch when substituting yarn or altering size.

Maker's Notes

During testing, a PaintBox DK cotton with a 3.5 mm hook served as the baseline. Three size variants were explored by adjusting the number of top-row repeats while keeping the middle height constant. Beginners who attempted the largest size sometimes observed slight pulling in the top circles; the recommendation was to pause and check symmetry after every few rounds. Time estimates varied: the initial attempt ran around 7 hours, with later iterations gaining efficiency as stuffing and seam alignment were refined. The main challenges were maintaining a perfectly straight middle section and achieving an invisible final seam. By adjusting stuffing density and tension, consistently round and compact results were achieved across sizes.

Gauge testing with a small swatch helped anticipate size shifts when substituting yarns or hooks. Substituting with sport weight and a smaller hook produced a noticeably smaller ball with a tighter fabric, shortening the circumference by roughly 12–15% and requiring one extra row in the top circle to preserve the look. Using a bulky weight with a larger hook yielded a larger sphere, prompting careful adjustments to the middle section to keep height proportional. The DK weight proved the most forgiving baseline for a broad range of sizes, while sport weight offered a precise mini version and bulky yarn delivered a plush alternative. Substitutions were evaluated with consistent emphasis on gauge, tension, and round alignment.

I tried a substitution: Substituting DK with sport weight and tightening by using a 3.0 mm hook produced a smaller ball with a denser fabric and slightly reduced circumference. The top circle required an extra row to maintain proportionality. A bulky weight with a 4.0–4.5 mm hook created a noticeably larger sphere, with stretched top and bottom circles and a need to recalibrate the middle section to preserve height. Across substitutions, the key remains testing a small swatch to confirm gauge before proceeding with full-size work. In practice, DK offered the most forgiving balance for a versatile range of sizes, while sport weight allowed a precise mini version and bulky yarn offered a chunky alternative with a distinct feel.

Ball of Almost Any Size Amigurumi Pattern

Free round-by-round crochet pattern for Balls of Any Size, with full stitch counts.

Beginner Friendly 8-10 Hours
Pattern at a glance
Skill level
Beginner Friendly
Time to make
8-10 Hours
Hook size
3.5 mm
Yarn weight
Dk
Finished size
Approx. 7 cm / 2.8 in (varies with yarn, hook and stuffing)
Gauge
Work tightly enough that stuffing does not show (3.5 mm hook)
Yarn used
Depends on size and colours used

Materials Needed

Main Fabric
  • 01
    Dk yarn in your chosen colours
Tools Required
  • 01
    3.5 mm crochet hook
  • 02
    Stitch markers
  • 03
    Yarn needle
  • 04
    Fibrefill stuffing
  • 05
    Scissors
  • 06
    Safety eyes (optional)

— Part 1 :

Round 1: 6 dc into a magic ring.
Round 2: 2dc into each dc (12)
Round 3: (dc, 2dc in next dc) repeat 6 times (18)
Round 4: 1 dc, 2dc in next dc, (2 dc, 2dc in next dc) repeat 5 times, 1 dc (24)
Round 5: (3 dc, 2dc in next dc) repeat 6 times (30)
Round 6: 2 dc, 2dc in next dc, (4 dc, 2dc in next dc) repeat 5 times, 2 dc (36)
Round 7: (5 dc, 2dc in next dc) repeat 6 times (42)
Round 8: 3 dc, 2dc in next dc, (6 dc, 2dc in next dc) repeat 5 times, 3 dc (48)

— Closing :

Round 8: 3 dc, dec, (6 dc, dec) repeat 5 times, 3 dc (42)

— Part 3 :

Round 7: (5 dc, dec) repeat 6 times (36)

— Part 4 :

Round 6: 2 dc, dec, (4 dc, dec) repeat 5 times, 2 dc (30)

— Part 5 :

Round 5: (3 dc, dec) repeat 6 times (24)

— Part 6 :

Round 4: 1 dc, dec, (2 dc, dec) repeat 5 times, 1 dc (18)

— Part 7 :

Round 3: (dc, dec) repeat 6 times (12)

— Part 8 :

Round 2: dec 6 times (6)

— Tail :

Round 1: Cut the yarn, leaving a long tail. Put the tail in a sewing needle, and thread through the front loop of each of the remaining 6 stitches going around the ring in the same direction you were working. Pull tight and finish the end, hiding it inside the ball.

Assembly Instructions

  1. Attach the top circle to the middle section by sewing around evenly between the top circle’s base and the middle section's top edge.
  2. Sew the bottom circle to the opposite edge, align seams, and stuff lightly before closing the opening to maintain roundness.
  3. Join the middle section to the central ball, ensuring symmetry; place markers for left-right alignment if needed and sew in place.
  4. Weave in all ends as you go, secure seams with a whip stitch, and finish with a final round of stitching to seal the ball.

Important Notes

  • Maintain a consistent tension throughout the project; irregular tension can create ridges or gaps around the circumference.

  • Stuff gradually, using small amounts at a time and stopping to check symmetry before continuing.

  • Mark your round starts to avoid losing track during the long top-to-middle-to-bottom assembly.

  • Weave in ends incrementally as you go to keep the final finish neat and to prevent tails from protruding.

  • If you scale up, re-check gauge with a quick test square to verify the size remains true to your intended circumference.

This ball is a tiny miracle of geometry—compact, tactile, and portable. It invites shaping, stuffing, and finishing that reward careful attention to proportion and alignment. A delightful reminder that simple stitches can yield robust, playful forms.

Good to know

You ask, we answer

The finished size depends on the number of rows used for the top circle and the number of middle rows kept to preserve height. With DK yarn and a 3.5 mm hook, expect a small palm-size ball; adding rows in the top and bottom while maintaining middle height yields a larger display sphere. The mid-size ball balances circumference and height consistently when the same top/bottom row counts are used.

Yes, but the final size will change. Switching to heavier yarn invites reducing the number of top-circle rows or using a smaller hook to preserve a similar circumference; lighter yarn may require more rows or a larger hook to reach the same overall size. Gauge testing remains essential when changing yarn weight.

This project is beginner-friendly, relying on familiar in-the-round work, a MR (magic ring) start, controlled increases, and simple decreases. Comfort with crocheting in rounds and following a row-by-row sequence helps, but the pattern is designed to guide you through each stage with clear, repeatable steps.

A mid-sized ball usually takes between 6 and 10 hours, depending on pace, focus, and how many sizes are attempted. Scaling up or down in size or color can shift total time, but the core workflow—top circle, middle height, bottom circle, then seam—remains steady.

Medium-sized turquoise crochet ball showing smooth curvature.
Join 100k+ crocheters

Get new free patterns, stitch tips and exclusive content in your inbox.