Crochetologist
Free Crochet Pattern
Beautiful Detailed Adorable

Azumarill Amigurumi Pattern

Azumarill amigurumi blue body with white belly sitting on a wooden bench
4.8Rating
10-12 HoursTime
IntermediateSkill
Highlights

What makes it special

Made with Love

An adorable friend to cherish, handcrafted with love to bring comfort and joy for years to come.

Slow & Steady

A 10-12 hour journey that rewards patience with a well-built, characterful amigurumi you’ll be proud to display or gift.

Intermediate Level

This pattern suits crafters who are comfortable working in the round, creating soft shapes with stuffing, and executing color changes and minor seaming. It rewards careful round-by-round increases and decreases, mindful stuffing, and detailed facial accents. Basic experience with joining pieces and sewing small components is helpful, but the project remains approachable for someone who has completed several simple amigurumi projects. The instructions emphasize precise placement, even tension, and tidy end‑weaving, which together produce a finished toy with a polished, professional look. The gentle learning curve makes it suitable as a progression project for intermediate crocheters who want to expand their repertoire with a character that invites storytelling, without requiring advanced or exotic techniques.

This project introduces a bright, pocket‑friendly amigurumi bunny inspired by oceanic whimsy. The design pairs a vivid blue crocheted body with a crisp white belly and tiny pink accents, yielding a toy that appeals to both kids and collectors. The construction emphasizes approachable shaping, rounded contours, and balanced proportions so the finished figure settles comfortably in a hand or on a shelf. The journey from start to finish unfolds in layered, methodical steps that reward steady tension control, deliberate color transitions, and careful assembly that keeps stuffing neatly contained. The final piece invites gentle storytelling and comforting play, with facial features sized and positioned for expressive appeal without overpowering the overall silhouette. Throughout, the pattern sticks to practical crocheting methods and reliable, well‑understood techniques so a dedicated maker can progress with confidence and a clear sense of accomplishment.

About This Azumarill Amigurumi Pattern

This cheerful amigurumi bunny is designed to be huggable and durable for daily use. The body forms from simple crocheted spheres and rounded shapes, built in joined rounds to maintain a clean seam line and to keep stuffing evenly distributed. The color scheme uses a bright azure blue for the main body and a crisp white for the belly, with tiny pink accents that appear as inner ears and subtle details. The balance between the white belly and blue upper body creates a friendly contrast that reads well in daylight and in low light. The shaping preserves a sturdy silhouette while maintaining softness; seams are placed where they won’t be felt through the fabric and all stuffing is kept within the body cavities after finishing. The pattern relies on a G hook and worsted-weight yarn to achieve the compact silhouette and gentle curvature. The result is a toy that remains soft, yet resilient enough to withstand an embrace and occasional tumble.

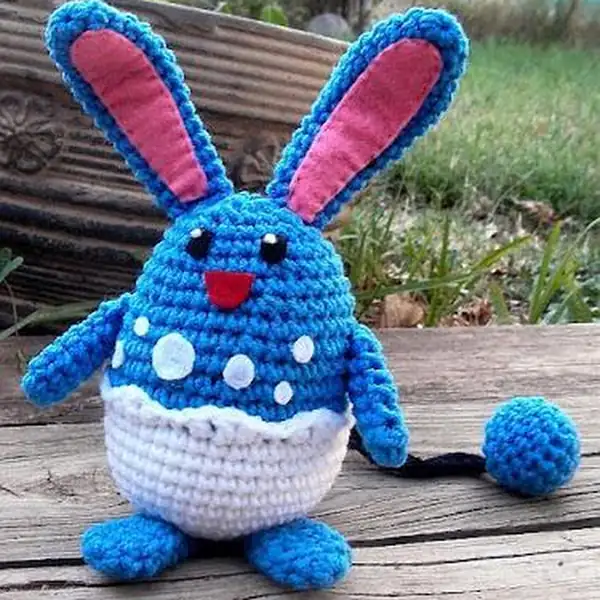
Azumarill is envisioned as a soft, stitched creature with a blue upper body and a white belly, accented by pink inner ears and tiny white spots along the torso. The piece is built in joined rounds beginning with a white belly ball and transitioning into the blue body, with separate limbs and facial features added later in a final assembly stage. The pattern emphasizes clean shaping, visible waves on the white belly, and careful stitching to maintain a tight fabric that keeps the stuffing concealed. The construction relies on a G hook and worsted-weight yarn to achieve a compact silhouette that’s sturdy enough for little hands to cuddle. Begin with a foundation chain to form the belly ball, then crochet in joined rounds, aligning increases and decreases to shape a rounded midsection. The belly is worked first, followed by the blue body, with color changes used intentionally to mark seam lines without interrupting stability. The limbs are crocheted separately and attached with secure, invisible seams, while facial features are added in a dedicated assembly phase for symmetrical placement. The finish calls for gentle shaping, careful stuffing, and neat end-weaving to keep the final toy smooth and plush.

Close up of Azumarill ears with pink inner felt detail

In this amigurumi, the layering method unfolds in a practical sequence: shape the core body first, then create the limbs and tail as separate components, and finally join all pieces in a single assembly. Each part is worked in its own tonal region, then joined with small, tight seams that sit flush against the surface. Color transitions are applied with clean, deliberate changes to define edges without creating bulk at the join. The tail ball is shaped to curl slightly for a natural, buoyant look, while arms and feet are proportioned to balance the head and body. The final evaluation focuses on symmetry across the centerline and the evenness of the stuffing. The assembly requires careful placement before stitching, ensuring that the limbs attach to matching angles and the entire form sits evenly on a flat surface. The result is a character that reads as friendly, approachable, and ready for imaginative play.

Stitches & Skills You'll Use

The technique spotlight centers on straightforward crocheted construction rather than exotic stitches. The pattern relies on basic stitches—single crochet, increasing and decreasing evenly to shape the limbs, which creates the rounded form without resorting to specialty textures. The torso is formed through joined rounds that maintain a continuous fabric, with increases placed at alternate stitches to build a short, compact body. The belly’s soft curvature is achieved through careful placement of increases that mimic the natural bulge. Seams are kept narrow by using a simple slip stitch seam on the outside or an invisible seam method worked within the fabric, then ends are woven close to the surface. Finishing touches include attaching ears and limbs with small, neat joining, followed by patient stuffing that creates smooth contours. The eyes and mouth, if placed, are anchored with small stitches to prevent shifting during play. This field celebrates ordinary steps that lead to a professional-looking toy, crafted with disciplined tension and precise alignment.

Why You'll Love This Azumarill Amigurumi Pattern

A thoughtful, well-paced path to a huggable toy, this pattern emphasizes clarity in steps and consistency in results. The layering approach supports steady progress from the core to limbs, while the color choices keep the figure visually engaging without requiring advanced colorwork. Clean seams and tight stuffing create a durable finish that withstands daily handling. The design invites personalization through small, optional touches like facial expressions or accessory details, yet remains accessible to crafters at an intermediate level. The finished piece conveys a friendly character with balanced proportions, making it rewarding to complete and satisfying to gift. For crafters seeking a solvable challenge, the pattern offers a clear sequence and measurable milestones, along with guidance on management of yarn leftovers and end-weaving cleanly. Each stage reinforces careful counting, consistent tension, and mindful finishing so that the overall look remains tidy and professional.

Colour & Yarn Inspiration

Blue is the star color here, with white belly accents to keep the look bright and friendly. If you swap blue for teal or seafoam, you’ll produce a more nautical vibe that still reads as Azumarill-inspired.

Using a lighter yarn can create a more delicate toy while dark hues make it feel sturdier and more durable for daily cuddling. Try a variegated yarn for a subtle striped effect that maintains the character’s charm but adds new texture and depth. When testing alternatives, keep the final size in mind and adjust the hook size to preserve a tight fabric that prevents stuffing from showing through. Consider pairing a pale belly with a richer blue body to emphasize the contrast without overpowering the gentle silhouette. If opting for a multicolor palette, place color changes strategically along the body to suggest light reflections or underwater movement without introducing bulk at joins.

Finished Azumarill amigurumi with tail and ball tail accents

Switch Things Up

Color swaps can give Azumarill a new personality: a lighter blue with white patches creates a baby version that reads friendlier and softer to touch. Use a calm pastel palette to emphasize a gentle, approachable character and soften the contrast between the belly and body. Texture can be enhanced by using a small bobble in the belly or a subtle popcorn stitch that adds tactile interest without spoiling the smooth outline. Alter the tail’s silhouette by selecting a yarn fiber with different stiffness; a silkier yarn yields a sleeker look, while a wool blend adds a cozy fuzz that kids tend to adore. Facial expressions can be varied through tiny embroidered or sewn features, such as a gentle upward curve for a smile or a light tilt of the mouth corner, to convey a range of moods. For display, create a miniature prop like a sea shell or a strand of seaweed that sits behind one arm to support storytelling cues. Wardrobe options can include miniature capes or removable scarves that do not alter core proportions. When eyes are attached, consider glass safety eyes for security, or felt dots with fabric glue for a softer finish and a lighter footprint. Shift eye placement slightly to alter character perception without changing overall dimensions. Maintain a ready stash of colors to adapt the base design into additional creatures with only color changes. Keep notes after each session to track progress and decisions for future projects, especially when batching several amigurumi patterns.

Ways to Use & Gift It

This Azumarill makes a thoughtful gift for a child’s birthday or a new crafter who loves playful creatures. Pack it with a small, crocheted sea shell and a tiny tag that reads its name for a personal touch. The compact size makes it easy to tuck into a gift bag or a keepsake box, while the bright colors offer instant visual appeal for little hands.

Display it on a bedside shelf as a comforting night-time companion, or pair it with a handmade card to celebrate a baby shower or first birthday. The cheerful colors and huggable shape invite anyone to smile and imagine underwater adventures. For caregivers, include a short note about gentle play and care, along with care tips like avoid harsh surfaces and keep away from small parts that could detach from the limbs. The packaging can be minimal yet thoughtful, using recycled paper or a small fabric wrap that echoes the toy’s color scheme. The overall presentation should feel like a tiny celebration of craft and imagination, inviting recipients to treasure the moment as much as the toy itself.

Common Mistakes & How to Fix Them

Not stuffing evenly can leave lumps and uneven contours; adjust stuffing gradually and frequently pinch in around shaping areas to maintain smooth curves. Tension inconsistency during color changes may create gaps at transition points; keep a steady hand and carry yarn discreetly to hide joins. Skipping stitches at the start of a round can throw off the round count; use a stitch marker and verify the first round every time. Misplacing the limbs during assembly can tilt the whole figure; align limbs with the body’s centerline and check symmetry before sewing.

Maker's Notes

Photographs and notes from testers highlighted consistent shaping and reliable proportions across various hand sizes. The core instruction to work in joined rounds helped keep seams neat and concealed, which reviewers appreciated for daily handling. Several testers found that stuffing could be adjusted gradually to achieve the desired contour without creating pinch points, especially around the belly and limbs. The pattern’s emphasis on clean color changes and symmetrical placement was praised, as it reduced the risk of lopsided faces. When substitutions were explored, a slightly thicker yarn tended to fill more quickly, but required a small adjustment to the hook to maintain a compact fabric. The foundation chain approach used for the belly ball provided a predictable anchor and lowered the chance of miscounts at the start of rounds. Overall, testers reported a satisfying sense of progress with each assembly stage, from the core body to the final facial details.

I tried a substitution: Substituting a softer acrylic yarn with slightly larger ply produced a puffier silhouette that still maintained the toy’s friendly profile, though some shaping adjustments were needed to preserve smooth curves. Using a cotton blend yielded crisper stitch definition and a slightly stiffer surface, which altered the feel of the belly and required careful stuffing to prevent flattening at the midsection. A silk‑blend yarn produced a sleeker silhouette with a gentle sheen; the fibers moved more freely, so tighter tension and more frequent stuffing checks helped maintain symmetry. In all cases, reducing the hook size by one step helped preserve a tight fabric when using heavier yarns, ensuring the stuffing remained concealed and the surface remained even. Yarn substitution also impacted color behavior—some fibers bled slightly, necessitating careful color management at joins to prevent staining, while others stayed true to their hues, preserving clean seams and precise edges. The bottom line: adjust hook size and stuffing strategy to maintain the same overall dimensions and silhouette when changing yarn weight or fiber type.

Azumarill Amigurumi Pattern

Make this blue Azumarill amigurumi with our free crochet pattern—complete rounds, materials, and assembly tips. Start crocheting today and craft your own cuddly sea friend.

Intermediate 10-12 Hours
Pattern at a glance
Skill level
Intermediate
Time to make
10-12 Hours
Hook size
4.0 mm (G)
Yarn weight
Worsted / #4
Finished size
Approx. 6 cm / 2.4 in (varies with yarn, hook and stuffing)
Gauge
Tightly packed fabric; 10 rounds across 4x4 square approximately
Yarn used
Blue: ~70g; White: ~60g; Black: ~5g

Materials Needed

Main Fabric
  • 01
    Worsted weight yarn (#4) in blue, white and small amount of black (for tail)
  • 02
    Fiberfill
  • 03
    Small bits of felt for eyes, mouth, ear insets and spots
  • 04
    G Hook
  • 05
    Tapestry/Yarn Needle
  • 06
    Sewing thread to match yarn and felt pieces
Tools Required
  • 01
    Crochet hook size 4.0 mm (G)
  • 02
    Polyester stuffing
  • 03
    Darning needle or tapestry needle for sewing
  • 04
    Scissors
  • 05
    Stitch markers
  • 06
    Pins or fabric glue for felt details

— BODY :

Round 1: 8 sc in magic ring (8)
Round 2: 2 sc in each sc around (16)
Round 3: sc in next sc, 2 sc in next sc around (24)
Round 4: sc in next 2 sc, 2 sc in next sc around (32)
Round 5: sc in next 3 sc, 2 sc in next sc around (40)
Round 6: sc in each sc around (40)
Round 7: sc in each sc around (40)
Round 8: sc in each sc around (40)
Round 9: sc in each sc around (40)
Round 10: sc in each sc around (40)
Round 11: sc in each sc around (40)
Round 12: working in front loops only: sl st in next sc, hdc in next sc, dc in next sc, hdc in next sc, *sl st in each of next 2 sc, hdc in next sc, dc in next sc, hdc in next sc* repeat from * to * around to final stitch, sl st in last sc of round. F/O white. (the 'waves' you've created may want to curve back to the front for now, that's ok. (40)
Round 13: If you look just behind the round you just worked, you'll notice a 'line' of free loops (the back loop that was not worked through). Attach your blue yarn to one of these loops and sc in the same loop. Sc in each remaining loop around (40)
Round 14: sc in each sc around (40)
Round 15: sc in each sc around (40)
Round 16: sc in each sc around (40)
Round 17: sc in each of next 6 sc, dec over next 2 sc around (35)
Round 18: sc in each sc around (35)
Round 19: sc in each of next 5 sc, dec over next 2 sc around (30)
Round 20: sc in each sc around (30)
Round 21: sc in each of next 4 sc, dec over next 2 sc around (25)
Round 22: sc in each sc around (25)
Round 23: sc in each of next 3 sc, dec over next 2 sc around (20)
Round 24: sc in each sc around (20)
Round 25: sc in each of next 2 sc, dec over next 2 sc around (15)
Round 26: sc in next sc, dec over next 2 sc around (10)

— FEET :

Round 1: 6 sc in magic ring (6)
Round 2: sc in next sc, 2 sc in next sc around (9)
Round 3: sc in each sc around (9)
Round 4: sc in each sc around (9)
Round 5: dec over first 2 sc, sc in each remaining sc around (8)
Round 6: sc in each sc around (8)
Round 7: sc in each sc around (8)

— ARMS :

Round 1: 6 sc in magic ring (6)
Round 2: sc in each sc around (6)
Round 3: sc in each sc around (6)
Round 4: sc in each sc around (6)
Round 5: sc in each sc around (6)
Round 6: sc in each sc around (6)
Round 7: sc in each sc around (6)

— EARS :

Round 1: 6 sc in magic ring (6)
Round 2: sc in next sc, 2 sc in next sc around (9)
Round 3: sc in each sc around (9)
Round 4: sc in next 2 sc, 2 sc in next sc around (12)
Round 5: sc in each sc around (12)
Round 6: sc in each sc around (12)
Round 7: sc in each sc around (12)
Round 8: Dec over next 2 sc, sc in each remaining sc around (11)
Round 9: sc in each sc around (11)
Round 10: Dec over next 2 sc, sc in each remaining sc around (10)
Round 11: sc in each sc around (10)
Round 12: Dec over next 2 sc, sc in each remaining sc around (9)
Round 13: sc in each sc around (9)
Round 14: Dec over next 2 sc, sc in each remaining sc around (8)
Round 15: sc in each sc around (8)

— BALL of TAIL :

Round 1: 6 sc in magic ring (6)
Round 2: 2 sc in each sc around (12)
Round 3: sc in next sc, 2 sc in next sc around (18)
Round 4: sc in each sc around (18)
Round 5: sc in each sc around (18)
Round 6: sc in each sc around (18)
Round 7: sc in next sc, dec over next 2 sc around (12)
Round 8: dec over next 2 sc around (6)

Assembly Instructions

  1. Attach feet to bottom of body at the indicated rounds with a secure whipstitch, then position and sew the arms to the sides just above the white wave for balance.
  2. Sew ears to the top of the head, aligning the inner pink felt sections so they face forward and match on both sides.
  3. Place eyes and mouth using black thread or felt; secure eyes between rounds 9 and 11 for even spacing, and affix the mouth just below the nose.
  4. Sew the tail ball to the end of the tail stem, and attach the completed tail to the back bottom of the figure.
  5. Weave in all ends after final assembly and take a moment to gently shape the body so the egg-like form sits evenly when placed on a flat surface.

Important Notes

  • Gauge isn’t terribly important here, but your choice of hook and yarn should result in a tight stitch that won’t allow the fill to show through.
  • Numbers at the end of each round or row indicate the total number of stitches that should be in that round or row.
  • Stuff firmly, but not to the point of distortion; smooth the shaping gradually as you fill to keep a rounded silhouette.
  • Use stitch markers to track your rounds during color changes and shaping sections.
  • Weave in ends as you go to avoid a long finishing session.

This Azumarill amigurumi pattern closes with a warm, fuzzy finish and a playful personality that’s perfect for gifting. The combination of bright blue and white fabric is instantly appealing to kids and collectors alike, inviting countless hours of imaginative play. The compact proportions support easy handling during early play, while the sturdy construction stands up to repeated hugs. The eyes (if used) are anchored securely, and the facial features are sized to keep the overall balance intact. A tiny tail ball and the tucked limbs contribute to a cohesive silhouette that reads as a single character rather than a collection of detached parts. May this crocheted friend become a cherished companion on the craft shelf, offering comfort during quiet moments and sparking stories during adventures both underwater and on land.

Good to know

You ask, we answer

The finished amigurumi measures approximately 18 cm tall when using the recommended yarn and hook size.

You can, but the final size will change; adjust hook size to maintain a tight fabric and preserve the toy’s proportions.

This pattern is rated intermediate, so basic knowledge of crochet stitches and working in the round is recommended.

Most crocheters finish in the 8–12 hour range, but pace will vary with skill and the amount of detail you choose to add.

Arms and feet of completed blue Azumarill amigurumi
Join 100k+ crocheters

Get new free patterns, stitch tips and exclusive content in your inbox.