Crochetologist
Free Crochet Pattern
Beautiful Detailed Adorable

Amanita House Amigurumi Pattern

Amanita House amigurumi mushroom house with doll nearby
4.3Rating
12-15 HoursTime
IntermediateSkill
Highlights

What makes it special

Made with Love

A playful amigurumi scene featuring a mushroom-house doll and a tiny caterpillar. Bright yarns and friendly faces spark imagination and cuddle-worthy charm.

Multi-Day Project

A rewarding 12+ hour journey—perfect for dedicated crocheters who love detailed work.

Intermediate Level

This pattern suits crafters who enjoy working in the round, color changes, and careful seaming, with a little extra time for assembling a multi-piece scene. A patient approach helps with color management and precise joining, but the steps stay within reach for a determined intermediate crocheter who has completed a few amigurumi projects before.

Whimsy has a way of turning small moments into lasting memories, and the Amanita House pattern is crafted to capture that spark in crocheted form. This project invites you to build a miniature world from the ground up, beginning with a sturdy base and finishing with tiny, thoughtful details that invite touch and storytelling. The process rewards patience, careful shaping, and a willingness to test color and texture together. It is a satisfying challenge for makers who enjoy multi-piece assembly and a tangible sense of place in their work.

Begin with a foundation chain and a starting tail anchored to a sturdy base, then follow clear, labeled steps that guide you through each component of the scene. The instructions emphasize measured rounds, deliberate shaping, and secure joining so the final vignette stays intact when displayed or handled. This pattern lends itself to thoughtful customization without sacrificing the cohesive pull of the finished scene.

Whether you are crafting this as a gift for a friend, a keepsake for your family, or a playful décor piece for your own shelf, the Amanita House pattern offers a rewarding journey from yarn to a tiny, story-filled home. You will finish with not just a set of amigurumi figures, but a complete scene you can hold, rearrange, and tell stories about. The work invites patience and curiosity, with opportunities to experiment with color and texture while keeping the overall form approachable for a confident crocheter.

About This Amanita House Amigurumi Pattern

The Amanita House pattern yields a trio of playful characters nestled around a mushroom-inspired dwelling. You’ll crochet the mushroom house sections, the door, the roof, and the windows, then stitch in a fabric grounding to create a three-dimensional base. The finished scene includes a doll wearing a dress, two arms and two legs, plus a caterpillar companion, all designed to fit onto or inside the mushroom habitat. The pattern emphasizes tight, even stitches, careful color changes, and precise seaming to keep the pieces aligned and secure. Expect a charming result that looks intricate but is built from approachable steps and clearly labeled parts.

Crafting this scene gives practice with magic ring beginnings, increasing and decreasing to shape the head and body, and coordinating multiple color palettes for the base, roof, and accents. You’ll learn how to stuff and balance the toy figures for posing, sew components firmly, and add tiny features like eyes or beads with careful placement. The aesthetic is cozy and whimsical enough to pair with other amigurumi or stand on its own as a decorative vignette.

As you progress, you’ll discover the joy of combining soft textures with sturdy construction, creating a durable but cuddly display piece. The mushroom house serves as a playful stage for the doll and caterpillar, with optional accessories that you can swap in for different seasons or moods. The result is a shared project you can revisit, color-swap, or expand into a larger forest scene over time.

The boxy shapes of the base are balanced by rounded corners and gentle curves in the roof and door, giving the final piece a friendly, approachable personality that invites touch and display alike.

Doll sitting beside mushroom house with caterpillar

Two core benefits stand out with this design: a compact, collectible scale that makes it easy to display on a shelf, and a rich, narrative feel that comes from combining multiple characters with a single habitat. You’ll have the chance to customize colorways for the house and clothing of the doll, letting you tailor the mood—from sunny and bright to earthy and whimsical.

In the end, the Amanita House pattern isn’t just about stitching; it’s about building a tiny universe you can inhabit with your hands. The finished scene becomes a talking point for gifting, a cozy seasonal decoration, or a playful reminder of the joy of crochet. The project invites you to revisit the pieces as your skills grow, swapping colors or adding accessories to reflect new occasions and to expand into a larger forest scene if you wish.

Stitches & Skills You'll Use

The pattern uses the classic single crochet for a tight fabric, the magic ring start to yield a clean center, and a steady rhythm of increases and decreases to shape the limbs and head. You’ll practice back loops only and front loops only to create subtle textural accents, plus straightforward color changes that keep transitions neat. The edging around the roof and window frames is finished with slim slip stitches for a clean line, and a gentle foundation chain builds the mushroom base without gaps. Finishing techniques include weaving in ends, careful stuffing to maintain pose, and precise seam placement to ensure stability of all attached parts.

Beads for eyes and simple embroidery on the doll’s face are used as tiny details that elevate the final presentation without complicating the build. The repertoire remains accessible for someone who has completed a few amigurumi projects, yet it offers enough challenge for a determined beginner who is ready to push their skills a little further. The result is a vivid, narrative sculpture you’ll be proud to display or gift.

As the pieces come together, the placement of the door, the color of the hill, and the expression on the doll’s face can dramatically shift the overall mood. The pattern teaches how to compose the scene into a cohesive, charming display that invites touch and contemplation. The finished trio is sturdy and cuddly, with gentle posing options that keep the display versatile for future arrangements.

Why You'll Love This Amanita House Amigurumi Pattern

This pattern appeals to makers who enjoy planning a complete, miniature scene rather than a single figure. The assembly sequence teaches careful alignment and sturdy joining so the final vignette stays intact during display or play. The project rewards patience with a holdable, cuddly result and a story you can narrate through placement and color choices.

The Amanita House invites ongoing customization through accessory swaps and seasonal touches, encouraging a stretch beyond basic amigurumi. Its scale makes it practical for shelves, desks, or nursery corners, while the narrative connections between the doll, the caterpillar, and the mushroom habitat offer a sense of whimsy that grows with every new colorway.

With a sturdy finish and approachable steps, this pattern provides a satisfying sense of accomplishment as you complete the trio, position them for display, and imagine future additions to the forest setting. The finished scene becomes a conversation piece that invites gifting and sharing among friends who enjoy handmade decor and storytelling through crochet.

Colour & Yarn Inspiration

For a bright, playful vibe, use lemon, white, and red for the mushroom house with a grassy base. For a more earthy look, swap lemon for olive or sage and replace red accents with warm brown or burnt orange. Variegated yarns on the cap can add a dotted, whimsical look while maintaining the same structure. Soft accents like pale pinks or lavender on the doll and caterpillar create a dreamlike scene. Ensure contrast is high enough so facial features and embroidery stand out against the fabric. Substituting yarn weight will alter density and size, but the charm remains intact.

Yarn choice influences movement and balance; a slightly thicker weight makes the house sturdier and the figures chunkier, while a finer weight yields a daintier effect. When selecting new colors, consider light versus dark and how those choices affect visibility of tiny features. Eyes, embroidery, and beads pop more against lighter backgrounds. Have fun mixing hues to craft a personal version of Amanita House that fits your space and style.

Finished Amanita House with accessories on display

Switch Things Up

Color swaps and scale adjustments let you personalize Amanita House without changing its structure. Swap lemon accents for lime or mint for a garden vibe, or shift the mushroom cap color from red to teal for a woodland mood. For a bigger spectacle, increase the inner scale by using a slightly thicker yarn and a correspondingly smaller hook while preserving proportion. For a compact desk buddy, choose lighter colors and a tighter hook to keep the finish crisp and neat.

Include extra elements like tiny felt leaves, a crocheted mushroom friend, or a little teacup sitting on the doorstep. A seasonal scarf for the doll or a small patch for the house can reflect holidays or birthdays. If teaching this to a friend or child, consider printing a simple color-key guide so progress can be tracked and the stitch vocabulary learned together.

Embellish with small embroidery touches for eyes and smiles using safe embroidery floss to ensure durability. Bead sizes for eyes can vary, or tiny safety eyes can be substituted for different expressions. Pose the figures in a welcoming stance to tell a story that is all your own. Remix and expand the little world with every added stitch.

Posing tips focus on natural lines: keep limbs slightly bent, place the caterpillar near the door to imply companionship, and tilt the roof a touch to suggest wind. The more those details are refined, the more personal the Amanita House becomes for gifting or display.

Ways to Use & Gift It

Because Amanita House is a multi-piece scene with tiny accessories, it makes a thoughtful gift for someone who enjoys display pieces and collectible toys. Gift it as a finished vignette for a friend who loves woodland themes, or give the pattern itself to a crochet enthusiast who enjoys expansion projects and seasonal decorating. The doll and caterpillar provide two character options that can be extended into a small family with additional friends in lime greens and mushroom tones. The project also works well as a playful baby keepsake, serving as a cuddly decorative piece in a nursery or reading corner.

As a display, this scene adds whimsy to a bookshelf or desk. Personalize it with seasonal accents—think a tiny scarf for winter, a flower crown for spring, or a tiny flag for celebration days. The compact size makes it an ideal desk companion or a conversation starter about fiber arts and handmade gifts. The Amanita House is a charming keepsake that brings smiles when gifted or displayed.

Common Mistakes & How to Fix Them

Common missteps include miscounting stitches around increases and decreases, which can throw proportion off. Keep a steady count on each round and pause to verify before continuing.

Rushing through the color changes can leave loose ends exposed or mismatched transitions. Plan the color-change sequence in advance and secure ends as you go rather than leaving long tails to finish later.

Over-stuffing the head or body can soften the shape and compromise pose. Add stuffing gradually and test the silhouette against the base to maintain balance.

Improper seam alignment can produce gaps where pieces meet. Use visible seam markers or pin pieces in place and check alignment before stitching to maintain a clean join.

Eyes or beads that are too large relative to the doll's face can overpower features. Test bead sizes on scrap fabric or stitch embroidery lightly first to judge scale before attaching to the finished piece.

Maker's Notes

When the Amanita House was put through a test run, the pattern performed smoothly with the specified sport weight yarn and a small hook. The rounds held their proportion well as color changes were executed, and the joints remained stable with careful stuffing. The starting tail and foundation chain proved helpful for anchoring the base and ensuring the mushroom house sat flat on a surface. The doll and caterpillar required patience around tiny seam joints, but the ends were neat and the figures retained pose well after finishing. Beginners benefit from tackling the doll first to practice the basic stitches and then moving to the more intricate components.

A few practical notes emerged: keep a single yarn ball handy when color changes are necessary to minimize tangling, and work in a well-lit space to place small eyes or beads accurately. Before final assembly, test balance by placing partially completed pieces on the base to confirm alignment and weight distribution. Light stuffing at the outset helps preserve shape while giving room for adjustment as the scene comes together.

I tried a substitution: Substituting with a DK weight yarn on a 3 mm hook shifts the scale by roughly 2 to 3 cm taller and yields a looser fabric. The jointed arms hang differently, and more dense stuffing is needed to maintain the intended silhouette. Facial details remain legible, but bead features appear proportionally larger on the face. Assembly timing increases slightly due to the larger pieces, but the overall charm of Amanita House remains intact. With a cotton or cotton blend alternative, the texture changes and density may differ; adjust through hook size to preserve the same silhouette. The finished display benefits from tighter fabric, which can make eyes and embroidery read more clearly against the surface. Substitutions require careful planning and testing, not rushing through rounds, so allow extra time for trial fitting and final shaping.

Amanita House Amigurumi Pattern

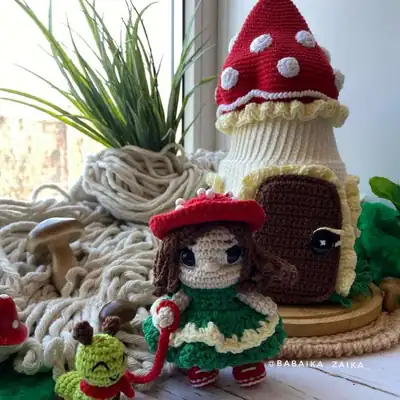
Make Amanita House with our free crochet amigurumi pattern—step-by-step rounds, materials, and assembly tips. Start crocheting today!

Intermediate 12-15 Hours
Pattern at a glance
Skill level
Intermediate
Time to make
12-15 Hours
Hook size
1.75 mm (B/1)
Yarn weight
Sport weight 4ply
Finished size
House height ~27 cm (10.6 in); Doll ~12 cm (4.7 in); Caterpillar ~6 cm (2.3 in)
Gauge
Gauge is not critical; works well with 1.75 mm hook using sport weight yarn; density should be tight to prevent stuffing show-through
Yarn used
Main color yarn total approximately 300-400 g depending on color substitutions and exact scale

Materials Needed

Main Fabric
  • 01
    Sport weight 4ply Alize Cotton Gold yarn (100g / 330m) in brown (N493), white (N55), red (N56), green (N126), lemon (187) for the Mushroom House and decor
  • 02
    Alize Cotton Gold Tweed (100g / 330m) N612 for accent or caterpillar features
  • 03
    Safety eyes 12mm (2 pieces) for the doll’s face
  • 04
    Beads for dress embellishment (optional)
  • 05
    Polyester stuffing for arms, legs, head, and body
  • 06
    Cardboard and tape for the mushroom base/supports
  • 07
    Needle for sewing pieces and embroidering features
Tools Required
  • 01
    Crochet hook size 1.75mm (B/1) for the smallest parts
  • 02
    Scissors
  • 03
    Yarn needle for sewing and weaving ends
  • 04
    Stitch markers to track rounds
  • 05
    Pins for placement before sewing
  • 06
    Safety eyes 12mm for the doll
  • 07
    Beads or embroidery floss for facial details
  • 08
    Cardboard backing for the mushroom base
  • 09
    Fabric glue or clear tape for attaching small parts (optional)

— Tails :

Round 1: Chain 41, From the second chain on the hook: 40sc, turn (40)
Round 2: Ch1, 25sc, 15sl st, turn (40)
Round 3: Ch1, 40sc, turn (40)
Round 4: Ch1, 25sc, 15sl st, turn (40)
Round 5: Ch1, 40sc, turn (40)
Round 6: Ch1, 25sc, 15sl st, turn (40)
Round 7: Ch1, 40sc, turn (40)
Round 8: Ch1, 25sc, 15sl st, turn (40)
Round 9: Ch1, 40sc, turn (40)
Round 10: Ch1, 25sc, 15sl st, turn (40)
Round 11: Ch1, 40sc, turn (40)
Round 12: Ch1, 25sc, 15sl st, turn (40)
Round 13: Ch1, 40sc, turn (40)
Round 14: Ch1, 25sc, 15sl st, turn (40)
Round 15: Ch1, 40sc, turn (40)
Round 16: Ch1, 25sc, 15sl st, turn (40)
Round 17: Ch1, 40sc, turn (40)
Round 18: Ch1, 25sc, 15sl st, turn (40)
Round 19: Ch1, 40sc, turn (40)
Round 20: Next, skip stitches for the window. Before skipping, make ch1 and push the part inside the loop (to get a knot). Fix all yarn tails at the end. Ch1, 10sc, skip 10sc, 5sc, 15sl st, turn;
Round 21: Ch1, 20sc, skip 10sc, 10sc, turn;
Round 22: Ch1,10sc, skip 10sc, 5sc, 15sl st, turn;
Round 23: Ch1, 20sc, skip 10sc, 10sc, turn;
Round 24: Ch1,10sc, skip 10sc, 5sc, 15sl st, turn;
Round 25: Ch1, 20sc, skip 10sc, 10sc, turn;
Round 26: Ch1,10sc, skip 10sc, 5sc, 15sl st, turn;
Round 27: Ch1, 20sc, skip 10sc, 10sc, turn;
Round 28: Ch1,10sc, skip 10sc, 5sc, 15sl st, turn;
Round 29: Ch1, 20sc, skip 10sc, 10sc, turn;
Round 30: Ch1, 10sc, ch10, 5sc, 15sl st, turn (40)
Round 31: Ch1, 20sc, 10sc on the chain, 10sc, turn (40)
Round 32: Ch1, 25sc, 15sl st, turn (40)
Round 33: Ch1, 40sc, turn (40)
Round 34: Ch1, 25sc, 15sl st, turn (40)
Round 35: Ch1, 40sc, turn (40)
Round 36: Ch1, 25sc, 15sl st, turn (40)
Round 37: Ch1, 40sc, turn (40)
Round 38: Ch1, 25sc, 15sl st, turn (40)
Round 39: Ch1, 40sc, turn (40)
Round 40: Ch1, 25sc, 15sl st, turn (40)
Round 41: Ch1, 40sc, turn (40)
Round 42: Ch1, 25sc, 15sl st, turn (40)
Round 43: Ch1, 40sc, turn (40)
Round 44: Ch1, 25sc, 15sl st, turn (40)
Round 45: Leave a hole for the door. Ch1, 20sc, turn (20)
Round 46: Ch1, 5sc, 15sl st, turn (20)
Round 47: Ch1, 20sc, turn (20)
Round 48: Ch1, 5sc, 15sl st, turn (20)
Round 49: Ch1, 20sc, turn (20)
Round 50: Ch1, 5sc, 15sl st, turn (20)
Round 51: Ch1, 20sc, turn (20)
Round 52: Ch1, 5sc, 15sl st, turn (20)
Round 53: Ch1, 20sc, turn (20)
Round 54: Ch1, 5sc, 15sl st, turn (20)
Round 55: Ch1, 20sc, turn (20)
Round 56: Ch1, 5sc, 15sl st, turn (20)
Round 57: Ch1, 20sc, ch21 (40)
Round 58: From the second chain on the hook: 25sc, 15sl st, turn (40)
Round 59: Ch1, 40sc, turn (40)
Round 60: Ch1, 25sc, 15sl st, turn (40)
Round 61: Ch1, 40sc, turn (40)
Round 62: Ch1, 25sc, 15sl st, turn (40)
Round 63: Ch1, 40sc, turn (40)
Round 64: Ch1, 25sc, 15sl st, turn (40)
Round 65: Ch1, 40sc, turn (40)
Round 66: Ch1, 25sc, 15sl st, turn (40)
Round 67: Ch1, 40sc, turn (40)
Round 68: Ch1, 25sc, 15sl st, turn (40)
Round 69: Ch1, 40sc, turn (40)
Round 70: Ch1, 25sc, 15sl st, turn (40)
Round 71: skip stitches for the window. Before skipping, make ch1 and push the part inside the loop (to get a knot). Fix all yarn tails at the end. Ch1, 20sc, skip 10 sc, 10sc, turn;
Round 72: Ch1, 10sc, skip 10 sc, 5sc, 15sl st, turn;
Round 73: Ch1, 20sc, skip 10sc, 10sc, turn;
Round 74: Ch1, 10sc, skip 10 sc, 5sc, 15sl st, turn;
Round 75: Ch1, 20sc, skip 10sc, 10sc, turn;
Round 76: Ch1, 10sc, skip 10sc, 5sc, 15sl st, turn;
Round 77: Ch1, 20sc, skip 10sc, 10sc, turn;
Round 78: Ch1, 10sc, skip 10sc, 5sc, 15sl st, turn;
Round 79: Ch1, 20sc, skip 10sc, 10sc, turn;
Round 80: Ch1, 10sc, skip 10sc, 5sc, 15sl st, turn;
Round 81: Ch1, 20sc, сh10, 10sc, turn;
Round 82: Ch1, 10sc, 10sc on the chain, 5sc, 15sl st, turn (40)
Round 83: Ch1, 20sc, 40sc, turn (40)
Round 84: Ch1, 25sc, 15sl st, turn (40)
Round 85: Ch1, 40sc, turn (40)
Round 86: Ch1, 25sc, 15sl st, turn (40)
Round 87: Ch1, 40sc, turn (40)
Round 88: Ch1, 25sc, 15sl st, turn (40)
Round 89: Ch1, 40sc, turn (40)
Round 90: Ch1, 25sc, 15sl st, turn (40)
Round 91: Ch1, 40sc, turn (40)
Round 92: Ch1, 25sc, 15sl st, turn (40)
Round 93: Ch1, 40sc, turn (40)
Round 94: Ch1, 25sc, 15sl st, turn (40)
Round 95: Ch1, 40sc, turn (40)
Round 96: Ch1, 25sc, 15sl st, turn (40)
Round 97: Ch1, 40sc, turn (40)

— Base (Walls) White :

Round 1: 6sc in MR Place row marker here.
Round 2: 6inc (12)
Round 3: (1sc, inc) *6 (18)
Round 4: (2sc, inc) *6 (24)
Round 5: (3sc, inc) *6 (30)
Round 6: (4sc, inc) *6 (36)
Round 7: (5sc, inc) *6 (42)
Round 8: (6sc, inc) *6 (48)
Round 9: (7sc, inc) *6 (54)
Round 10: (8sc, inc) *6 (60)
Round 11: (9sc, inc) *6 (66)
Round 12: (10sc, inc) *6 (72)
Round 13: (11sc, inc) *6 (78)
Round 14: (12sc, inc) *6 (84)
Round 15: (13sc, inc) *6 (90)
Round 16: (14sc, inc) *6 (96)
Round 17: (15sc, inc) *6 (102)

— Base (Walls) Lemon :

Round 1: Ch1, 86sc (through both pieces), 15sc along the free edge of the bottom (without turning)
Round 2: Change color to green and crochet 86 loop stitches. Fasten off.

— Door Opening Area :

Round 1: 44sl st, turn (44)
Round 2: ch2, 44dc-inc, sl st (88)

— Windows Lemon Frames :

Round 1: 58sl st, turn (58)
Round 2: ch1, 58dc-inc (116)

— Bottom Brown :

Round 1: Chain 17. Start from the second chain on the hook: 16sc, turn (16)
Round 2: Ch1, 16sc, turn (14 rows).
Round 3: Ch1, 16sc, turn (14 rows).
Round 4: Ch1, 16sc, turn (14 rows).
Round 5: Ch1, 16sc, turn (14 rows).
Round 6: Ch1, 16sc, turn (14 rows).
Round 7: Ch1, 16sc, turn (14 rows).
Round 8: Ch1, 16sc, turn (14 rows).
Round 9: Ch1, 16sc, turn (14 rows).
Round 10: Ch1, 16sc, turn (14 rows).
Round 11: Ch1, 16sc, turn (14 rows).
Round 12: Ch1, 16sc, turn (14 rows).
Round 13: Ch1, 16sc, turn (14 rows).
Round 14: Ch1, 16sc, turn (14 rows).
Round 15: Ch1, 16sc, turn (14 rows).
Round 16: ch1, dec, 12sc, dec, turn (14)
Round 17: Ch1, 14sc, turn;
Round 18: Ch1, 14sc, turn;
Round 19: ch1, dec, 10sc, dec, turn (12)
Round 20: Ch1, 12sc, turn (2 rows).
Round 21: Ch1, 12sc, turn (2 rows).

— Door Brown Pieces :

Round 1: 6sc in MR Place row marker here.
Round 2: 6inc (12)
Round 3: 12sc;
Round 4: (1sc, inc) *6 (18)
Round 5: 18sc;
Round 6: (2sc, inc) *6 (24)
Round 7: 24sc;
Round 8: (3sc, inc) *6 (30)
Round 9: 30sc;
Round 10: (4sc, inc) *6 (36)
Round 11: 36sc;
Round 12: (5sc, inc) *6 (42)
Round 13: 42sc;
Round 14: (6sc, inc) *6 (48)
Round 15: (7sc, inc) *6 (54)
Round 16: 54sc;
Round 17: (8sc, inc) *6 (60)
Round 18: (9sc, inc) *6 (66)
Round 19: 66sc;
Round 20: (10sc, inc) *6 (72)
Round 21: (11sc, inc) *6 (78)
Round 22: 78sc;
Round 23: (12sc, inc) *6 (84)
Round 24: (13sc, inc) *6 (90)
Round 25: 90sc;
Round 26: (14sc, inc) *6 (96)
Round 27: 96sc;
Round 28: 96sc;
Round 29: 96sc;
Round 30: 96sc;
Round 31: BLO (14sc, dec) *6 (90)
Round 32: (13sc, dec) *6 (84)

— Roof Brown :

Round 1: 6sc in MR Place row marker here.
Round 2: 6inc (12)

— Doll :

Round 1: 6sc in MR Place row marker here.
Round 2: 6sc;
Round 3: 6sc;
Round 4: 6sc;
Round 5: 6sc;
Round 6: 6sc;

— Roof White Edge :

Round 1: Chain 6. Start in the second chain from the hook: inc, 3sc, 3sc in the last chain, 4sc (12)
Round 2: 2inc, 3sc, 3inc, 3sc, inc (18)
Round 3: BLO 18sc;
Round 4: 4sc, 6dec, 2sc (12)
Round 5: 4sc, 3dec, 2sc (9)
Round 6: Change color to milky. (1sc, dec) *3 (6)
Round 7: 6sc;
Round 8: 6sc;
Round 9: 6sc;
Round 10: 6sc;
Round 11: 6sc;
Round 12: 6sc;

— Body :

Round 1: 6sc in MR Place row marker here.
Round 2: 6inc (12)
Round 3: (1sc, inc) *6 (18)
Round 4: (2sc, inc) *6 (24)
Round 5: 24sc;
Round 6: 24sc;
Round 7: 24sc;
Round 8: Change color to milky. BLO 24sc;
Round 9: 24sc;
Round 10: (2sc, dec) *6 (18)
Round 11: 18sc;
Round 12: (1sc, dec) *6 (12)
Round 13: 12sc Stuff the body with fiberfill. Head;
Round 14: 12inc (24)
Round 15: (3sc, inc) *6 (30)
Round 16: 30sc;
Round 17: 30sc;
Round 18: 30sc;
Round 19: 30sc;
Round 20: 30sc;
Round 21: 30sc;
Round 22: 30sc;

— Spots (12 Pieces) :

Round 20: at a distance of 8-10 sc.
Round 21: at a distance of 8-10 sc.
Round 23: (3sc, dec) *6 (24)
Round 24: (2sc, dec) *6 (18)
Round 25: (1sc, dec) *6 (12)
Round 26: 6dec (6)

— Base :

Round 1: 6sc in MR Place row marker here.
Round 2: 6inc (12)
Round 3: (1sc, inc) *6 (18)
Round 4: (2sc, inc) *6 (24)
Round 5: (3sc, inc) *6 (30)
Round 6: 30sc;
Round 7: 30sc;
Round 8: 30sc;
Round 9: Crochet the curls. sl st, (ch13, from the second chain on the hook 12sl st, sl st into the base) *30 Leave a long tail for sewing.

— Head :

Round 1: 6sc in MR Place row marker here.
Round 2: 6inc (12)
Round 3: (1sc, inc) *6 (18)
Round 4: (2sc, inc) *6 (24)
Round 5: (3sc, inc) *6 (30)
Round 6: (4sc, inc) *6 (36)
Round 7: 36sc;
Round 8: 36sc;
Round 9: 36sc;
Round 10: (5sc, inc) *6 (42)
Round 11: (6sc, inc) *6 (48)
Round 12: (7sc, inc) *6 (54)
Round 13: 54sc;
Round 14: 54sl st Fasten off, cut the yarn, weave in the ends. Sew beads in a chess order on the hat. Put a hat on the doll's head. Dress With green yarn. Work in rows.

— Doll Arms :

Round 1: Chain 19. From the second chain on the hook: 18sc, turn (18)
Round 2: ch1, 3sc, ch4, (skip 4 sc, start from the next stitch), 4sc, ch4, (skip 4 sc, start from the next stitch), 3sc, turn (18)
Round 3: ch1, (1sc, inc) *9, turn (27)
Round 4: ch2, (1dc, dc-inc) *13, 1dc, turn (40)
Round 5: BLO ch2, 40dc, turn (40)
Round 6: ch2, (dc-inc, sc) *20;

— Caterpillar :

Round 1: 6sc in MR Place row marker here.
Round 2: 6inc (12)
Round 3: 12sc;
Round 4: 1sc, 4-dc Bobble st, 2sc, 4-dc Bobble st, 7sc (12)
Round 5: 12sc;
Round 6: 6dec (6)
Round 7: 6inc (12)
Round 8: 2sc, 4-dc Bobble st, 2sc, 4-dc Bobble st, 6sc (12)
Round 9: 12sc;
Round 10: 6dec (6)
Round 11: 6inc (12)
Round 12: 3sc, 4-dc Bobble st, 2sc, 4-dc Bobble st, 5sc (12)
Round 13: 12sc;
Round 14: 6dec (6)
Round 15: 6inc (12)
Round 16: (1sc, inc) *6 (18)
Round 17: 18sc;
Round 18: 18sc;
Round 19: 18sc;
Round 20: 18sc;
Round 21: (1sc, dec) *6 (12)
Round 22: 6dec (6)

— Tail :

Round 1: 6sc in MR;
Round 2: 6sc Leave long tail for sewing. Sew the antennas to the head. Embroider eyes and mouth with black thread.

Assembly Instructions

  1. Stuff each piece firmly before closing.
  2. Pin all parts in place and check the proportions against the photos.
  3. Sew parts on securely with matching yarn.
  4. Weave in all ends and shape the finished piece.

Important Notes

  • Carefully follow safety guidelines when using beads or safety eyes, especially for pieces intended as gifts for small children. Consider embroidery for eyes as a safer alternative on toys for little ones.

  • Gauge matters for this project. If the fabric feels loose, consider tightening tension or swapping to a slightly thicker yarn with a smaller hook to preserve shape and stability.

  • Hand wash the finished pieces gently in cool water and lay flat to dry to preserve stitch integrity and colorfastness. Do not machine wash or dry on heat.

  • Store completed Amanita House in a cool, dry place away from direct sunlight to prevent fading of colors and weakening of stuffing over time.

  • Use a stable base or small fabric grounding to keep the scene upright when displaying. The base helps prevent tipping and protects delicate attachments during handling.

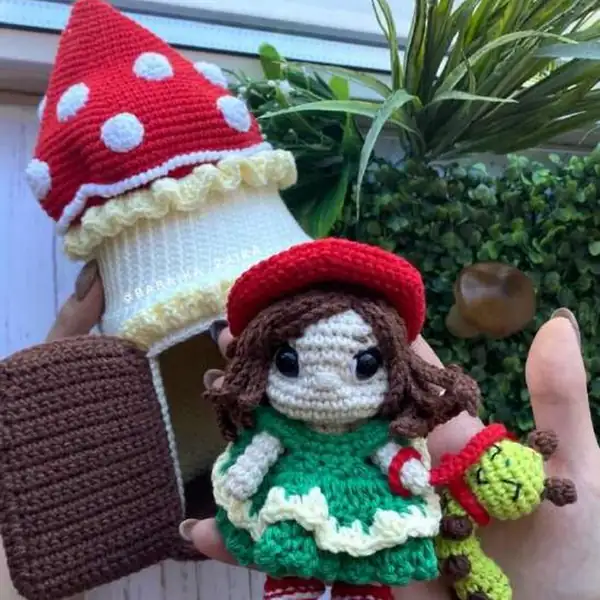
This whimsical Amanita House amigurumi pattern is a joy to stitch and a delight to display. It combines a cozy mushroom-dwelling theme with a playful doll and caterpillar, offering color-rich textures and thoughtful details. You’ll end with a complete scene you can gift or proudly display on a shelf. The process rewards careful crafting and imaginative customization, so take your time and enjoy each round. Happy crocheting, and may your tiny world bring warmth to your home. As you finish, you’ll have a durable, cuddly trio and a story you can tell with every piece. Share the journey with friends and family who appreciate handmade gifts, and consider expanding the forest with new characters in future projects. The Amanita House pattern invites ongoing creativity and a sense of whimsy that lasts beyond the last stitch.

Good to know

You ask, we answer

The mushroom house stands about 27 cm tall (10.6 inches) with a base and roof assembled. The doll is approximately 12 cm tall (4.7 inches), and the caterpillar measures around 6 cm (2.3 inches). Finished size can vary slightly with yarn weight and hook choice.

Yes, you can experiment with different yarn weights, but the final dimensions will shift accordingly. If you choose a thicker yarn, use a smaller hook to keep stitches tight and proportions similar; with a thinner yarn, a slightly larger hook may be necessary to maintain density.

This pattern is rated intermediate; it requires basic crochet stitches, color changes, and assembly, plus some careful finishing. If you’ve completed a few amigurumi projects before and are comfortable with in-the-round work, you’ll likely enjoy the challenge.

Most crocheters allocate 12-15 hours for the entire build, including assembling the mushroom house, sewing the doll and caterpillar, and finishing details. Time can vary based on your pace, familiarity with color changes, and how meticulously you place the features.

Close-up of mushroom house door and roof details
Join 100k+ crocheters

Get new free patterns, stitch tips and exclusive content in your inbox.