Crochetologist
Free Crochet Pattern
Beautiful Detailed Adorable

Amalfi Top Crochet Pattern

Front view of Amalfi crochet top on model showing buttoned square panel design and short sleeves crochet top
4.1Rating
12-15 HoursTime
IntermediateSkill
Highlights

What makes it special

Wear It Proudly

Relaxed style with a modern twist, perfect for everyday wear while maintaining that handcrafted uniqueness.

Multi-Day Project

Allow around twelve to fifteen hours to assemble squares, sew panels, attach sleeves and add the collar and buttons for a neat finished shirt.

Intermediate Level

Intermediate. Recommended experience includes following multi-part crochet instructions, joining separate pieces into panels, working tidy seams and completing collar and button finishing for a polished garment.

Crocheting the Amalfi Top is a slow, steady practice: one small square at a time produces a wearable garment that rewards patience. Makers who enjoy repetitive, portable work will appreciate how each finished motif reads clearly as part of a deliberate whole rather than a quick, homespun throw-together.

This pattern suits relaxed afternoons on a porch, weekend pockets of making between errands, or a considered slow gift for someone who values breathable, handcrafted clothing with light structure. The project invites measured progress and the calm focus of repeating a compact sequence of stitches until the panels are ready to assemble.

About This Amalfi Top Crochet Pattern

A summer-ready crochet shirt constructed from repeating square motifs that combine into a modern button-up top. The pattern produces a top base, paired front panels, a full back panel, two sleeve apertures formed from stacked motif loops, and a sewn collar with a button band and pocket-like edging. Materials specified for the design: Alize Diva Stretch, color 167, weight category 2; yardage per size (from smallest to largest): 2750, 3250, 3750, 4250, 4750, 5250 yards; seven 9 mm wooden buttons; and a 3.75 mm (F) crochet hook.

Motifs include diagonal squares, full squares and half squares worked in rounds and joined into panels, then assembled and shaped into sleeve loops before collar and edge finishing are applied. The finished silhouette is relaxed and slightly boxy, intended to layer over a tank or tee and to move with a breathable, lacy texture created by the repeated square modules.

This pattern walks you through producing three motif types and assembling them into a wearable top using a stitch-and-sew approach. You make small pieces flat, join them into panels and then sew those panels to a simple upper base that establishes shoulder and neckline lines. Sleeve openings are created by stacking square loops at the body edges and flattening them into attachment points; the collar is worked as a narrow band with buttonholes and sewn to the neckline for a tailored finish.

The stepwise sequence—motif making, panel joining, loop creation, then collar and edge finishing—keeps the project portable and breaks the work into repeatable, achievable segments.

Close-up of crochet square motifs and collar detail on the Amalfi top highlighting lacy double crochet clusters

The construction emphasizes predictability: repeating identical squares produces a predictable yardage-to-coverage ratio so you can estimate how many motifs you will need. Crocheting panels in small pieces makes the project forgiving during fitting; you can lay parts flat, reposition rows and adjust seam placement before anything is permanent. The instructions are modular rather than sculpted, so fitting is a matter of arithmetic and alignment instead of complex decreases or short rows.

Stitches & Skills You'll Use

The motifs are formed by clustered stitches and chain spaces worked in rounds so that each square grows outward from a small center. Repeatable corner and edge sequences create the diagonal and full-square shapes the layout requires. You will work groups of three tall stitches separated by chain spaces into corner chains and along edges so the motifs connect naturally when joined.

Standard foundation chains begin each motif round and slip stitches are used for ending rounds and for some joining passes. Single crochet is reserved for small edge finishing and the button band when a firmer edge is needed. The joining options compatible with this construction include whip joins, slip-stitch joins and mattress-style seam approaches; practice each join on a short strip of two or three squares to determine which look and tension best suit your row gauge and personal finishing preference.

Why You'll Love This Amalfi Top Crochet Pattern

The Amalfi Top turns simple, repeated modules into a garment that looks considered and boutique-made without requiring advanced shaping techniques. The steady, rhythmic progress of completing identical squares provides frequent, satisfying moments of completion as panels grow. Assembly and finishing are decisive, visible steps: correct alignment, well-stitched seams and a neatly sewn collar transform a pile of motifs into a garment that sits and photographs like a purchased top.

Makers who appreciate process-driven projects enjoy the way each motif becomes part of a larger structure that rewards measured attention.

Colour & Yarn Inspiration

Neutral palettes—sand, warm taupe, soft gray or off-white—allow the lacy square texture to read clearly and provide maximum wardrobe versatility. A single neutral color will layer effortlessly with a wide range of outfits and accessories.

A tonal gradient of three related shades can be alternated across rows of squares for an understated ombre effect that remains cohesive at a distance. For a bolder approach, use high-contrast pairs and stagger them so the contrast forms columns or steps rather than random dots.

Choose summer-friendly fibers: cotton and cotton blends carry heat well and feel cool against the skin; linen-blends increase drape and soften with wear. Mercerized cotton or cotton-viscose blends add a subtle sheen and a slightly softer hand for a more finished look.

Flat-lay of finished Amalfi top showing front panels, button band and collar in crochet

Switch Things Up

Change the visual direction of the diagonal squares across the front panels to create alternating chevrons that read as directional texture when the top is viewed at a distance.

Introduce contrast by replacing every other square with a different color and staggering placement so the contrast reads as vertical or stepped stripes rather than isolated blocks.

Shorten the overall length by removing one or two rows of full squares from the lower body panels to create a cropped, boxier silhouette.

Slim the sleeve opening by using a single-square-high loop and working a fitted single crochet edging around the armhole instead of leaving the loop open for a breezier sleeve.

Swap the worked button band for a narrow single crochet edging and secure the front with decorative toggles or loops for a more casual, nautical feel.

Work with linen-blend or cotton-linen yarns to increase drape and produce a cooler, summer-friendly hand; lighter, slubby fibers will soften the motif edges and improve downward movement.

For an open, breezy beach cover-up, use a larger hook and a cotton blend to increase the size of the holes created by the chain spaces; the result is a garment that breathes freely while remaining structured by the grid of squares.

Add surface embroidery along the collar or front bands after assembly to personalize initials, small florals or geometric accents without changing the underlying construction.

When changing overall fit for larger or smaller proportions, prefer adding or removing whole squares from panel counts rather than altering the size of individual motifs to keep the geometry and seam alignment consistent.

Ways to Use & Gift It

The Amalfi Top makes a thoughtful handmade garment for someone who appreciates small-batch clothing: a neutral version becomes a versatile wardrobe staple while a tonal duo or gradient offers subtle interest for a friend who prefers colorplay. Present a finished top in simple tissue and a fabric-wrapped box to emphasize its handcrafted nature.

Because the project is made from many small pieces, consider making two or three spare squares in the gift recipient’s likely colorways so you can tuck them in as emergency repairs or replacements; include care notes and suggested washing instructions to help the recipient maintain the fabric’s hand and drape.

Common Mistakes & How to Fix Them

Counting errors at the end of a square lead to mismatched edges: recount the number of cluster groups and chain spaces before fastening off each motif to avoid uneven joins. Sewing two panels without first checking their row counts causes visible offset: always lay paired panels flat and verify that corresponding rows and seams line up before stitching. Joining square edges in the wrong orientation breaks the directional lace: confirm which corner of a diagonal square faces outward before attaching so the lace flows uniformly across the garment. Seaming with overly large or uneven stitches creates a visible ridge: use a joining stitch size that mirrors the surrounding motif tension to keep joins nearly invisible. Leaving long tail ends unaddressed during motif work increases finishing time: tuck short tails into adjacent stitches as you finish each motif rather than postponing all weaving until the end.

Maker's Notes

The pattern sample was assembled to confirm construction flow and seam quantities. During early assembly rounds testers observed that the first joined rounds require deliberate attention: the placement of round endings and the sequence you use to join the first few motifs determine whether subsequent joins sit flat or pull. In trials, some makers misread where a joining slip stitch should sit at the end of a round, which made the first seam puck slightly; catching that detail early prevents repeatable tension errors across a panel.

The repetitive nature of the later motif rounds does make the final few rows on each square quick to execute once the rhythm is established. Lay panels flat to confirm visual alignment before any permanent stitching so you can make minor adjustments without reopening seams.

I tried a substitution: A controlled substitution test used a slightly heavier DK-weight cotton on a 4.0 mm hook in place of the specified weight-2 yarn and 3.75 mm hook. Each finished square measured approximately 7.5 cm across compared with the original pattern’s 8.5 cm motif, producing a denser fabric with less fluid drape. The narrower squares yielded a garment roughly two centimeters smaller across the chest in the same motif count; to maintain the intended measurements with a heavier yarn, increase the number of full squares per panel or move up a size in motif counts. Always make at least one full square to measure before committing to a substitution and recalculate motif counts and total yardage from that measured sample.

Amalfi Top Crochet Pattern

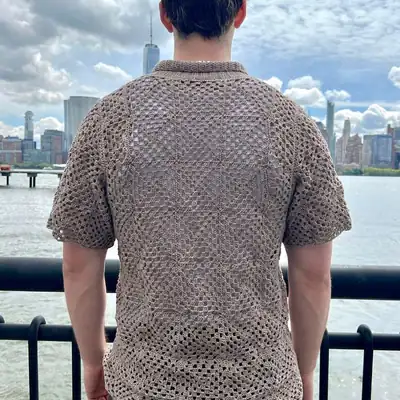
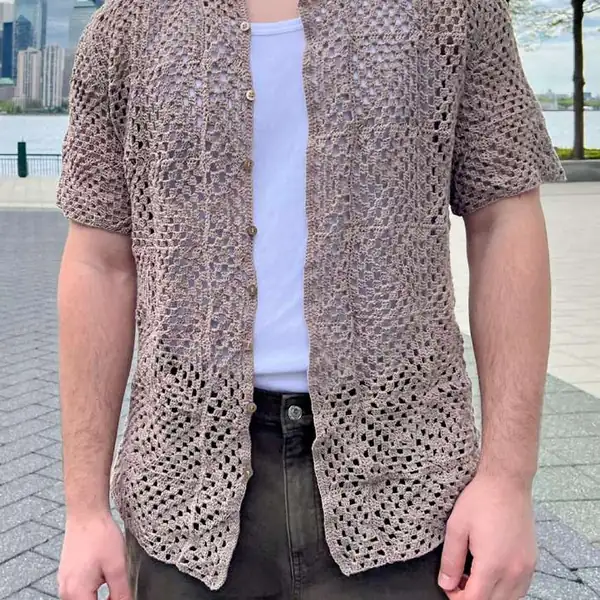
Make the Amalfi Top with this free crochet pattern — modular squares assembled into a button-up shirt with collar and sleeves. Full instructions and materials included. Start today!

Intermediate 12-15 Hours
Pattern at a glance
Skill level
Intermediate
Time to make
12-15 Hours
Hook size
3.75 mm (F)
Yarn weight
Fine / #2
Finished size
Approx. varies by size; sample large measures roughly 70 cm / 27.5 in chest laid flat and about 72 cm / 28.5 in body length, adjusted by number of full squares used
Gauge
One full square measures approximately 8.5 cm x 8.5 cm when worked in the round of double crochet clusters and chain-2 spaces; match this gauge so panels assemble evenly.
Yarn used
Main-color yardage by size: Small 2750 yds (2520 m), Medium 3250 yds (2970 m), Large 3750 yds (3429 m), XL 4250 yds (3886 m), 2XL 4750 yds (4346 m), 3XL 5250 yds (4800 m)

Materials Needed

Main Fabric
  • 01
    Alize Diva Stretch Yarn color 167, weight 2 (Fine/#2) — 2750 yards (small), 3250 yards (medium), 3750 yards (large), 4250 yards (XL), 4750 yards (2XL), 5250 yards (3XL)
  • 02
    7 × 9mm buttons (approx. 7 wooden buttons)
  • 03
    Optional contrast yarn for decorative accents — 50–100 yards
Tools Required
  • 01
    Crochet hook size 3.75 mm (F)
  • 02
    Stitch markers
  • 03
    Tapestry needle for weaving and sewing
  • 04
    Scissors
  • 05
    Measuring tape (optional for fitting)
  • 06
    Pins for positioning squares and sleeves

— Part 1 :

Round 1: Ch 2. In the 2nd ch from hook, make: [dc 3, ch 2, dc 3]. (8, 8, 8, 8, 8, 8)
Round 2: Ch 1 (does not count as st), turn, dc 3 times in the next st from hook. Ch 2, in the next ch-2 space from your hook, make: [dc 3, ch 2, dc 3]. Then, ch 2, and make 3 dc into the very last st.
Round 3: Ch 1 (does not count as st), turn, dc 3 times in the next st from hook. Ch 2, in the next ch-2 space from your hook, dc 3 times. Then, ch;

— Part 2 :

Round 2: In the next ch-2 space from your hook, make: [dc 3, ch 2, dc 3]. Then, ch 2, and dc 3 times in the next ch-2 space from your hook. Ch 2, and dc 3 times into the very last st. (28, 28, 28, 28, 28, 28)
Round 4: Ch 1 (does not count as st), turn, dc 3 times in the next st from hook. Ch 2, in the next ch-2 space from your hook, dc 3 times. Again, ch 2, and dc 3 times in the next ch-2 space from your hook. Then, ch 2, and in the next ch-2 space from your hook, make: [dc 3, ch 2, dc 3]. Then, ch 2, and make 3 dc into the next ch-2 space from hook. Again, ch 2 and make 3 dc into the next ch- 2 space from hook. Finally, ch 2 and dc 3 times into the very last st. (38, 38, 38, 38, 38)
Round 5: Ch 1 (does not count as st), turn, dc 3 times in the next st from hook. Ch 2, in the next ch-2 space from your hook, dc 3 times. Again, ch 2, and dc 3 times in the next ch-2 space from your hook. Once more, ch 2 and dc 3 times in the next ch-2 space from your hook. Then, ch 2, and in the next ch-2 space from your hook, make: [dc 3, ch 2, dc 3]. Then, ch 2, and make 3 dc into the next ch-2 space from hook. Again, ch 2 and make 3 dc into the next ch-2 space from hook. Once more, ch 2 and make 3 dc into the next ch-2 space from hook. Lastly, ch 2 and dc 3 times All sizes: make 5;

— Part 3 :

Round 3: Ch 1 (does not count as st), in the same ch-2 space, make: [dc 3, ch 2, dc 3]. Ch 2, dc 3 times in the next ch-2 space from hook.
Round 4: Ch 1 (does not count as st), in the same ch-2 space, make: [dc 3, ch 2, dc 3]. Ch 2, dc 3 times in the next ch-2 space from hook.

— Part 4 :

Round 1: Ch 2. In the 2nd ch from hook, make: [dc 3, ch 2, dc 3, ch 2, dc 3, ch 2]. Then, sl st across your first 3 dc of the round, and sl st once more into the first ch-2 space of the round. You will begin each round going forward from a ch-2 space. (20, 20, 20, 20, 20, 20)
Round 2: Ch 1 (does not count as st), in the same ch-2 space, make: [dc 3, ch 2, dc 3]. Ch 2, in the next ch-2 space from hook, make: [dc 3, ch 2, dc 3]. Repeat from two more times. Then, sl st across the first 3 dc of the round, and sl st once more into the very first ch-2 space of the round.
Round 4: Ch 1 (does not count as st), in the same ch-2 space, make: [dc 3, ch 2, dc 3]. Ch 2, dc 3 times in the next ch-2 space from hook. Ch 2, dc 3 times in the next ch-2 space from hook. Ch 2, dc 3 times in the next ch-2 space from hook. Ch 2, in the next ch-2 space from hook make: [dc 3, ch 2, dc 3]. Repeat from once more. Then, ch 2, dc 3 times in the next ch-2 space from hook. Ch 2, dc 3 times in the next ch-2 space from hook. Again, ch 2, dc 3 times in the next ch-2 space from hook.

— Part 5 :

Round 2: Ch 1 (does not count as st), turn, dc in the next st from hook. Ch 2, in the next ch-2 space from hook, make: [dc 3, ch 2, dc 3]. Ch 2, in the next ch-2 space from hook, make: [dc 3, ch 2, dc 3]. Ch 2, dc in the very last st. (26, 26, 26, 26, 26, 26)
Round 3: Ch 1 (does not count as st, dc 3 times in the next ch-2 space from hook. Ch 2, in the next ch-2 space from hook make: [dc 3, ch 2, dc 3]. Ch 2, dc 3 times in the next ch-2 space from hook. Ch 2, in the next ch-2 space from hook make: [dc 3, ch 2, dc 3]. Ch 2, dc 3 times in the next ch-2 space from hook. (33, 33, 33, 33, 33;
Round 4: Ch 1 (does not count as st), turn, dc in the next st from hook. Ch 2, dc 3 times in the next ch-2 space from hook. Ch 2, in the next ch-2 space from hook make: [dc 3, ch 2, dc 3]. Ch 2, dc 3 times in the next ch-2 space from hook.

— Part 6 :

Round 1: Ch 2. In the 2nd ch from hook, make: [dc 3, ch 2, dc 3, ch 2, dc 3]. (13, 13, 13, 13, 13;
Round 5: Ch 1 (does not count as st), turn, dc 3 times in the next ch-2 space from hook. Ch 2, dc 3 times in the next ch-2 space from hook. Ch 2, in the next ch-2 space from hook make: [dc 3, ch 2, dc 3]. Ch 2, dc 3 times in the next ch-2 space from hook. Ch 2, dc 3 times in the next ch-2 space from hook. Again, Ch 2, dc 3 times in the next ch-2 space from hook. Then ch 2, in the next ch-2 space from hook make: [dc 3, ch 2, dc 3]. Ch 2, dc 3 times in the next ch-2 space from hook. Again, Ch 2, dc 3 times in the next ch-2 space from hook.

— Part 7 :

Round 1: For all sizes, ch 19. Turn, dc in 2nd ch from hook and in each ch across. (18)
Round 2: Ch 1 (does not count as st), turn, dc in each st across. (18)

Assembly Instructions

  1. Arrange the completed diagonal squares, full squares and half squares into the top base formation described, then sew the full-square columns to create the large rectangle that becomes the top base.
  2. Attach the front panels to the top base by sewing each 2×2 block of full squares and its stacked diagonal square to the first two and last two columns of the top base, leaving the center open for the back panel.
  3. Position and sew the back panel between the front panels on the top base, spacing it evenly so the front panel gaps match on both sides and the neckline lines up.
  4. Sew a column of half squares down the vertical edge of each front panel starting beneath the diagonal square and working to the bottom edge to create a finished front edge.
  5. Construct each sleeve as two stacked loops of squares and a top cap square with diagonal ends, flatten and sew the sleeve edges into the sleeve holes, pinning midpoints first to maintain even distribution.
  6. Crochet the collar strip according to the provided stitch counts, then sew the collar edges to the neckline beginning approximately one inch from the front panel edge and working around to the opposite side.
  7. Sew seven 9mm buttons along one front edge spaced approximately two inches apart, then weave in all ends and press gently if desired.

Important Notes

  • Aim for consistent motif sizing so full squares measure close to the pattern’s reference—habitually measuring motifs keeps panels aligned during assembly.
  • Pin and baste panels in place before permanent stitching to check fit and seam placement; temporary basting makes it easier to adjust alignment around shoulders, necklines and armpits.
  • When attaching sleeves, mark the top and bottom midpoints of the sleeve window and of the sleeve loop and match those points during the first alignment pass so the sleeve distributes evenly when sewn.
  • Fasten off each motif cleanly and weave its tail into adjacent stitches immediately after finishing to keep the final finishing stage quick and tidy.
  • Block or lightly steam finished squares where necessary to square edges and relax stitch tension before joining; blocking produces neater seams and truer measurements for final assembly.

A wearable sewing-along in miniature: the Amalfi Top turns a stack of simple motifs into an elevated, airy shirt. The finishing steps—careful seaming, a worked collar and neatly spaced closures—give the piece a polished result that reads like a small-run boutique item while remaining accessible to makers who enjoy modular construction and slow, satisfying progress.

Good to know

You ask, we answer

Finished dimensions depend on the size option you select and the number of full squares you include in the top base and panels; the sample provided with the pattern corresponds to the third size and produces a relaxed, slightly boxy fit meant to be worn over a tank or tee.

Yes; substitutions change gauge and finished motif size. Make a measured sample square with your chosen yarn and hook, note its dimensions, then adjust the number of motifs per panel to match the pattern’s intended chest and length measurements rather than assuming identical coverage.

Experience with joining motifs and seaming panels is recommended; the pattern uses modular assembly rather than complex shaping, so patience with layout and alignment can make the process accessible to a capable, careful maker.

Expect approximately twelve to fifteen hours to complete the work from first motif to finished collar and buttons; individual speed will vary with familiarity with the motifs and seaming methods.

Yes. Change overall length by adding or removing rows of full squares from the lower body panels before final seaming, and alter sleeve circumference by increasing or decreasing the number of squares that form each sleeve loop; make those adjustments while the panels are still loose so you can try the piece on and verify proportions.

No. Buttons and a sewn collar provide a tailored appearance and a reinforced button band, but you may omit buttons and finish the neckline with a narrow single crochet edging for a pullover-style top.

Side view of the Amalfi top showing sleeve loop assembly and textured square panels in neutral yarn
Join 100k+ crocheters

Get new free patterns, stitch tips and exclusive content in your inbox.