Crochetologist
Free Crochet Pattern
Beautiful Detailed Adorable

Delicate Thread Earrings Crochet Pattern

Pair of small pink rose crochet earrings made in size 10 cotton thread shown hanging over a teacup, crochet earring amigurumi style accessory
4.0Rating
2-3 HoursTime
IntermediateSkill
Highlights

What makes it special

Made with Love

An elegant detail to elevate any look, combining traditional techniques with contemporary design sensibilities.

Bite-Sized Project

Most single-pair designs are small and take between two and three hours to make, including blocking and attaching earring posts for a finished wearable pair.

Intermediate Level

This intermediate collection suits crocheters comfortable with magic ring, picot, double treble and working short rows; expect shaping with turning rows, blocking and simple hardware attachment for crisp finished earrings.

These delicate crochet earrings are all about small moments of joy: a tiny picot here, a neat magic ring there, and suddenly you hold a ready-to-wear pair that looks like it belongs in a boutique. This collection is perfect for makers who love miniature projects with immediate, stylish results and who want to turn a few spare hours into a charming, handmade gift.

Whether you make a simple circular pair for everyday wear or a layered pineapple drop for special occasions, these patterns are designed to fit into an evening of relaxed stitching and careful finishing while delivering pieces with crisp edges and professional hardware attachment.

About This Delicate Thread Earrings Crochet Pattern

A curated collection of delicate crochet earring designs worked in size 10 cotton thread with a 1.5 mm hook, ideal for gift-ready accessories and seasonal handmade markets. This booklet gathers small, wearable motifs—circles, pineapples, teardrops, clovers and geometric diamonds—each written as a short row or round recipe so you can stitch a pair in a single afternoon. The patterns list materials including #10 cotton thread, 1.5 mm hook, fishhook earring posts and optional stiffeners, and each design finishes with blocking and attaching instructions so your pieces stay crisp.

The concise instructions are designed to be approachable for crocheters comfortable with basic stitches and ready to practice small special stitches like double treble and picot.

These pages present compact crochet earring recipes that combine rounds, short rows and a few special stitches to form lightweight motifs that hang well from fishhook posts.

Working each piece requires concentrating on stitch counts and finishing: you will block and stiffen motifs after weaving in ends, then attach posts through two thread thicknesses to ensure durability.

The instructions are intentionally concise so you move quickly from first chain to finished earring while practicing seamless joins and small embellishments like picots and clustered trebles.

White tear drop crochet earrings with lacy center made in #10 cotton thread showing finished earring hanging on a fishhook post

The reader will experience focused shaping rather than long repetitive rounds, making these projects ideal for refining tension and stitch memory.

Each design ends with explicit blocking and post-attachment guidance so your earrings look polished and shop-ready.

Stitches & Skills You'll Use

This collection focuses on magic ring starts, single crochet, double crochet, half double crochet and a few higher trebles such as double treble and triple treble for decorative arches; these stitches form the essential vocabulary of each motif and allow concise shaping without large pieces of fabric. The patterns also ask you to work short rows and turning chains in many designs, so you will practice controlled turning and edge shaping to form teardrop and pineapple silhouettes.

Picot edges appear regularly as tiny decorative points; they are formed as a short chain and a slip stitch into the base chain to create crisp little points that hold after blocking. Slip stitches and careful joining are used to finish rounds cleanly and to create small loops for hardware attachment.

Blocking and stiffening are not stitches but essential finishing skills in this set: pinning motifs to shape while wet and applying a fabric stiffener will transform flexible thread into stable jewelry components that hang and photograph like shop samples.

Why You'll Love This Delicate Thread Earrings Crochet Pattern

I absolutely love this booklet because every small motif rewards careful work with instant wearable results and tangible satisfaction. I enjoy how a few strategic picots or a double-treble flourish completely change the silhouette of a tiny piece. Stitching these designs is a calming, focused practice that fits into an evening and still produces gifts that look boutique-made.

The attention to blocking and stiffening means the finished earrings hold their shape and photograph beautifully, which is deeply satisfying when I prepare handmade gifts or market stock. I also appreciate how the simple hardware attachment instructions remove any guesswork at the finishing stage and make the final step quick and secure.

Colour & Yarn Inspiration

Because these patterns are written for size 10 cotton thread, color choices dramatically change the final mood: classic ecru or white reads vintage and bridal, whereas saturated jewel tones create modern statement pieces that contrast beautifully with metallic hardware. Using mercerized cotton in a soft matte finish gives a subtle sheen that photographs well, while a slightly glossy thread emphasizes the lace pattern and picot highlights for a dressier look.

When planning palettes, try a tonal pairing—main motif in a neutral with a tiny contrasting border in a bright color—to keep the motif readable while introducing a pop of color. For festival-style earrings, metallic or variegated threads produce an artisanal, textured finish that plays nicely with beaded picots or embroidered center dots.

Round holey circle crochet earrings in ecru thread pinned for blocking on a neutral surface showing finished pair and texture

Switch Things Up

I like to change a motif’s scale by swapping the size 10 cotton thread for a slightly thicker thread and increasing the hook by 0.25–0.5 mm to create a chunkier statement earring.

Another option is to work the same motif in two contrasting colors, joining them with a small border to create a framed layered effect that draws the eye.

I sometimes replace a picot edge with a beaded picot, threading tiny seed beads onto the thread before working the chain to add sparkle at the motif’s edge.

For a lightweight option, I work with mercerized cotton and use only a single stiffening coat so the earrings remain flexible and comfortable for long wear.

I have also experimented with creating a tiny fringe on the bottom edge by adding a short loop fringe of three chains repeated across the lower row for playful movement.

Try swapping fishhook posts for small lever-back earrings for security when gifting or traveling with your handmade pieces.

I occasionally embroider a tiny center detail with metallic thread after blocking to add a subtle highlight without changing the motif shape.

For a boho look, I join two motifs with a short chain and hang them vertically from a single post to make tiered earrings.

To personalize gifts, I stitch initials into the back of the motif with matching thread so the front remains clean and the personalization is discreet.

Finally, consider making matching necklace pendants using the same motifs strung on a thin cord to create a coordinated set that showcases the pattern’s adaptability.

Ways to Use & Gift It

These crochet earrings make elegant, personal gifts that are compact for postage and easy to package: tuck a pair into a small jewelry box lined with tissue and attach a handwritten note about the stitch used to make them. For bridesmaid gifts, choose white or soft metallic thread and make matching pairs that coordinate with wedding palettes; add a tiny tag explaining care and stiffener recommendations so recipients know how to keep them looking crisp.

For market sellers, assemble small sets of complementary motifs—one pair of teardrops, one pair of geometric diamonds—mounted on a simple branded card with care instructions. Another idea is to create themed gift bundles combining earrings with a matching crocheted bookmark or tiny ornament using the same thread and colorway for a coordinated handcrafted present.

Common Mistakes & How to Fix Them

Miscounting stitches at the start of a round causes uneven edges and misaligned picots; recount immediately after each round and use a marker to mark the start stitch so counts stay accurate. Skipping the blocking and stiffening step makes lacey motifs hang limp and lose their defining shape; pin each motif to a foam surface to shape while wet and apply the recommended stiffener for crisp edges. Attaching the earring post through only a single thread layer risks hardware failure with wear; pass the post through two thicknesses of thread and close the bottom loop securely with pliers for strength. Pulling the starting tail too short from a magic ring can unravel when tightened; leave an eight inch tail when forming the ring so you can secure and weave it in before finishing. Using inconsistent tension between rounds creates waves or puckers in small motifs; practice maintaining steady hand tension and adjust hook grip or yarn feed to keep stitch size uniform. Forgetting to secure picots and decorative loops allows them to twist out of place; anchor decorative chains with a slip stitch into the base stitch and secure with a weave-in tail before final blocking.

Maker's Notes

When I made a selection of the motifs I worked with standard size 10 cotton thread and a 1.5 mm steel hook and completed four separate pairs in about eight cumulative hours. The magic ring and initial joins are where beginners most often stumble, especially when tightening the ring or leaving too short a starting tail; I now leave an eight inch tail when forming the ring so I can stitch it down securely. Working higher trebles such as DTr and TTr requires patience to maintain even tension across the long stitch, so I slowed my rhythm on those rows to keep uniform height.

Blocking and stiffening took another concentrated hour across the set because each motif needs to dry fully; beginners should plan extra time for this finishing stage and test stiffeners on a scrap motif first.

I tried a substitution: I tested one design in mercerized cotton sport weight with a 2.25 mm hook to see how scaling affected the result and found the finished motif increased roughly 30–40 percent in both height and width compared with the pattern sample made in size 10 thread with a 1.5 mm hook. The larger version behaved similarly for blocking and stiffening but required a slightly larger post for proportion and a single coat of stiffener rather than two coats to keep a pleasant drape.

Delicate Thread Earrings Crochet Pattern

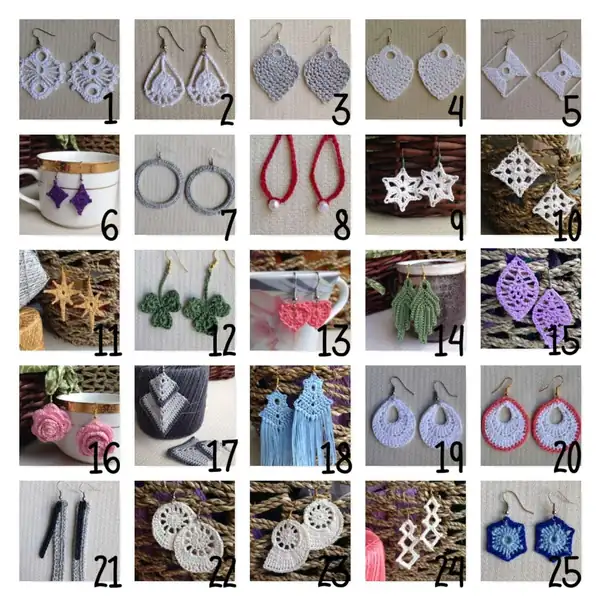
Free round-by-round crochet pattern for 25 Earrings Volume 2, with full stitch counts.

Intermediate 2-3 Hours
Pattern at a glance
Skill level
Intermediate
Time to make
2-3 Hours
Hook size
1.5 mm
Yarn weight
Thread / Size 10 crochet thread
Finished size
Approximately 2.5 in / 6.5 cm at largest dimension for sample motifs (varies by design and thread tension)
Gauge
Approximate gauge for these fine-thread motifs with 1.5 mm hook: 24 single crochet stitches = 2 inches across in dense areas; adjust tension and sample for your chosen motif to ensure desired size.
Yarn used
Approximately 25-50 yards per pair of earrings when worked in size 10 cotton thread, depending on design complexity and use of contrast colors.

Materials Needed

Main Fabric
  • 01
    Size 10 cotton crochet thread (#10), 25-50 yards per pair depending on design
  • 02
    Main color cotton thread - approximately 25 yards per earring pair
  • 03
    Contrast color thread - small amounts, 5-15 yards if required for multicolor designs
  • 04
    Fabric stiffener for medium stiffness, small bottle
  • 05
    Modge Podge for higher stiffness on delicate loops, small bottle
Tools Required
  • 01
    1.5 mm crochet hook
  • 02
    Fishhook earring posts (pair per design)
  • 03
    Jewelry pliers for opening and closing earring loops
  • 04
    Straight pins for blocking and shaping
  • 05
    Foam or cardboard blocking surface
  • 06
    Scissors
  • 07
    Tapestry/yarn needle for weaving in ends
  • 08
    Small container or brush for stiffening solution

— Difficulty Level :

Round 1: Sc in each of next 5 sc, ch 5 (this ch-5-space will be referred to as center-ch-5- space), sc in each of next 4;
Round 2: Ch2, (Ttr in center-ch-5-space, ch 1) 4;
Round 3: 2 Sc in ch-sp, {(slst, ch3, slst) in next Ttr, sc in ch-sp,} four times, sc in next Ttr, sc in each of next 9 sc, sc in next Ttr and in next sp, {(slst, ch3, slst) in next Ttr, sc in ch-sp,} four times, sc in same space, sc in next sc, slst in next st. Finish off.

— Difficulty Level :

Round 1: Ch 3 (counts as dc), 15 dc in ring, join in 3rd chain of beginning ch-3.
Round 2: Ch 5 (counts as dc and a ch-2-sp), (dc in next dc, ch2) five times, dc in dc, ch9, skip 4 dc, tr in next dc, ch 9, slst in third ch of beginning ch-5. Finish off.

— Earring Design #3 “Medium Pineapple” :

Round 1: Ch 3 counts as dc), 19 dc in ring, join in 3rd chain of beginning ch-3.

— Earring Design #3 “Medium Pineapple” :

Round 1: (Ch3, slst in next st) 9 times.
Round 2: Turn, (Ch3, slst in next ch space) 9 times.
Round 7: Turn, slst in ch sp, (ch3, slst in next ch sp) 8;
Round 8: Turn, slst in ch sp, (ch3, slst in next ch sp) 7;
Round 9: Turn, slst in ch sp, (ch3, slst in next ch sp) 6 times.
Round 10: Turn, slst in ch sp, (ch3, slst in next ch sp) 5 times.
Round 11: Turn, slst in ch sp, (ch3, slst in next ch sp) 4 times.
Round 12: Turn, slst in ch sp, (ch3, slst in next ch sp) 3 times.
Round 13: Turn, slst in ch sp, (ch3, slst in next ch sp) 2 times.
Round 14: Turn, slst in ch sp, ch4, slst in next ch sp. Finish off.

— Earring Design #4 “Large Pineapple” :

Round 1: Ch 3 (counts as dc), 23 dc in ring, join in 3rd chain of beginning ch-3.

— Earring Design #4 “Large Pineapple” :

Round 1: (Ch3, slst in next st) 12 times.
Round 2: Turn, (Ch3, slst in next ch space) 12;
Round 6: Turn, slst in ch sp, (ch3, slst in next ch sp) 11times.
Round 7: Turn, slst in ch sp, (ch3, slst in next ch sp) 10times.
Round 8: Turn, slst in ch sp, (ch3, slst in next ch sp) 9 times.
Round 9: Turn, slst in ch sp, (ch3, slst in next ch sp) 8 times.
Round 10: Turn, slst in ch sp, (ch3, slst in next ch sp) 7 times.
Round 11: Turn, slst in ch sp, (ch3, slst in next ch sp) 6 times.
Round 12: Turn, slst in ch sp, (ch3, slst in next ch sp) 5 times.
Round 13: Turn, slst in ch sp, (ch3, slst in next ch sp) 4 times.
Round 14: Turn, slst in ch sp, (ch3, slst in next ch sp) 3 times.
Round 15: Turn, slst in ch sp, (ch3, slst in next ch sp) 2 times.
Round 16: Turn, slst in ch sp, ch4, slst in next ch sp. Finish off.

— Foundation ring :

Round 1: Ch7, 2dtr in same st, 2Dtr in each of next 3 sts, 3;

— Earring Design #6 “Tea Cup Diamonds” :

Round 1: Ch3 in ring, dc, tr, picot, tr, 2dc, picot, 2dc, tr, picot, tr, 2dc, picot, join in top of beginning ch3.
Round 2: Ch3 (counts as dc), 2dc in ring, (ch 4, 3dc in ring) 5 times, ch 4, join with slst in 3rd ch of beginning ch.
Round 3: Sc in same st as join, skip next st, sc in next st, [(2sc, ch3, 2sc) in ch sp, 1 sc in next st, skip next st, 1 sc in next st] 5 times, (2sc, ch3, 2sc) in next ch sp, join with slst to first st of round. Finish off.

— Part 9 :

Round 1: Ch 3 (counts as dc here and throughout), 2dc in ring, ch4, (3dc in ring, ch 4) three times, join with slst to top of beginning-ch-3, turn.
Round 2: Ch 3, (2dc, ch 4, 3dc) in next ch sp, ch 2, *(3dc, ch 4, 3dc) in next ch sp, ch 2, repeat from * around. Join with slst to top of beginning-ch-3. Finish off.

— Earring Design #11 “Christmas Star” :

Round 1: Magic ring, 20 hdc in ring, join with slst to first st.
Round 2: Small arm: ch 5, slst in second ch from hook, slst in next ch, sc in each of next two chs. Skip one st, slst in next st.

— Earring Design #12 “Three Leaf Clover” :

Round 1: [Ch6, slst in 4th ch from hook (first clover ring formed), ch3, slst in magic ring] 3 times, do not turn. Pull magic ring so only a small ring exists but not too tight.
Round 2: *(2dc, 3tr, ch2, sc, ch2, 3tr, 2dc) in next clover ring, slst in magic ring; repeat from * until all 3 clover leaves have been worked, ch12. Finish off.

— Earring Design #13 “Tiny Hearts” :

Round 1: (Ch 3, 2dc, 3tr, ch 1, sc, ch 1, 3tr, 3dc) in ring.

— Earring Design #14 “Irish Crochet Leaf” :

Round 1: Turn, ch1, sc in same st and in next 10 sts.
Round 2: Turn, ch1, sc in same st and in each of next 9;
Round 3: (Hereafter each row will be "U" shaped). Turn, slst in each of next 3 sts, ch 1, sc in each of next 10 sts, 3sc in next st, sc in next 9 sts. Leave remaining sts unworked.
Round 4: Turn, slst in each of next 3 sts, ch1, sc in same st and in next 7sts, 3sc in next st, sc in each of next 10;
Round 5: Turn, slst in each of next 3 sts, ch1, sc in same st and in next 8 sts, 3sc in next st, sc in each of next 8 sts. Leave remaining sts unworked.
Round 6: Turn, slst in each of the next 3 sts, ch1, sc in next 6 sts, 3sc in next st, sc in each of next 9 sts.
Round 7: Turn, ch1, slst in next 9 sts, (sc, ch7, sc) in next st, sc in next st, slst in next 6 sts. Leave remaining sts unworked.
Round 8: Turn, slst in next 8 sts, 7 sc in ch sp, sc in next st, slst in next 6 sts. Finish off.

— Difficulty Level :

Round 1: Ch 4 (counts as first ch and a hdc), hdc in third ch from hook, ch 2, 2hdc in first ch of row.
Round 2: Ch 2 (counts as hdc here and throughout), turn, hdc in next st, ch 2, hdc in ch sp, ch 2, hdc in each of the last two sts.
Round 3: Ch 2, turn, hdc in next st, ch 3, skip ch sp, 2 dc in next hdc, ch 3, skip ch sp, hdc in each of the last two sts.
Round 4: Ch 2, turn, hdc in next st, ch 3, skip ch sp, hdc in next dc, ch 2, hdc in same st, ch 3, skip ch sp, hdc in each of the last two sts.
Round 5: Ch 2, turn, hdc in next st, ch 3, skip ch sp, hdc in next hdc, ch 1, (hdc, ch 1, hdc, ch 1, hdc, ch 1) in center ch sp, hdc in next hdc, ch 3, skip ch sp, hdc in each of the last two sts.
Round 6: Ch2, turn, hdc in next st, ch 3, skip ch sp, (sc in next ch-1-sp, ch 3) four times, skip ch sp, hdc in each of the last two sts.
Round 7: Ch 2, turn, hdc in next st, ch 3, skip ch sp, (sc in next ch sp, ch 3) three times, skip ch-3-sp, hdc in each of the last two sts.
Round 8: Ch 2, turn, hdc in next st, ch 3, skip ch sp, (sc in next ch sp, ch 3) two times, skip ch-3-sp, hdc in each of the last two sts.
Round 9: Ch 2, turn, hdc in next st, ch 3, skip ch sp, sc in next ch sp, ch 3, skip ch sp, hdc in each of the last two sts.
Round 10: Ch 2, turn, hdc in next st, ch 5, skip two ch spaces, hdc in each of the last two sts.
Round 11: Ch 2, turn, hdc in next st, skip ch sp, hdc in each of last two sts.
Round 12: Turn, sc in next st, skip next st, sc in last st.
Round 13: Turn, slst in next st.

— Earring Design #16 “Real Roses” :

Round 1: dc in fourth ch from hook, *ch1, skip 2 chains, (dc, ch2, dc) in next ch; repeat from* across. Turn.
Round 2: ch3, 3dc in next ch-2-sp, (Sc in next ch-1-sp, 4dc in next ch-2-sp) 3 times, (Sc in next ch-1-sp, 5dc in next ch-2-sp) 4 times, (Sc in next ch-1-sp, 6dc in next ch-2-sp) 4 times, (Sc in next ch-1-sp, 7dc in next ch-2-sp) 5 times, (Sc in next ch-1-sp, 8dc in next ch-2-sp) in remaining spaces, Finish off but leave extra ten” tail to use for sewing the rose together.

— With Color A :

Round 1: Ch2 (counts as first hdc here and throughout), (hdc, ch2, 2hdc) in ring. Pull ring tight and secure.
Round 2: Ch2, turn, hdc in next st, (2hdc, ch2, 2 hdc) in ch sp, hdc in last two sts.
Round 3: Ch2, turn, hdc in each of next 3 sts, (2 hdc, ch2, 2;
Round 4: Ch2, turn, hdc in each of next 5 sts, (2 hdc, ch2, 2;
Round 5: Ch2, turn, hdc in each of next 7 sts, (2 hdc, ch2, 2;
Round 6: Ch2, turn, hdc in each of next 9 sts, (2 hdc, ch2, 2 hdc) in ch sp, hdc in each remaining st.
Round 7: Ch2, turn, hdc in each of next 11 sts, (2 hdc, ch2, 2 hdc) in ch sp, hdc in each remaining st.
Round 8: Ch2, turn, hdc in each of next 13 sts, (2 hdc, ch2, 2 hdc) in ch sp, hdc in each remaining st.
Round 9: Ch2, turn, hdc in each st to corner, 5 hdc in corner ch sp, hdc in each remaining st. Finish off;

— Earring Design #18 “Hanging Hexagons” :

Round 1: working in magic ring: Ch2, 2hdc, ch2, (3 hdc, ch2) five times. Join with slst in top of beginning ch2. Pull ring tight.

— Earring Design #18 “Hanging Hexagons” :

Round 1: ch 2, hdc in same st and in each of next two stitches and in next ch sp, ch 2, hdc in same ch sp, hdc in each of next 3 sts and in next ch sp. Leave remaining stitches unworked. Ch 3, turn.
Round 2: dc in each of next 4 sts, (dc, ch 2, dc) in ch sp, dc in each of the next 4 sts and in top of ch2.

— Earring Design #19 “Large Tear Drops” :

Round 1: Working in each st around: slst, slst, sc, sc, 2hdc, 2dc, 2tr, 2tr, 2tr, 2dc, 2hdc, sc, sc, slst, slst. Join with slst.
Round 2: slst in next slst, working in each remaining st around: 2sc, 2sc, 2hdc, 2hdc, 2dc, 2dc, 2tr in each of next six sts, 2dc, 2dc, 2hdc, 2hdc, 2sc, 2sc, slst, slst, join. Finish off.

— With Color A :

Round 1: Working in each st around: slst, slst, sc, sc, 2hdc, 2dc, 2tr, 2tr, 2tr, 2dc, 2hdc, sc, sc, slst, slst. Join with slst.
Round 2: Slst in next slst, working in each remaining st around: 2sc, 2sc, 2hdc, 2hdc, 2dc, 2dc, 2tr in each of next six sts, 2dc, 2dc, 2hdc, 2hdc, 2sc, 2sc, slst, slst, join.
Round 3: Sc in each st around, join. Finish off.

— Part 21 :

Round 1: Hdc in third chain from hook and in each ch across, turn.
Round 2: Ch 2, working in front loops only; hdc in each st across.

— Part 22 :

Round 1: Hdc in third chain from hook and in each ch across.

— Earring Design #22 “Holey Circles” :

Round 1: Ch 2 (counts as dc), 11 dc in ring, join with slst in top of beginning ch-2. Pull magic ring tight and secure tail.
Round 2: Ch 4 (counts as dc and ch 2), (dc, ch 2) in each st around, join with slst in 2nd ch of beginning ch4. (12dc and 12 ch2-sps)
Round 3: Slst in next ch sp, 2 sc in next ch sp, 3 hdc in next ch sp, 4 dc in next ch sp, 4 tr in next ch sp, (5 DTr in next sp) twice, 4 tr in next sp, 4 dc in next sp, 3 hdc in next sp, 2 sc in next sp, slst in next sp, join with slst in first st of round 3.

— Special Stitches :

Round 1: Ch 2 (counts as dc), 11 dc in ring, join with slst in top of beginning ch-2. Pull magic ring tight and secure tail. (12 dc)
Round 2: Ch 4 (counts as dc and ch 2), (dc, ch 2) in each st around, join with slst in 2nd ch of beginning ch4. (12dc and 12;
Round 3: Slst in next ch sp, 2 sc in next ch sp, 3 hdc in next ch sp, 4 dc in next ch sp, 4 tr in next ch sp, 5 Dtr in next sp, 5 Ttr in next sp, 6 Qtr in next sp, leave remaining sts unworked. (30 sts, including slst)
Round 4: Ch 1, turn, working in front loops only sc in same st and in each st around until you reach the next ch-2- sp. (2 sc in next ch sp, sc in next st) 4 times, slst around post of closest QTr. Finish off. (42 sc)

— Earring Design #24 “Stacked Frames” :

Round 1: Ch 34, slst in 20th ch from hook, ch 8, slst in 8th ch from previous slst, ch 6, slst in first ch of row.
Round 2: Ch 1, sc in each of next two sts, picot, sc in each of next three sts, skip slst, sc in each of next 4 sts, picot, sc in each of next 3 sts, skip slst, (sc in each of next 5 sts, picot) 3 times, sc in each of next 5 sts, sc in each of next 4 sts, picot, sc in each of next 4 sts, skip slst, sc in each of next 3 sts, picot, sc in remaining sts, Join with slst to first sc. Finish off.

— With first color :

Round 1: Ch 5, ( counts as a dc and ch-2-sp), (3 dc, ch;
Round 2: 5 times, 2 dc, join with slst in third ch of beginning ch5.

— With first color :

Round 2: Ch 1, sc in same st, ch 2, ( sc in each of next three dc, ch 2) 5 times, sc in each of next two dc, join with slst in first st of round.

Assembly Instructions

  1. Block motifs on a foam surface: wet the finished piece, pin it to shape with straight pins and allow to dry fully before stiffening.
  2. Apply fabric stiffener or Modge Podge according to desired stiffness, allow to dry completely, and repeat if extra rigidity is needed for loops or thin shapes.
  3. Attach fishhook posts by opening the bottom circle with pliers, slipping the circle through the topmost stitch of the blocked motif and through two thicknesses of thread, then closing the circle securely.
  4. Weave in all loose ends before blocking and use a small knot or dab of glue on the tail’s end when working very fine thread to prevent loosening.
  5. For layered or scale designs, stack the smaller motif on top of the larger, align centered corners or edges by eye and stitch through all layers with matching thread to secure them before attaching hardware.

Important Notes

  • Work with fine thread under good light and a comfortable magnified view to avoid eye strain when counting small stitch repeats.
  • Use a fresh, sharp pair of pliers for jewelry work to prevent slipping or scoring the earring loops during attachment.
  • Follow the stiffener manufacturer’s safety and application instructions and test on a scrap motif to confirm desired stiffness before treating a final piece.
  • Label pairs as you make them and keep matching motifs together so that blocking and finishing produce two identical pieces.
  • When changing color, secure tails by weaving them into the back of the motif before blocking to avoid visible joins after stiffening.

This collection of cotton thread earring patterns celebrates small, wearable crochet with clean finishes and clear finishing guidance. Make delicate teardrops, pineapples, clovers or geometric diamonds and turn them into ready-to-wear gifts. Each short pattern focuses on one or two special stitches so you can practice new techniques without a long time commitment. Enjoy the satisfying rhythm of tiny stitches transforming into polished earrings you’ll be proud to wear.

Good to know

You ask, we answer

The patterns use size 10 cotton crochet thread and a 1.5 mm hook to achieve lightweight, lacy motifs that hold their shape after blocking. Using the recommended thread and hook produces the proportions shown in the instructions and the sample photographs; substituting a different thread weight will change dimensions and may require a different hook size.

After finishing and weaving in ends, wet the motif lightly, pin it to a foam or cardboard surface to the intended shape and allow it to dry. Apply fabric stiffener or Modge Podge following the product directions and allow to dry fully; repeat if you need firmer results. Always test the stiffener on a scrap before treating the final piece.

Attach the fishhook post to the topmost stitch of the motif so that the earring hangs balanced; pass the post through two thicknesses of thread or through a small loop of stitched thread for durability, then close the bottom circle securely with pliers so the hardware will not open during wear.

Yes, changing thread weight and hook size will scale the motifs: heavier thread with a larger hook makes chunkier, more statement pieces, while lighter thread produces daintier earrings. Keep in mind that stiffening and blocking techniques may need adjusting and hardware placement should be checked proportionally after resizing.

Patterns range from simple rounds and short rows to intermediate special stitches like DTr, Ttr and Qtr; basic experience with single and double crochet plus the ability to follow short-row shaping is recommended. The booklet defines its special stitches and uses straightforward instructions so an adventurous beginner can learn with practice.

Time varies by design complexity and finishing steps, but most pairs take between two and three hours from start to finish including blocking and attaching hardware; simpler circular motifs may take less than an hour while layered or multi-row pieces require more careful shaping and stiffening.

Geometric diamond crochet earrings in white thread on a neutral background illustrating a layered motif and hardware attachment
Join 100k+ crocheters

Get new free patterns, stitch tips and exclusive content in your inbox.